Accounts
Accounts, Projects, Users, Roles and Policies
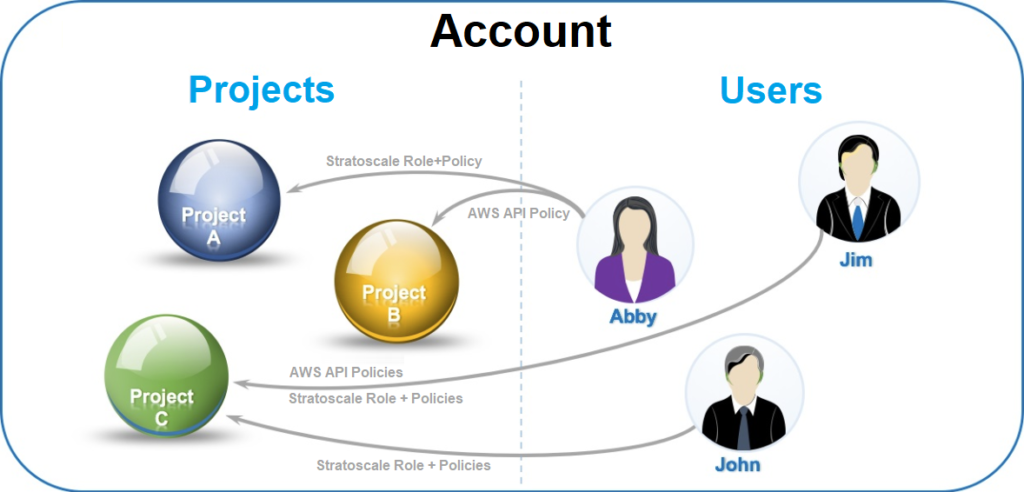
The virtual resources of the Zadara Cloud Services region are managed through an administrative hierarchy of accounts & projects. The Zadara Cloud Services region consists of one or more accounts each of which contains one or more projects. Virtual resources such as VLANs, instances, volumes, images and snapshots are created per project, account or region. Users, who are members of a account, can be assigned different projects within their account, through either a Zadara Cloud Services role and one or more Zadara Cloud Services policies, one or more AWS API policies, or both. This assignment enables you to provide access to Zadara Cloud Services to numerous users, dividing and separating the resources that each user will be able to view, create, and manage.
Creating Accounts
When you log in to Zadara Cloud Services the first time, you have only one default account – cloud_admin. As Admin user of this account you are able to view and manage all the physical and virtual resources of the system. However, if you want to divide your virtual resources among numerous users from different groups, or departments, you need to create different accounts.
Only an Admin (system administrator) user can create accounts.
Click Identity & Access > Accounts > Create. The Create Account dialog box appears.
Enter the following information:
Name – enter a unique name for the new account. Note: The names are not case sensitive.
Description [Optional] – enter a description of the new account.
Click OK to create the new account. The new account is created and appears in the list of accounts.
Disabling Accounts
To disable an account:
Go to the Identity & Access > Accounts > view and highlight the row of the enabled account you wish to disable. A Disable button appears in the toolbar.
Click the Disable button. The system disables the account, and the Disable button changes to Enable.
Note
When the selected account is disabled, the Delete button becomes available.
The cloud_admin account cannot be disabled.
Enabling Accounts
To enable accounts:
Go to the Identity & Access > Accounts > view and highlight the row of the disabled account that you wish to enable. An Enable button appears in the toolbar.
Click the Enable button. The system enables the account, the Enable button changes to Disable.
Note
When the selected account is enabled the Delete button is not available.
The cloud_admin account is always enabled.
Renaming Accounts
To rename accounts:
Go to the Identity & Access > Accounts > view, and either
Highlight the row of the account you wish to rename. A Rename button appears in the toolbar.
Click Rename. The Rename Account window is displayed.
Make the necessary changes in the account name and description, and click OK.
Note
The cloud_admin account cannot be renamed.
Identity Provider
Zadara Cloud Services users and groups can be accessed from an Identity Provider such as MS Active Directory. This is done by first connecting the Zadara Cloud Services account to the MS Active Directory. Connection with the Identity Provider must be configured independently for each Zadara Cloud Services account.
Once an account becomes connected to Active Directory, the newly available Active Directory users and groups must be assigned Zadara Cloud Services Project Roles and Policies. This can be done either through the CLI commands or via the GUI.
Each of these users will now be able to login to Zadara Cloud Services with their Active Directory name and password.
Connecting to the Identity Provider
To connect an account to the MS Active Directory Identity Provider:
Note
If you want to connect the account to only some of the users in the Active Directory, then first tag their names or create an ad-hoc group for them. This allows you to use the filters to select only those users that should be connected to the Zadara Cloud Services account.
Go to the Identity & Access > Accounts > view and highlight the row of the account which you wish to connect to the Identity Provider. An Identity Provider button appears in the toolbar.
Click the Identity Provider button. The Create LDAP Provider wizard > Connection tab is displayed.
Note
An existing LDAP connection can be disconnected via the Disconnect LDAP button on the bottom.
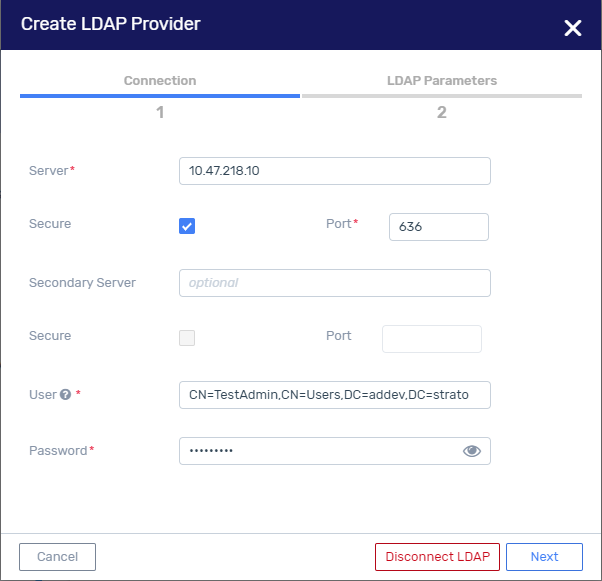
Enter the following Connection details of the MS Active Directory Server
Server - Enter the address of the MS Active Directory Server expressed either as a URL or DNS name. For example: 10.11.12.13 or “mydomain.com”.
Secure - Check this box if you want the address to be secure.
Port - The reserved port is 389 if the connection is not secure, 636 if the connection is secure.
Secondary Server (optional) - This is a backup server if the first one is not available. Enter the address of the MS Active Directory Server expressed either as a URL or DNS name. For example: 10.11.12.13 or ‘mydomain.com’.
Secure - Check this box if you want the address of the secondary server to be secure.
Port - The reserved port for the secondary server is 389 if the connection is not secure, 636 if the connection is secure.
User - This is the distinguished name of a user through which one can gain access to Active Directory Server. For example: cn=ldap,cn=Users,dc=myorganization,dc=com. This user need not be an administrator or member of the domain. Should be a read-only user of the MS Active Directory.
Password - This is the MS Active Directory password of the User.
Click Next. The next step of the wizard, LDAP Parameters, is displayed.
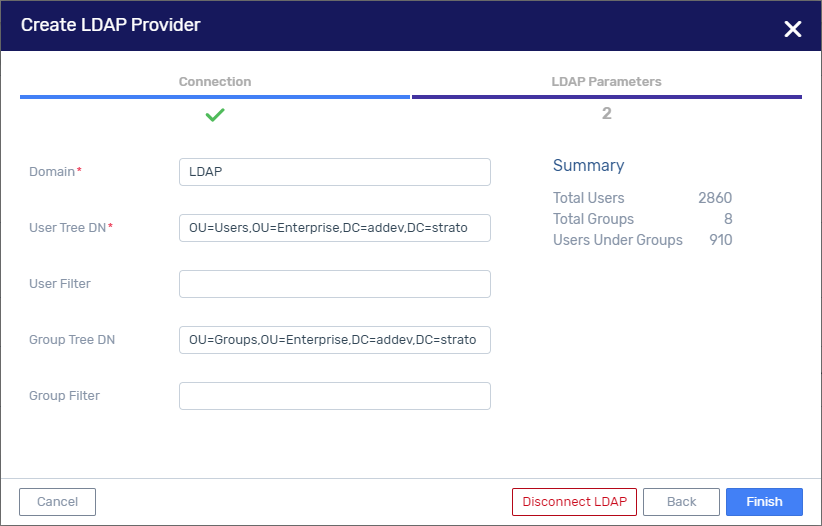
LDAP Parameters - All parameters are expressed in the LDAP syntax. In the sample LDAP Parameter input below, the input does not include the quote marks at the beginning and end of each input. The input for the User Filter and Group Filter parameters does include the parentheses.
Domain - This is the domain of the customer in the Active Directory. For example: “dc=myorganization,dc=com”.
User Tree DN - This defines the location in the Active Directory in which the users will be scanned. For example: “cn=Users,dc=myorganization,dc=com”.
User Filter - This filters the users scanned in the User Tree. For example: “(name=zadara-*)” would search in the User Tree for any user beginning with ‘zadara-‘. Or “(memberOf=cn=grp-zadaraldap,cn=Users,dc=myorganization,dc=com)” would search for any user whobelongs to the ad-hoc group created in the Active Directory, ‘cn=grp-stratoldap,cn=Users,dc=myorganization,dc=com’.
Group Tree - This defines the location in the Active Directory in which the groups will be scanned. For example: “cn=Users,dc=myorganization,dc=com”.
Group Filter - This filters the groups scanned in the Group Tree. For example: “(name=grp-*)” would search for any group beginning with ‘grp-‘.
Click Finish
The selected account becomes connected to the MS Active Directory.
The users matching the filters described above will appear as users of the selected account together with their Active Directory password and email address. Their password and email address cannot be modified within Zadara Cloud Services.
The groups matching the filters described above will appear as groups of the selected account, containing the users defined in the Active Directory.
Assigning Project Roles and Zadara Cloud Services Policies
Before these users will be able to work with Zadara Cloud Services, you must first assign a project to each of them, either individually, or via the groups of which they are members, together with its Zadara Cloud Services role and policies.
Assigning Roles to an Active Directory User via the Zadara Cloud Services CLI
The following CLI commands are recommended to assign the Account and Project ‘Admin’ roles to a user made available to Zadara Cloud Services via Active Directory:
Note
In this use case we are assuming that the Zadara Cloud Services account, ‘new_account’, which was connected to a domain in Active Directory, already contains the project, ‘new_project’.
Check the user list to locate the new user made available to Zadara Cloud Services via Active Directory. Note its domain ID.
Zadara Cloud Services @ cloud_admin/default > `user list <https://neokarmdocs.wpengine.com/knowledge/user-list>`__ -c id -c name -c domain_id+----------------------------------+----------+----------------------------------+ | **id** | **name** | **domain_id** | +----------------------------------+----------+----------------------------------+ | c8a63b29558d4765a6cd78760729a2f7 | new_user | 2d27e2fe6d8a4398b901c4d84c478777 | +----------------------------------+----------+----------------------------------+ | 1c90791e14de48389778a00f1e984f16 | maestro | default | +----------------------------------+----------+----------------------------------+ | admin | admin | default | +----------------------------------+----------+----------------------------------+
Verify that user, ‘new_user’, from the Active Directory list, does not already appear in another Zadara Cloud Services account. (The same Zadara Cloud Services user name can appear in more than one account even though their ID’s will be unique.)
Zadara Cloud Services @ cloud_admin/default > `user list <https://neokarmdocs.wpengine.com/knowledge/user-list>`__ --name new_user -c id -c name -c domain_id+----------------------------------+----------+----------------------------------+ | **id** | **name** | **domain_id** | +----------------------------------+----------+----------------------------------+ | c8a63b29558d4765a6cd78760729a2f7 | new_user | 2d27e2fe6d8a4398b901c4d84c478777 | +----------------------------------+----------+----------------------------------+
List the domains with their IDs and names.
Zadara Cloud Services @ cloud_admin/default > `domain list <https://neokarmdocs.wpengine.com/knowledge/domain-list>`__ -c id -c name================================ =========== **id** **name** 2d27e2fe6d8a4398b901c4d84c478777 new_account default cloud_admin ================================ ===========
List the projects with their IDs, names and domains.
Zadara Cloud Services @ cloud_admin/default > `project list <https://neokarmdocs.wpengine.com/knowledge/project-list>`__ -c id -c name -c domain_name================================ =========== =============== **id** **name** **domain_name** ================================ =========== =============== 1569c28e3a344ee2b3989640499b8eca new_project new_account 4bd79a2fa9574af2a4b9a7a87195f144 default cloud_admin ================================ =========== ===============
List all available roles in Zadara Cloud Services.
Zadara Cloud Services @ cloud_admin/default > `role list <https://neokarmdocs.wpengine.com/knowledge/role-list>`__============ ============ **id** **name** ============ ============ admin admin tenant_admin tenant_admin \_member\_ member ============ ============
Check if ‘new_user’ has already been assigned a role in the domain, ‘new_account’.
Zadara Cloud Services @ cloud_admin/default > `domain list-roles-on-domain <https://neokarmdocs.wpengine.com/knowledge/domain-list-roles-on-domain>`__ 2d27e2fe6d8a4398b901c4d84c478777 c8a63b29558d4765a6cd78760729a2f7+--------------+ | value | +==============+ | tenant_admin | +--------------+
If already assigned a role in the domain, ‘new_account’, other than ‘admin’ remove this role from ‘new_user’. Otherwise, skip to Step No. 8.
Zadara Cloud Services @ cloud_admin/default > domain revoke-role 2d27e2fe6d8a4398b901c4d84c478777 c8a63b29558d4765a6cd78760729a2f7 tenant_admin===== ======= Field Value ===== ======= value Success ===== =======
Check if ‘new_user’ has already been assigned a role in the project, ‘new_project’.
Zadara Cloud Services @ cloud_admin/default > project list-roles-on-project 1569c28e3a344ee2b3989640499b8eca c8a63b29558d4765a6cd78760729a2f7+--------------+ | value | +==============+ | tenant_admin | +--------------+
If already assigned a role in ‘new_project’ other than ‘admin’, remove this role from ‘new_user’. Otherwise, skip to Step No. 10.
Zadara Cloud Services @ cloud_admin/default > project revoke-role 1569c28e3a344ee2b3989640499b8eca c8a63b29558d4765a6cd78760729a2f7 tenant_admin===== ======= Field Value ===== ======= value Success ===== =======
Assign the ‘admin’ role to ‘new_user’ in the domain, ‘new_account’.
Zadara Cloud Services @ cloud_admin/default > domain grant-role 2d27e2fe6d8a4398b901c4d84c478777 c8a63b29558d4765a6cd78760729a2f7 admin===== ======= Field Value ===== ======= value Success ===== =======
Assign the ‘admin’ role to ‘new_user’ in the project, ‘new_project’.
Zadara Cloud Services @ cloud_admin/default > project grant-role 1569c28e3a344ee2b3989640499b8eca c8a63b29558d4765a6cd78760729a2f7 admin
===== =======
Field Value
===== =======
value Success
===== =======
Verify that the role of ‘new_user’ in the domain, ‘new_account’, is ‘admin’.
Zadara Cloud Services @ cloud_admin/default > domain list-roles-on-domain
2d27e2fe6d8a4398b901c4d84c478777 c8a63b29558d4765a6cd78760729a2f7
+-------+
| value |
+=======+
| admin |
+-------+
Verify that the role of ‘new_user’ in ‘new_project’ is ‘admin.
Zadara Cloud Services @ cloud_admin/default > `project list-roles-on-project
1569c28e3a344ee2b3989640499b8eca c8a63b29558d4765a6cd78760729a2f7
+-------+
| value |
+=======+
| admin |
+-------+
Assigning Zadara Cloud Services Permissions to an Active Directory User via the Zadara Cloud Services GUI
The following GUI actions are recommended to assign Zadara Cloud Services permissions to a user made available to Zadara Cloud Services via Active Directory:
Note
In this use case we are assuming that the Zadara Cloud Services account which was connected to a domain in Active Directory, already contains the new project.
Locate the new user made available to Zadara Cloud Services via Active Directory.
In the Identity & Access > Accounts> view for the requested account, click the Users tab. The list of users for that account will appear.
Highlight the user to whom you wish to assign Zadara Cloud Services permissions.
Assign a Project to the user with the project role of ‘Admin’ and the Zadara Cloud Services policy
Click on the Manage Permissions button. This accesses the Manage Permissions for User dialog box.
+ Add Project - Select a project.
Roles - Select the ‘Member’ role, for example, and click OK.
Policies - Select ‘FullAccess’, for example.
Click on the name of the project. This displays the details about the project assigned to the user. Note that the user’s project role is now ‘Admin’.
Deleting Accounts
When you delete an account, you also delete all of its projects and users. Therefore, before deleting an account, make sure that you take into consideration the full implications of this action.
Warning
Account must be disabled before it can be deleted.
To delete an account:
Go to the Identity & Access > Accounts > view and highlight the row of the account you wish to delete. A Delete button appears in the toolbar.
Click the Delete.button The system displays a confirmation box.
Click OK to delete the account and all of its projects and users.
Note
The cloud_admin account cannot be deleted.
Account Limits
Overview
Compute, Services and Storage resources can be limited per account and per project within the account. When these limits are set, Zadara Cloud Services tracks the usage of these resources when they are allocated or freed-up, both at the project level and at the account level. Only an admin user may set the available resource limits for each account. It is recommended that each account admin (tenant admin user) set the available resource limits for each of the projects within the account.
For a given resource, the sum of the limits set for each project within an account may exceed the limit set for the account itself. However the total amount of the resource actually used may never exceed either the project limit or account limit set for that resource. For example, if a cloud admin sets a 10-image limit for account A, the account admin of A may set a 5-image limit for each of its three member projects - P1, P2, P3. This sets the total limits of the projects at 15, even though the limit of account A is only 10. Nevertheless, users within account A will be allowed to create images only until they either reach the limit of 5 in their project, or until 10 images have been created in the account across all projects.
Note
Networking resources can currently be limited only per project.
Managing Account Limits
In the Identity & Access > Accounts view for a specific account, click the Limits tab. A list of all Compute, Services and Storage limits of the specific account together with their current usage is displayed.
Limits can be imposed on the following account resources:
Compute
Number of cores
Number of images
Number of instances
Number of key-pairs
RAM
Services
Number of Kubernetes clusters
Number of MapReduce clusters
Number of database clusters
Number of database instances
Number of filesystems
Number of load balancers
Number of registries
Storage
Number of snapshots
Number of volumes
Volume capacity
Note
Storage limits are defined and displayed per storage pool, which are then aggregated to an Account limit.
Adding Compute Resource Limits to Accounts
Zadara Cloud Services allows you to limit the amount of compute resources each account can use. Compute limits affect the following resources:
Number of cores
Number of images
Number of instances
Number of key-pairs
RAM
To limit one of these resources for an account:
In the Identity & Access > Accounts > view for a specific account view, click on the Limits tab. Lists of all Compute, Service and Storage limits of the selected account together with their current usage is displayed.
Click on the Add button which is at the top-right of the Compute part of the list. The Add Compute Limit window is displayed.
Do the following:
Select the Resource to be limited,
Note its current Usage, if relevant.
Enter it’s Limit. Verify that the limit exceeds the current usage.
Click OK. The selected resource limit will be updated on the list of Compute resource limits for the selected account.
Adding Service Resource Limits to Accounts
Zadara Cloud Services allows you to limit the amount of service resources each account can use. Service limits affect the following resources:
Number of load balancers
To limit one of these resources for an account:
In the Identity & Access > Accounts > view for a specific account view, click on the Limits tab. Lists of all Compute, Service and Storage limits of the selected account together with their current usage, is displayed.
Click on the Add button which is at the top-right of the list of Services. The Add Service Limit window is displayed.
Do the following:
Select the Resource to be limited,
Note its current Usage, if relevant.
Enter it’s Limit. Verify that the limit exceeds the current usage.
#. Click OK. The selected resource limit will be updated on the list of Service resource limits for the selected account.
Adding Storage Resource Limits to Accounts
Zadara Cloud Services allows you to limit the amount of storage resources each account can use, per storage pool. Storage limits affect the following resources
Number of snapshots
Number of volumes
Volume capacity
To limit one of these resources for an account:
In the Identity & Access > Accounts > view for a specific account view, click on the Limits tab. Lists of all Compute, Services and Storage limits for the selected account together with their current usage, is displayed.
Click on the Add button which is at the top-right of the Storage part of the list. The Add Storage Limit window is displayed.
Do the following:
Select the Resource to be limited,
Select the Storage Pool, in which the resource will be located.
Note its current Usage, if relevant.
Enter it’s Limit. Verify that the limit exceeds the current usage.
Click OK. The selected resource limit will be updated on the list of Storage resource limits per storage pool, and aggregated to the Account level.
Editing Virtual Resource Limits of Accounts
To edit a virtual resource limit of an account:
In the Identity & Access > Accounts > view for a specific account view, click on the Limits tab. Lists of all Compute, Services and Storage limits of the selected account together with their current usage is displayed.
Hover over a resource limit and click on its Edit icon. The resource’s respective Edit Limit window is displayed.
Do the following:
Note its current Usage, if relevant.
Modify its Limit. Verify that the limit exceeds the current usage.
Click OK. The selected resource limit will be updated in its respective resource list for the selected Account.
Deleting Virtual Resource Limit from Accounts
To delete a virtual resource limit from an account:
In the Identity & Access > Accounts > view for a specific account view, click on the Limits tab. Lists of all Compute, Service and Storage limits of the selected account together with their current usage is displayed.
Hover over a resource limit and click on its Delete icon. The resource limit will be deleted from its respective resource list for the selected Account.