Managing Volumes, Snapshots and Clones
VPSA virtual Volumes are thinly provisioned utilizing an efficient and sophisticated block-level mapping layer. The Volume’s virtual address space is carved into virtual contiguous blocks (a.k.a. “Chunks”). When you create a Volume it consumes zero Pool capacity. Pool capacity is provisioned to volumes on demand. Only at the first write to each chunk the physical space is allocated from the Pool capacity to the Volume, and mapping update of the virtual-to-physical addresses.
The Volume’s virtual Capacity is not limited to the available Pool capacity.
Snapshots are read-only representations of the Volume’s data at a given point-in-time. They are thinly provisioned and share the same data chunks with their Volume as much as possible until you actually modify the chunk’s data. This triggers a Redirect On Write (ROW) operation where a new chunk is provisioned and the modified data is written there.
Cloned Volumes are Volumes created by cloning another Volume’s data set at a specified point-in-time Snapshot. Volumes and their Clones share unmodified Pool Chunks. A COW is triggered whenever you modify a chunk in the Volume or in the Clone.
Volumes can be Block Volumes (exposed via an iSCSI or Fibre Channel protocols) or NAS Shares (exposed via NFS or SMB protocols).
Creating and Deleting a Volume
To Create a Volume go to the Page and press the Create button. Select whether you wish to create a Block Volume or a NAS Share.
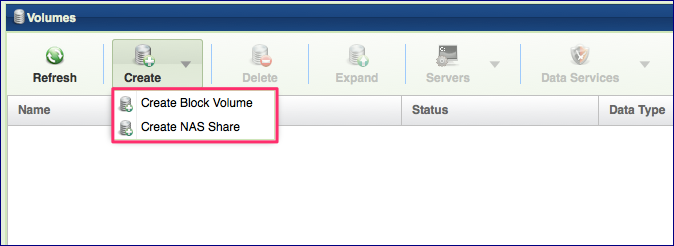
Creating a Block Volume
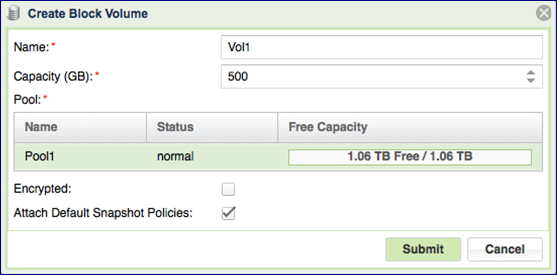
Define the following Volume attributes in the Create Block Volume dialog:
Name – the Volume’s display name. This must be unique, and can be modified throughout the Volume’s lifetime.
Note
Objects names can be up to 128 chars long and can contain letters and digits, dashes “-” and underscores “_”
Capacity – Virtual Capacity of the Volume in GB. All Volumes are thinly provisioned. No actual capacity is allocated when the Volume is created, so the aggregated Virtual capacity of the volumes is not bounded by the Pool capacity. It is possible to over-provision a Pool, but you need to manage and monitor this it carefully, using a Pool Protection Mechanism (see Managing Pool Capacity Alerts for more details).
Pool – Select the Pool that is most appropriate for your Volume’s QoS requirements (based on available capacity, caching, RAID protection, drive types, etc.).
Encrypted – Select this checkbox if you wish to encrypt the volume’s data on the drives. Please note that you must first define an encryption password via the Page. For more details about Volume encryption please check Managing Encrypted Volumes
Attach Default Snapshot Policies – Refer to Managing Snapshot Policies for a detailed explanation regarding snapshot policies. You can apply and remove snapshot policies from a Volume at any time.
Creating a NAS Share
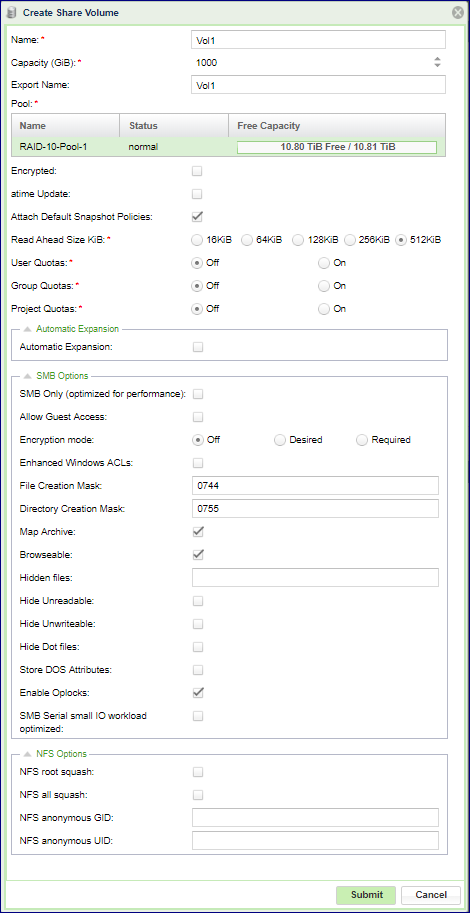
Define the following Volume attributes in the Create Share dialog:
Name – The Share’s display name. It must be unique, and can be modified throughout the Share’s lifetime
Note
Objects names can be up to 128 chars long and can contain letters and digits, dashes “-” and underscores “_”
Capacity – Virtual Capacity of the Volume in GB. All Volumes are thinly provisioned. No actual capacity is allocated when the Volume is created, so the aggregated Virtual capacity of the volumes is not bounded by the Pool capacity. It is possible to over-provision a Pool, but you need to manage and monitor this it carefully, using a Pool Protection Mechanism (see Managing Pool Capacity Alerts for more details).
Export Name – The name of the NFS/SMB mount point as seen by the Server. This must be unique. By default it is identical to the Share name.
Note
In addition to the primary Expeort Name defined here, there is an option to add secondary Export Names to the same share. This can be done in the Volume properties page. See Viewing Volume Properties
Note
Changing Export Name requires an unmount/remount of all NFS clients for changed name to take effect
Pool – Select the Pool that is most appropriate for your Share’s QoS requirements (based on available capacity, caching, RAID protection etc.).
Attach Default snapshot Policy – See Managing Snapshot Policies for a detailed explanation regarding snapshot policies. You can apply and remove snapshot policies from a Share at any time. If you select this checkbox you need to select one of the existing snapshot policies.
Encrypted – Select this checkbox if you wish to encrypt the Share’s data on the drives. Please note that you must first define an encryption password via the Page. For more details about Volume encryption please see Managing Encrypted Volumes
atime Update – Set this checkbox to indicate whether you want to enable updating the access time of files and directories on every access, including read-access. By default atime Update is disabled. Enabling it will impact performance.
User Quotas – Select On or Off, to enable/disable the User Quotas mechanism for this Volume. for more information about quotas see Setting User/Group Quotas
Group Quotas – Select a On or Off to enable/disable the Group Quotas mechanism for this Volume.
Note
If both User and Group quotas are “On” the first limit to be met takes effect.
Project Quotas – Select a On or Off to enable/disable the Project Quotas mechanism for this Volume. Project is defined as a set of folders (one or more) regardless of their User/group ownership. See here about Project Quotas: Setting Project Quotas
Note
Project and Group Quotas are mutually exclusive. One cannot define both on the same volume
SMB Options
SMB Only – Set this checkbox if you know that this NAS share will only be attached to Servers via the SMB protocol. When this is the case the VPSA is able to do some locking optimization that enhances performance.
Allow Guest Access – Set this checkbox if you want to enable connection and access to the NAS share by anonymous users without requiring a password.
Encryption Mode – Select this to use SMB Encryption Secure protocol. Connected Windows hosts should support SMB encryption. See Microsoft MSDN for details: https://blogs.msdn.microsoft.com/openspecification/2012/10/05/encryption-in-smb-3-0-a-protocol-perspective/ Select “Off” to disable SMB Encryption, “Required” to enforce SMB Encryption (Windows host must enable encryption to connect) or “Desired” to let the client side decide if encryption is used or not.
Enhanced Windows ACLs – Set this checkbox to enable the Enhanced Windows ACLs. These include support for Windows NT format ACLs, permission inheritance and additional extended attributes specific to Windows.
File Creation Mask – Use this field to set the default bitmask used for file creation at the UNIX level.
Directory Creation Mask – Use this field to set the default bitmask used for directory creation at the UNIX level.
Map Archive – Set this checkbox to enable mapping of an archive bit. The DOS archive bit is used to flag a file that has been changed since it was last archived. Many programs do not work properly if the archive bit is not stored correctly for DOS and Windows files.
Browseable – Select this checkbox for this share to be shown in the list of available shares in a network view and in the browse list.
Hidden Files – Use this field to enter a list of files or directories that will not be visible, but will still be accessible. The DOS ‘hidden’ attribute is applied to any files or directories that match. Each entry in the list must be separated by a ‘/’, which allows spaces to be included in the entry. ‘*’ and ‘?’ can be used to specify multiple files or directories as in DOS wild cards. Each entry must be a UNIX path, not a DOS path, and must not include the Unix directory separator ‘/’. Note that this list is case sensitive.
Hide Unreadable – Set this checkbox to prevent clients from seeing the existence of files that cannot be read.
Hide Unwritable – Set this checkbox to prevent clients from seeing the existence of files that cannot be written to.
Store DOS Attributes – Set this checkbox to preserve DOS file attributes Specifically , Hidden, Archive, Read-Only and System in the when creating/copying files into an SMB share. Turn on for compatibility with file system created on early NTFS versions.
SMB Serial small IO workload optimized – Select this checkbox if your workload is serial small IOs from a single client (non concurrent)
NFS Options
NFS Root Squash – Select this checkbox to block external root access to this share. If this box is checked, the system maps requests from uid/gid 0 (root) to the anonymous uid/gid.
NFS All Squash – Select this checkbox to consolidate permission set for all users accessing this export (can be used to coordinate permissions between multiple server/applications or for setting up public file shares ). If this box is checked, the system maps all external user requests to the anonymous uid/gid.
Note
All Squash also applied for uid/gid 0 (root) making all squash and root Squash mutually exclusive
VMWare NFS V3 Mounts require NFS Root Squash & All Squash to be disabled (not checked)
NFS anonymous GID – explicitly sets a specific group id for the anonymous account. this option is useful when set in conjunction with NFS Root/All Squash.
NFS anonymous GID – explicitly sets a specific user id for the anonymous account. this option is useful when set in conjunction with NFS Root/All Squash.
Note
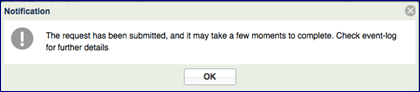
Share creation involves the process of initializing a file system which may take a few minutes depending on the Virtual capacity of the Share. During this time the share is shown in a “Creating” state, but will be available for immediate use. When initialization is completed, the Share’s status changes to “Available” and an event-log message is saved.
Deleting a Volume/Share
You can delete a Volume only if it is not attached to a server.
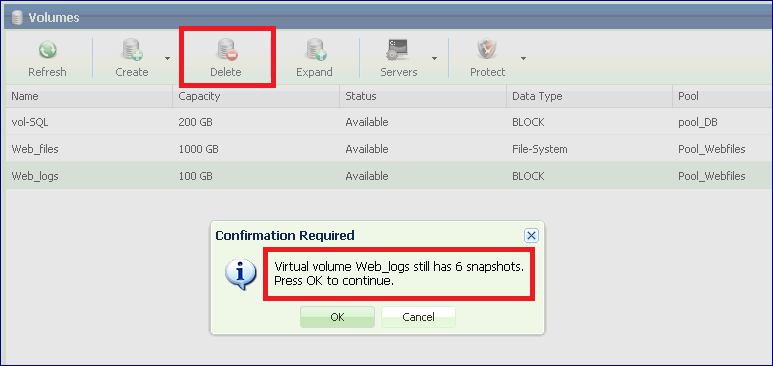
On the page select the Volume and press the Delete button. After confirming that you want to delete, it will immediately move the Volume to “Deleting” status. The deletion process may take some time depending on the Volume size and the number of Snapshots and Clones which share the data Chunks. The VPSA then updates chunk mapping and references accordingly. When the deletion process completes, the Volume will disappear from the page, and an event-log message will be saved.
If the Volume has snapshots associated with it the VPSA will delete them together with the Volume. You will be prompted to confirm the deletion of the Snapshots as well.
Clones of the deleted Volume are not affected by the deletion of the Volume.
Note
By default when you delete a volume it isn’t destroyed immediately, but it moves to the Pool’s Recycle Bin for 7 days until it is permanently deleted. From the Recycle Bin an administrator can purge (permanently delete) or restore the volume.
Attaching & detaching Volumes to Servers
Volumes can be attached to many Servers. Block Volumes are attached via the iSCSI protocol. NAS Shares are attached via the NFS/SMB protocol.
To attach a Volume
Go to the page, select the Volume and press the Servers > Attach to Server(s) button:
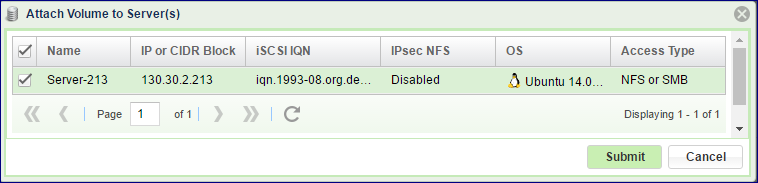
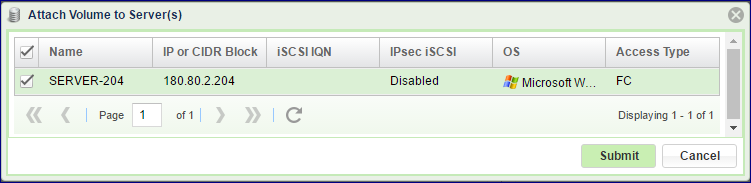
Select the Server(s) that you’d like to provide with access to the Volume.
For NAS Shares, select the access type: NFS or SMB.
For Block Volumes over Fibre Channel, select FC
Press Submit to confirm.
Mounting an NFS Share on a Linux machine
Install the NFS client:
On Ubuntu Servers do:
apt-get install nfs-common
On Redhat/CenOS Servers do:
yum install nfs-utils
Create a mount point:
$ mkdir /mnt/nfs_share
Run the following command as the superuser (or with sudo):
$mount –t nfs4 <NFS_Export_Path>/<mount point>
You can find the NFS_Export_Path in the Volumes > Properties tab.
Follow the step in Creating NAS Users to setup basic NFS authentication.
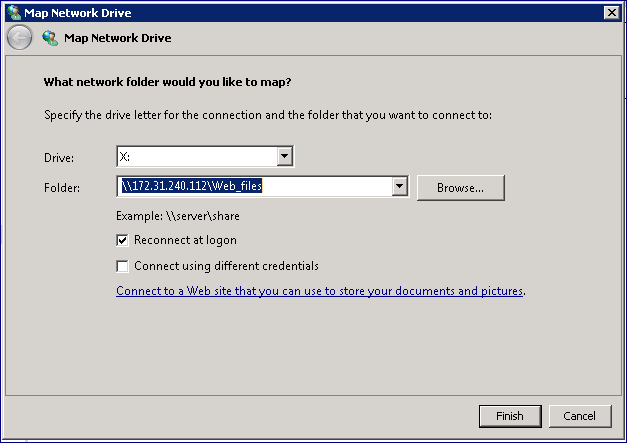
Mounting an SMB Share on a Windows Server
On the Windows Server, go to and Enter the SMB Export Path of the SMB share in the format: “\\<VPSA_IP>\<volume_export_name>”. You can find the SMB Export Path parameter in the VPSA GUI tab.
The first time you connect from a Widows Server to a VPSA share you are requested to enter an SMB User name and Password. Please check Creating SMB Users for more details (or use SMB guest access).
Format a Volume
Once the Volume is attached to the Server and identified by the Operating System as a drive, use the specific OS tools to format the drive to the needs of the OS or file-system used. Allocation units of 512B to 64KB are supported.
To detach a Volume
When you detach a Volume from a Server, the Server will lose access to the Volume’s data. Recommended practice is to unmount the Volume on the Server side before detaching it on the VPSA.
To detach a Volume from a Server, go to the Page and click the button. You will be requested to select the Servers from which to detach this Volume.
Alternatively, you can view the attached Servers list in the Volume’s South Panel, select the Server to detach from and click the Detach button on the top-left corner of the South Panel:

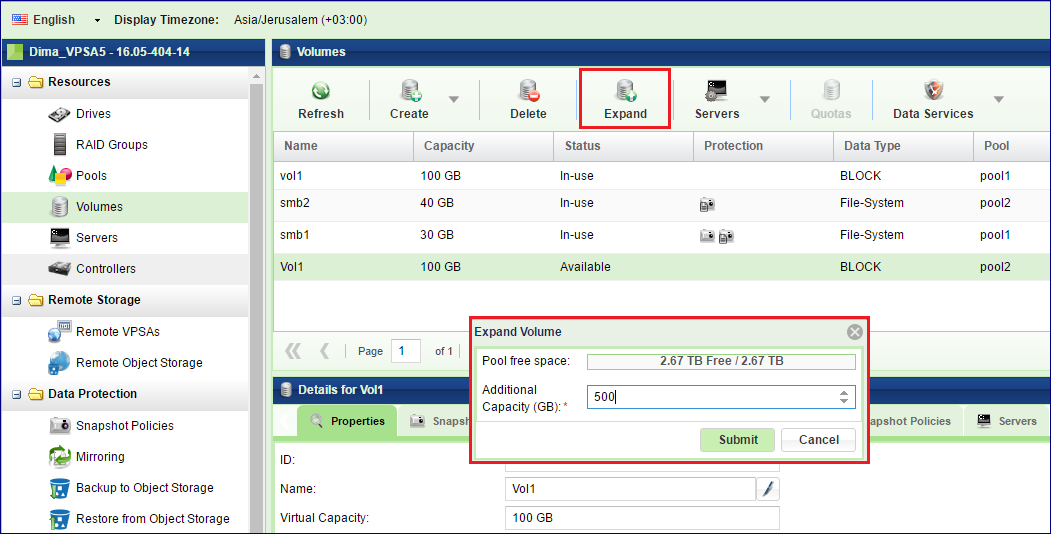
Expanding a Volume
You can expand a Volume anytime, regardless if the Volume has Snapshots, Clones or is being remotely mirrored. To expand a Volume go to the page, select the Volume and press the Expand button. Enter the amount of virtual capacity you’d like to expand the Volume by and press Submit.
Volume Automatic Expansion
To avoid out-of-space situations for File shares, the VPSA provides an Auto Expansion mechanism.
It allow the customer to define an automatic NAS volume expansion policy.
Auto expansion is controlled by 3 parameters:
Emergency Threshold - Volume will be expanded once the free capacity of the NAS share is below the given threshold. Default: 10% of the volume provisioned capacity.
Expand By - The additional provisioned capacity to be added. Default: 50GiB
Maximum Volume Capacity - The maximum allowed volume provisioned capacity (up to MAX Pool capacity) Default: 0GiB (Unlimited)
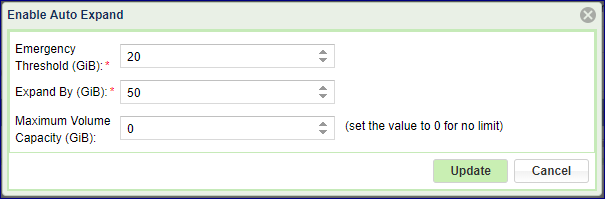
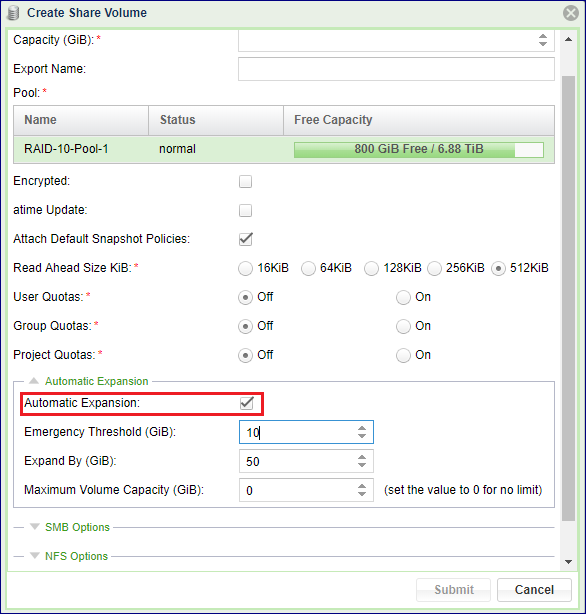
By default all volumes are created with Auto Expansion disabled. To enable it check the Automatic Expansion checkbox on the share creation dialog, or enable it from the Capacity Properties page.
Managing Snapshots and Snapshot Policies
Snapshots are Read-Only representations of the Volume’s data set at a given point-in-time. Snapshots are very efficiently thinly provisioned, sharing all the unmodified data chunks with the Volume. Write ordering is ensured at Snapshot creation, i.e. all writes that were acknowledged to the Server by the VPSA before the Snapshot was created will be contained in the Snapshot’s data set.
Manual creation & deletion of Snapshots
To manually create a Snapshot:
Go to the Volumes page, press the Data Services button and select Create Snapshot.

Enter a Unique Snapshot name and confirm the operation.
To manually delete a Snapshot:
Go to the page select the Volume and view the Snapshots South Panel tab to display the list of snapshots associated with this Volume.
Select the snapshot to be deleted in the Snapshots tab and press the Delete Snapshot button at the top left corner of the South Panel.

The snapshot will move to a Deleting state and will disappear from the list once the deletion process completes. Please note that Snapshots deletion typically takes less than a minute, but in complex configurations it may extend up to few minutes.
Note
You can not manually delete snapshots related to the volume mirrors. See Managing Remote Mirroring for details.
Managing Snapshot Policies
Snapshot policies define the Snapshots life cycle via the enforcement of creation and deletion policies. Snapshot Policies are “global” entities, and you can apply instances of the policies to one or more Volumes. Unapplied policies are idle—they do not consume any resources and never create any snapshots. A few points to consider:
You can apply a Snapshot policy to one or more Volumes.
You can apply multiple Snapshot Policies to a Volume.
If two or more Snapshot policies are scheduled to create a Snapshot at the same time on the same Volume, only a single Snapshot will be created. That Snapshot will only be deleted when all relevant Delete Policies approve its deletion.
Snapshot creation time is a “rounded” time, regardless of the precise policy creation time. For example, if you initialized a Snapshot Policy at 9:02 that has a Creation Policy to create a snapshot every 10 minutes, the Snapshots will be created at 9:10, 9:20, 9:30 and so forth (not at 9:12, 9:22, 9:32, etc.).
For the predefined snapshots policies like “Every Day” or “Every Hour” the Snapshot creation time is distributed on 10 minutes slots during the hour. The specified interval of one hour is kept, but not necessarily on the hour. Snapshots may be taken every hour 10 minutes after the hour, or 20 minutes after the hour, etc… (For example: 9:10, 10:10, 11:10 , …) If a precise snapshot creation time is needed, define a custom snapshot policy that specifies the exact time.
You can decide whether or not empty snapshots are to be created. i.e. if the time has come to create a Snapshot according to the Creation Policy but no data has changed since the previous Snapshot, you can specify whether a new and empty Snapshot will be created. This might be useful if you want to make sure the snapshot policy is enforced and snapshots are taken on time regardless of the data changes.
The following Snapshots Policies are predefined in the VPSA.

To create a new Snapshot Policy:
Go to the page and press the Create button.
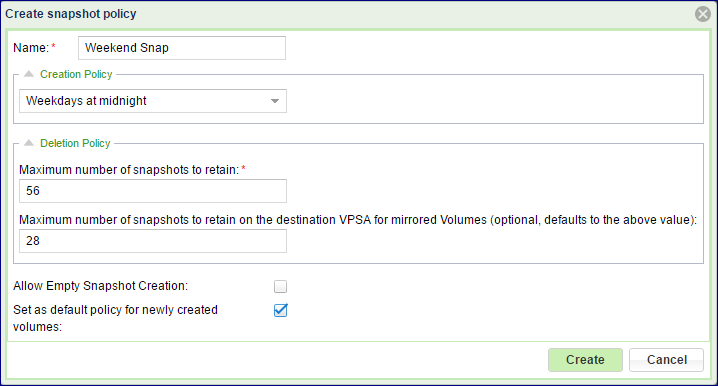
Name - Provide a meaningful name to the Policy.
Note
Objects names can be up to 128 chars long and can contain letters and digits, dashes “-” and underscores “_”
Creation Policy – Select the appropriate policy from the drop down list.
Deletion Policy – Use these 2 fields to define the maximum number of Snapshots to retain in the Deletion Policy. If you will be using this policy for Remote Mirroring, you can define a different number of Snapshots to retain on the DR site. This field is optional and defaults to the above deletion policy.
Allow Empty Snapshot Creation – Select this checkbox if you’d like Snapshots to be created according to the Creation Policy, even if no data was modified since the previous Snapshot.
Set as default policy for newly created volumes – Select this checkbox if you’d like all new Volumes to default to this Snapshot Policy.Select the appropriate Creation Policy from the drop down list.
Define the number of Snapshots to retain in the deletion policy.
Allows Empty Snapshot Creation – Set this checkbox if you’d like snapshots to be created according to the creation policy even if no data was modified since the previous snapshot.
If you will be using this policy for Remote Mirroring, you can define a different number of Snapshots to retain on the DR site. This field is optional and defaults to the above deletion policy.
To Edit a Snapshot Policy
Go to the page, select the Policy and press the Edit button.
You can edit all of the Snapshot Policy’s attributes: Name, Creation Policy, Deletion Policy Allow Empty Snapshots Creation and Set as Default Policy.
You can modify a Snapshot Policy even when it is active on one or more Volumes. The modifications in the Policy’s behavior will be reflected on all relevant Volumes.
If you reduce the number of Snapshots to retain for a Snapshot Policy that is active on one or mode Volumes, it will trigger the deletion of all Snapshots that no longer meet the new Deletion Policy.
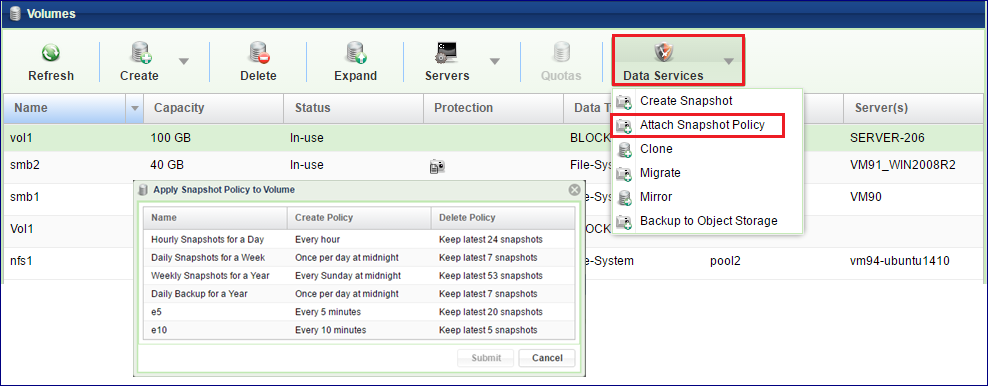
To Apply a Snapshot Policy on a Volume
Go to the page, select the Volume and select from the menu.
Select the Snapshot Policy to apply to the Volume and press the Submit button.
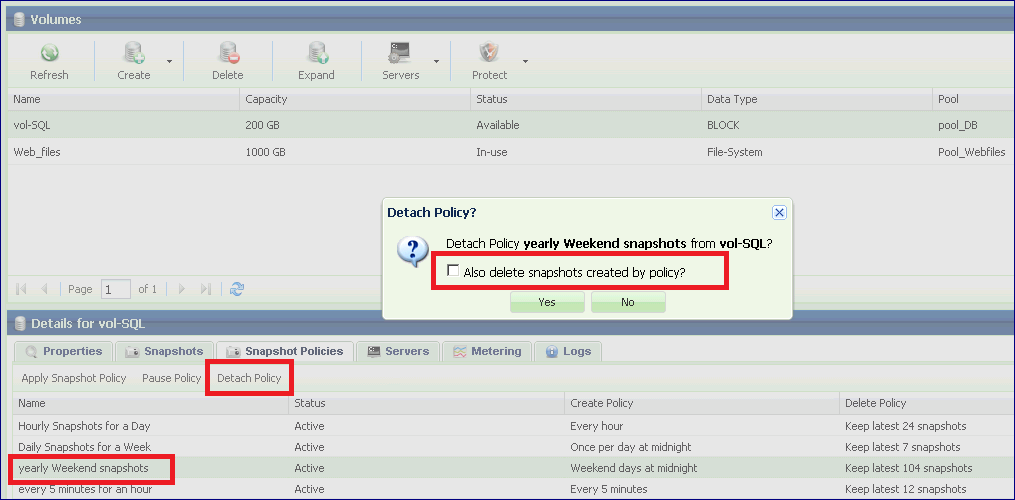
To detach a Snapshot Policy from a Volume
Go to the page, select the Volume and press the Snapshot Policies south tab to view the Volume’s applied Snapshot Policies.
Select the Snapshot Policy to delete and press the Detach Policy button on the top left corner of the South Panel.
You will be prompted to decide whether or not to delete all the Volume’s Snapshots which are associated with this Policy.
Pause\Resume a Snapshot Policy
You can pause an active Volume Snapshot Policy. New Snapshots will not be created, but existing Snapshots are not affected. Pausing a Snapshot Policy on one Volume has no impact on other Volumes that have this Policy active as well.
To pause a Snapshot Policy, go to the page, select the Volume and press the Snapshot Policies tab on the South Panel to view the Volume’s active Snapshot Policies.
Select the Snapshot Policy and press the Pause Policy button on the top left corner of the South Panel.
The Policy status will change to “Paused”.
To resume a Policy: The Pause / Resume button toggles according to the current Policy status. Select a Policy in a Paused state and press the Resume Policy button. The Policy Status will change to “Active”.

Managing SMB File History
SMB File History is a mechanism that allows restoration of previous versions of any given file or folder on a NAS volume, attached to Windows. SMB File History is similar to the VPSA snapshots mechanism, and driven by the same Snapshots Policies.
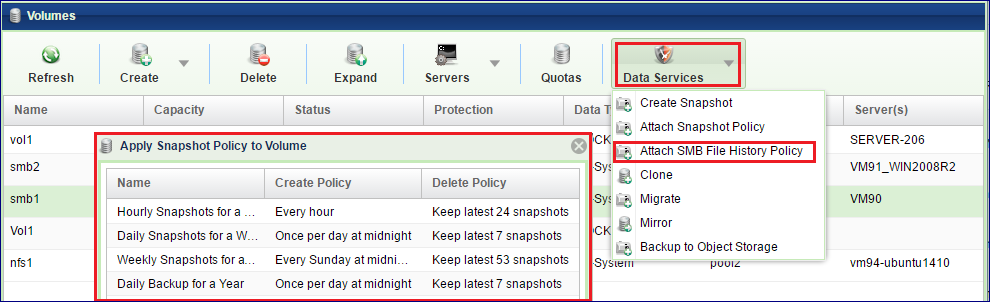
To Apply a SMB File History Policy on a Volume
Go to the Volumes page, select the NAS Volume and select from the menu.
Select the Snapshot Policy to apply to the Volume and press the Submit button.
To detach a SMB File History Policy from a Volume
Go to the Volumes page, select the Volume and press the Snapshot Policies south tab to view the Volume’s applied Snapshot Policies.
Select the Snapshot Policy to delete and press the Detach Policy button on the top left corner of the South Panel.
You will be prompted to select whether or not to delete all the Volume’s Snapshots associated with this Policy.
To restore files from SMB File History
On a Windows Server open Windows Explorer and navigate to the file/folder you want to restore.
Right click on the file and select Restore previous versions.
In the dialog that opens go to the Previous Versions tab and select the version to restore.
Click Restore.

Note
Each share can keep up to 64 snapshots for File History recovery purposes, (e.g. once a day for a month) and maximum of 512 snapshots for a VPSA Storage Array
Note
When a Volume with SMB File History Snapshots is migrated to another Pool, the SMB File History snapshots will not be migrated to the new Pool
Cloning a Volume
Cloning a Volume is the process of creating a Read/Write zero-capacity replica of a Volume, with a data set identical to that of the Volume, from a selected point-in-time (which can be the time the Clone is created, or one of the existing Snapshots’ point-in-time).
The result of the Cloning operation is a new Volume. The two Volumes now share all of the non-modified chunks. Only upon a first-write to a chunk, a Copy-On-Write occurs which allocates a new chunk and breaks the chunk sharing.
You can create an unlimited number of Clones of a given Volume, either from the same data set (from the same Snapshot) or from different data sets.
Clones are completely independent from each other, from the source Volume and from the Snapshot from which they were created. For example, you can delete the original Volume and/or Snapshot and it will leave the Cloned Volume unaffected. You can also modify Volume attributes of each Clone independently.
You can only create Clones within the Pool where the original Volume resides.
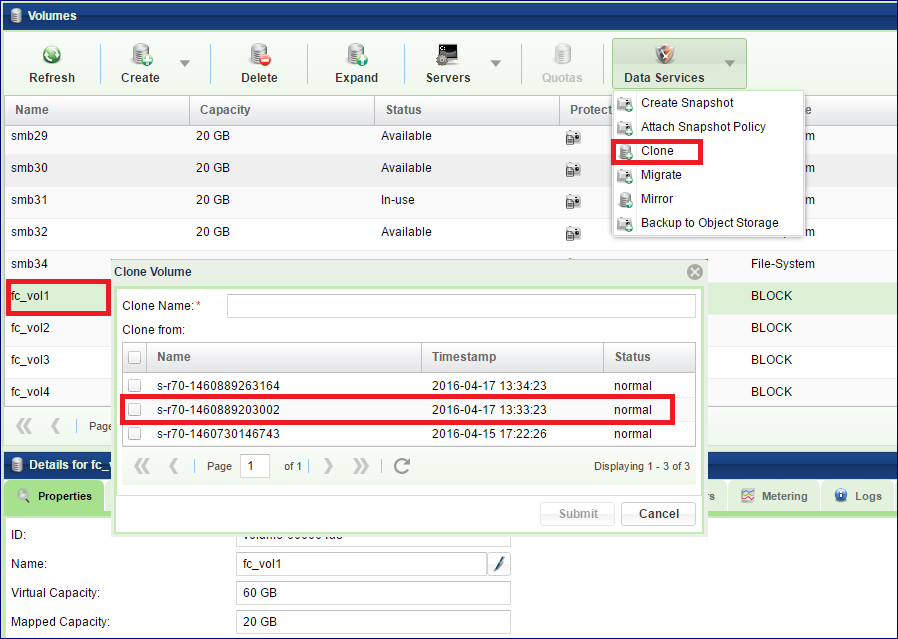
To create a new Clone
Go to The Volumes page, select the Volume to be cloned and press the Data Services > Clone button.
Clone Name – Enter a name for the Cloned Volume.
Clone from – Select the point-in-time Snapshot whose data set you wish to replicate. If you wish to clone the current data set of the Volume, don’t select any Snapshot.
press the Submit button to complete the operation.
Alternatively, you can go to the Volumes page, select the Volume to be cloned, press the Snapshots tab at the South Panel, select the desired point-in-time Snapshot and press the Clone button at the top left corner of the South Panel.
Enter a name for the new cloned Volume.

The newly created Clone will appear as a regular Volume in the Volume list.

The NFS/SMB Export name of a cloned Volume will be identical to the Cloned Volume display name.
Online Volume Migration
Volumes created in a VPSA pool can be easily migrated to a different pool in the same VPSA. All entities bounded to the volume (snapshot policies, servers attachments etc.) will be migrated as well. Existing snapshots migration is configurable by the user.
The online migration process is completely seamless to the end user and will not cause any service disruption to the hosts connected to the volume.
A common use case for using the Online Volume Migration feature is migrating performance demanding volume to a more performant storage pool(e.g. SATA pool to an SSD pool) on-the-fly.
Online Volume Migration can be initiated from the VPSA GUI or via VPSA REST API. For the REST API usage and examples please refer to the Volumes section of the VPSA REST API Guide.
Migrating a Volume
In the left pane menu navigate to the Volumes section under the Resources section.
Select the volume that will be migrated to another VPSA Pool.
From the upper options menu select the Data Services option and then select Migrate.

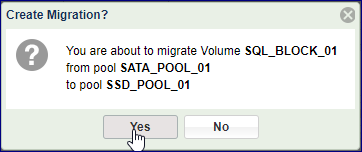
Destination pool – Select the destination Pool to migrate to, from the list of available pools. Make sure to select a Pool with sufficient free capacity.
Migrate Existing Snapshots – Check the checkbox if the migration of the volume should include the existing snapshots of the volume. In case “Migrate Existing Snapshots” is checked all snapshots will be migrated to the destination Pool. Note that in case the “Migrate Existing Snapshots” is not checked,the Volume snapshots will be deleted.

Compress – Check the checkbox if you want the new volume to be compressed.
Dedupe – Check the checkbox if you want the new volume to be deduped.
Press the Submit button to start the operation.

Review the details and confirm the Online Volume Migration operation.
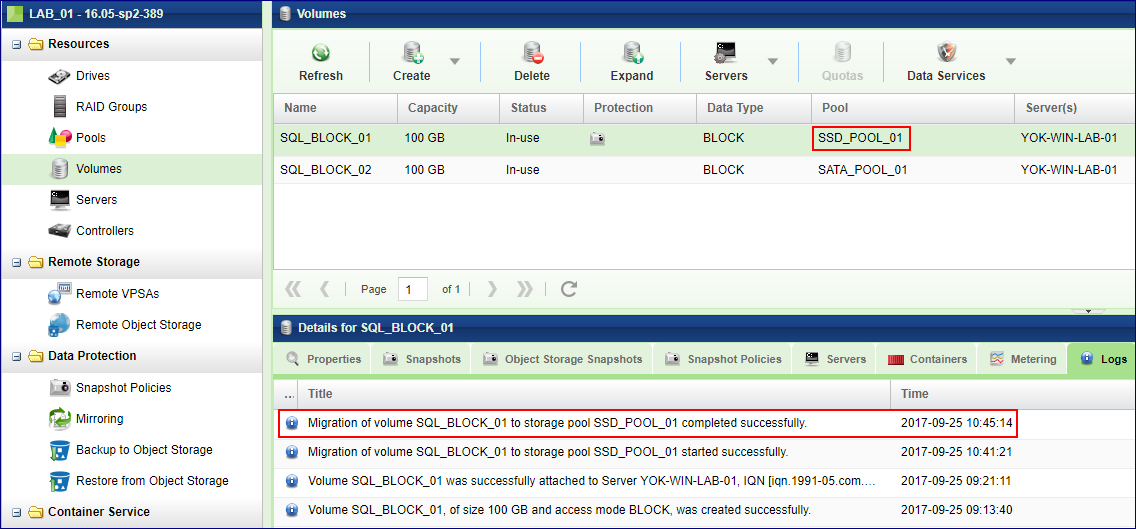
Monitoring the migration
Once started, the online migration task can be monitored from the VPSA GUI.
In the left pane menu navigate to the Volumes section under Resources
Select the volume that is currently being migrated.
On the south panel, a new tab is available - Migration Status. The Migration Status tab will provide real-time migration information while the migration is still running.

The user has complete control on the migration task as it can be Paused or Aborted from the Migration Status tab.
Upon completion, the Migration Status tab will be removed from the Volume south panel. A log entry will be added as an indication of a successful migration.
Managing Encrypted Volumes
Encryption management of Data-at-Rest (data on the Disk Drives) is applied by the VPSA on a per-Volume basis. Encrypted and unencrypted Volumes can coexist in the same VPSA Pool.
A VPSA generates a random 256-bit unique Volume Encryption Key per encrypted Volume and uses the Advanced Encryption Standard (AES) to encrypt and decrypt the Volume data.
Note
In previous versions of the VPSA software, AES 128 was used. Volumes that were created on those versions are encrypted with 128 bit keys.
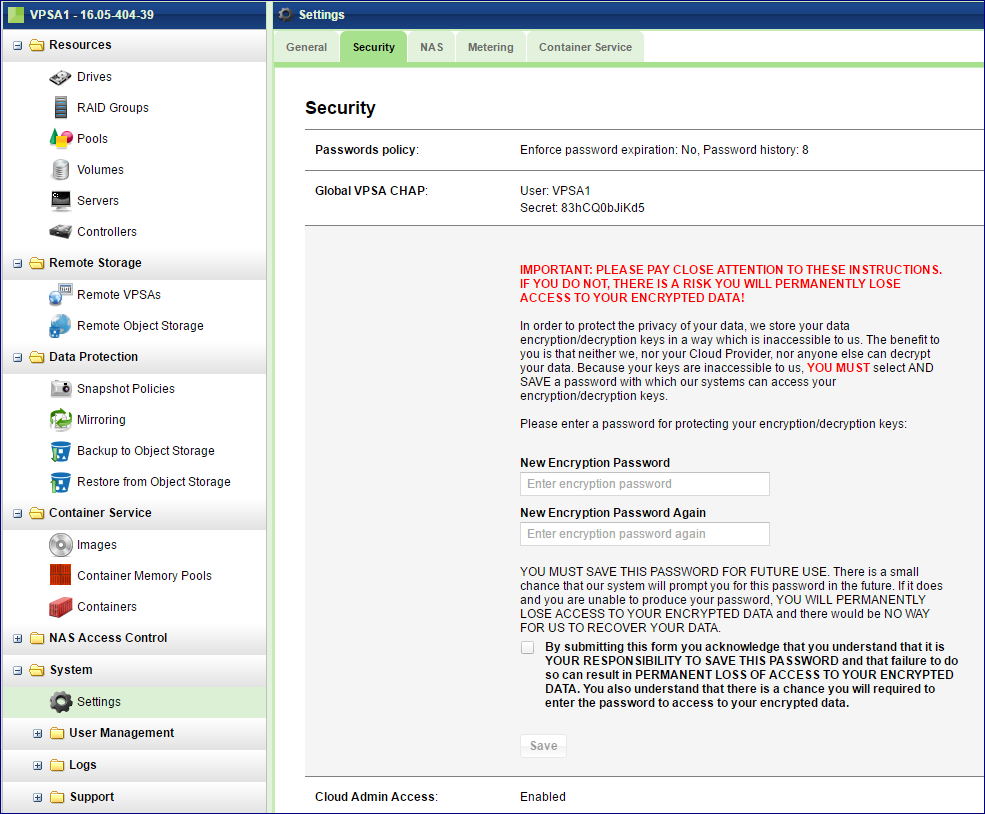
The Volume Encryption Keys are stored on disk as ciphertext, using AES with a 256-bit Master Encryption Key, which is generated from a user-supplied Master Encryption Password.
The User owns the Master Encryption Password. It is never stored on any persistent media. Instead, only its SHA3 hash-sum is saved on disk for password validation.
Caution
Since the system does not keep the Master Encryption Password, you are fully responsible to retain and protect the Master Encryption Password.
During VPSA operation, the Master Encryption Password itself is held in kernel memory of the VPSA. Core-dumping any User Mode process within the VPSA will not reveal the Master Encryption Key.
This method ensures that encrypted Data-at-Rest cannot be accessed without explicitly knowing the user-supplied Master Encryption Password, thus providing you full protection if you opt for Data-at-Rest Volume encryption.
The encryption attribute of Volumes cannot be changed! If you’d like to encrypt the data of a non-encrypted Volume, or vice versa, you will need to create a new Volume and copy the data.
To create a Master Encryption Password, go to the page, Security tab and press the Edit in the Encryption section. Read the instructions and warning. Type your Password and Save.
Once the Master Encryption Password is set, you can change or reset it at any time.
Master Encryption Password does not affect the encrypted data.
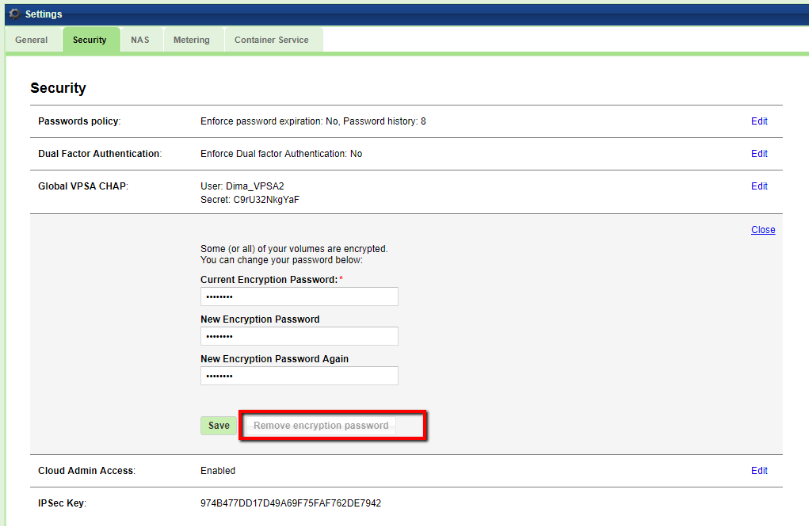
Store your Master Encryption Password in a secure place
To create an Encrypted Volume follow the steps in section Creating and Deleting a Volume.
Encrypted Volumes are displayed with the  icon.
icon.
Protecting Files Shares with Built-in Anti-Virus
The Zadara VPSA provides Anti-Virus protection to file shares with its integrated McAfee Anti-Virus engine. Generally speaking, all you need to do is to enable virus scanning at the volume creation time, or at any time later. You can either use the default scanning policy, or modify it to fit your specific needs.
Infected files will be either deleted or quarantine according to the policy. Virus signatures and Virus scan engine updates are completely automatic.
Understanding the Anti-Virus page The following screen appears when selecting on the navigation left panel.
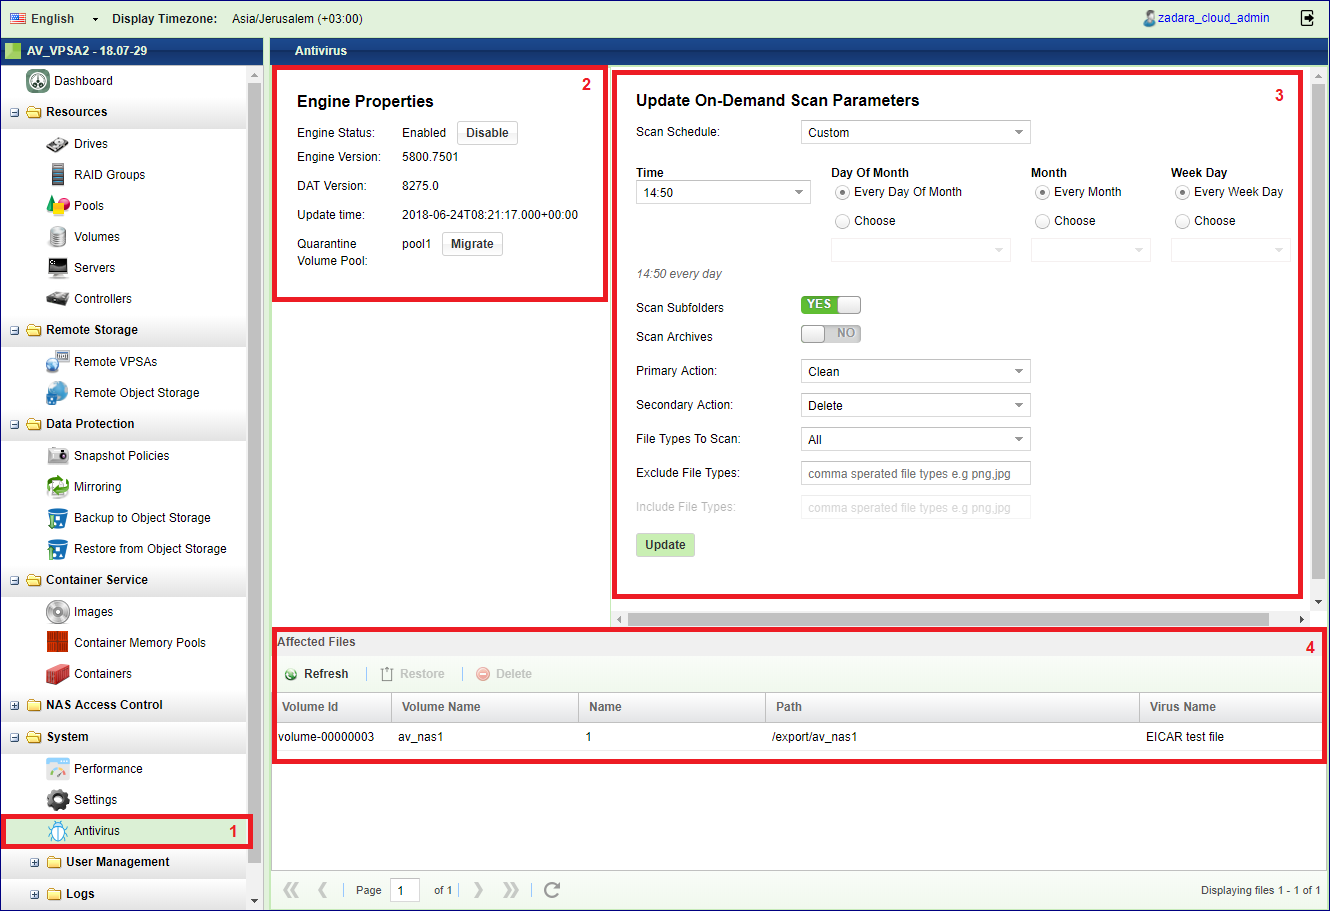
This screen is divided into the following sections:
Navigation - Click here for Anti-Virus
Engine Properties - Use it to verify that your engine is up-to-date, and to enable/disable AV engine.
Policy - Use it to modify the scanning policy and adjust it for your needs.
Quarantine Viewer - Use it to view and manipulate infected files that were moved into the quarantine.
Activating Virus protection at Volume creation

You can activate virus protection when creating NAS share. - Follow the instruction in Creating a NAS Share. - Expand the Antivirus Options sections - Check the Enable On Demand Scan - Select All file types to scan, or specify specific file types extensions - If all file types are selected you may specify a list of excluded file extensions - You may exclude specific folders on the share from being scanned by specifying their full path
Note
The above parameters overwrite the default Anti-Virus policy described in the next section.
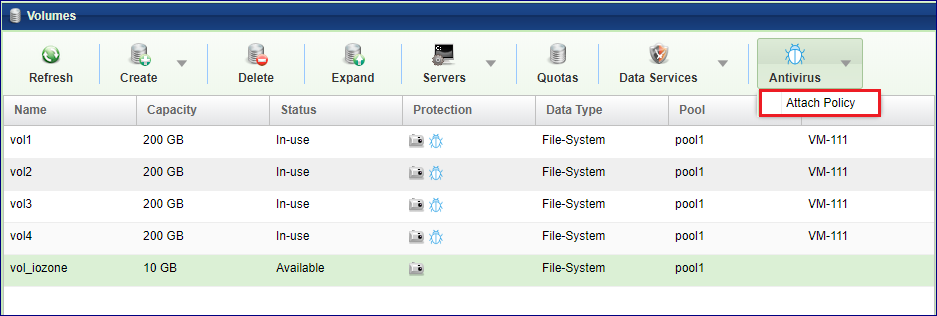
You can also activate/deactivate virus protection on an existing Volume.
Open the page, select the volume of interest and click Antivirus. Click Attach Policy or Detach Policy. Provide the same parameters as described above.
Adjusting Anti-Virus Protection Policy The default (that applies to all Shares) can be modified for your needs on the Anti-Virus page as follows:
Go to the page
Scan Schedule - Either select one of the pre-defined schedules (e.g. Everyday after midnight) or custom your own
You can specify the day of the week, or the date of the month, and specify the time
Scan Subfolders - Specify if you want the AV to scan files in subfolders
Scan Archives - Specify if you want the AV to scan files within archive files such as ZIP, TAR, etc…
Primary & Secondary Actions - Specify the actions you want the AV engine to take: (If the primary action failed, the AV engine tries the secondary action)
Clean - remove the virus from the infected file
Delete the infected file from the NAS share, and move it into the quarantine
Ignore the unaffected file and continue the scan
File Types to Scan - Either All files, or specify specific file types extensions
Exclude File Types - If all was selected, you have the options to specify file extensions to skip
click Update to keep the changes made to the policy.
Managing Quarantined files The Infected Files pane lists all the files that were found infected and were removed to the quarantine. Review these files, select the rows in interest and take one the following actions: - Delete the files - Restore the files into their original folder
Viewing Volume Properties
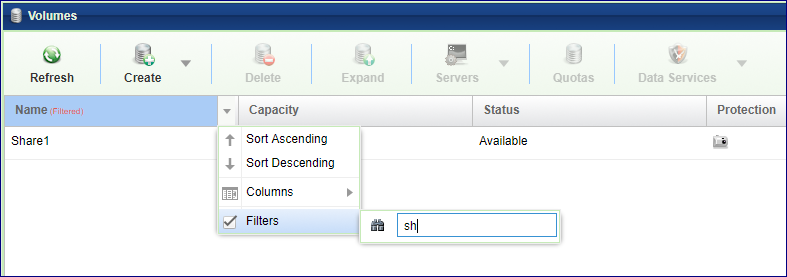
Filtering Volumes
In a VPSA with many volumes it might be difficult to locate a specific volume in the page. The following Filtering option may be useful. In the page click the little arrow on the Name column title, select Filter and start typing the name of the volume of interest. The table will be filtered accordingly.
The Page displays the list of Volumes (Block and NAS) in the VPSA. Select a Volume to see its detailed information in the following South Panel tabs:
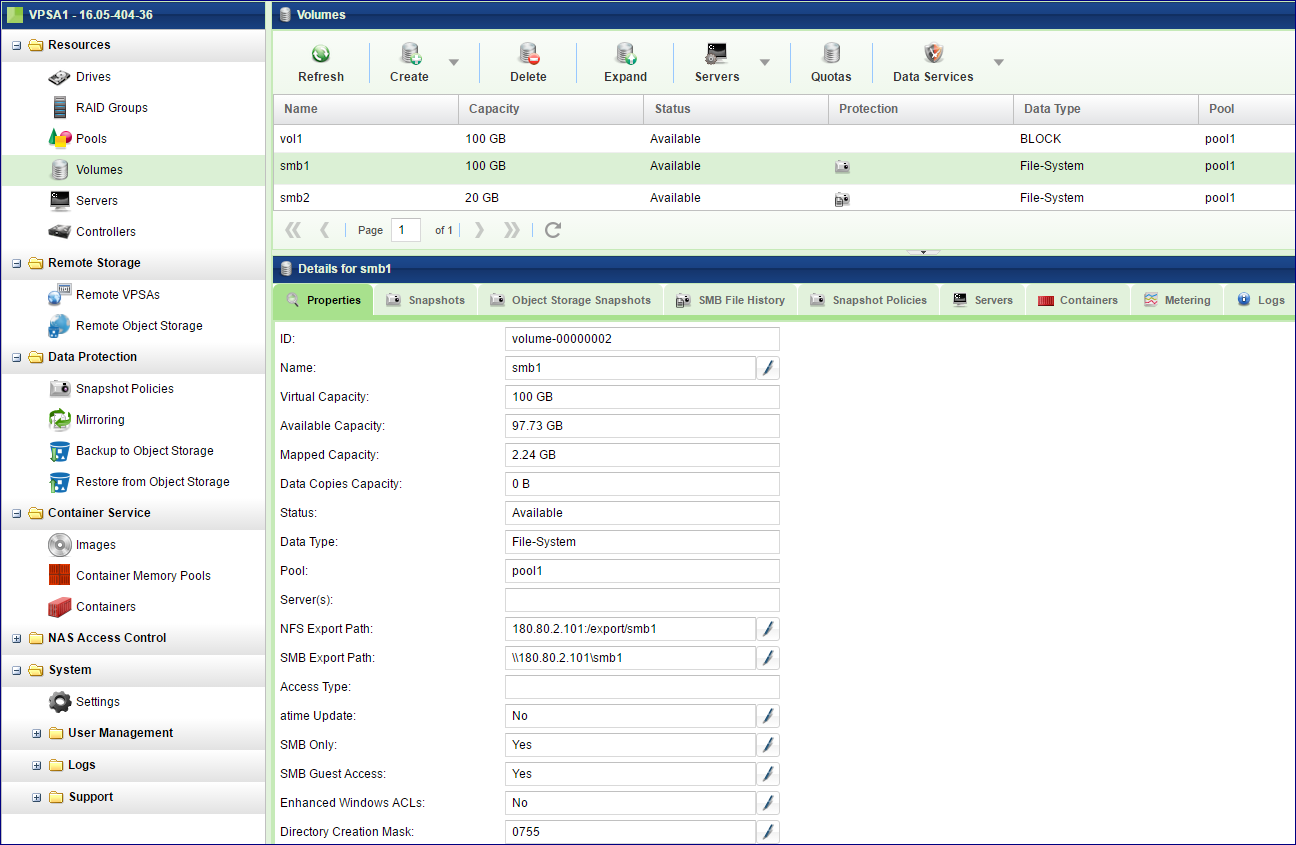
Properties
Each Volume includes the following properties:
Property |
Description |
|---|---|
ID |
An internally assigned unique ID. |
Name |
User assigned name. Can be modified anytime. |
Comment |
User free text comment. Can be used for labels, reminders or any other purpose |
Virtual Capacity |
Capacity of the Volume as seen by the attached Servers. |
Available Capacity |
(NAS Shares Only) Free capacity of the NAS Share. |
Mapped Capacity |
The used capacity (allocated from the Pool) of the Volume excluding its Snapshots and Clones. |
Data Copies Capacity |
The used capacity (allocated from the Pool) of the Volume’s Snapshots and Clones. Note: the total capacity allocated for a Volume and all its Clones and Snapshots is the sum of Mapped Capacity + Data Copies Capacity |
Status |
|
Data Type |
|
Pool |
The Pool name where this Volume is provisioned. |
Server(s) |
Server Name attached to the Volume. Multiple(X) will be displayed when X servers are attached. |
NFS Export Path |
(NAS Shares Only) The NFS Share export path to be used when mounting it. All defined paths are listed here. Additional path can be defined. |
SMB Export Path |
(NAS Shares Only) The SMB Share export path(s) to be used when connecting to it from a Windows Server. All defines paths listed. |
Access Type |
(NAS Shares Only) Access protocols which are used by the Servers which are attached to a NAS Share: NFS, SMB, or Multiple. |
atime Update |
(NAS Shares Only) Yes/No – Indicates whether to update access time of NAS Share files and directories on every access, including read-access. |
SMB Only |
(NAS Shares Only) Yes/No – enable/disable locking optimizations |
SMB Guest Access |
(SMB Only) Yes/No – Allow/Block anonymous user access |
SMB Encryption Mode |
(SMB Only) Off/Desired/Required - Sets SMB encrypt secured protocol behaviour |
Enhanced Windows ACLs |
(SMB Only) Yes/No |
Directory Creation Mask |
(NAS Shares Only) Default directory umask value |
File Creation Mask |
(NAS Shares Only) Default file umask value |
Map archive |
(NAS Shares Only) Yes/No - Maps the windows archive bit to the unix execute bit. |
SMB Browsable |
(SMB Only) Yes/No - seen in the list of available shares |
SMB Hidden Files |
(SMB Only) This is a list of files or directories that are not visible but are accessible. |
SMB Hide Unreadable |
(SMB Only) Yes/No - Prevents clients from seeing the existence of files that cannot be read. |
SMB Hide Unwritable |
(SMB Only) Yes/No - Prevents clients from seeing the existence of files that cannot be written. |
SMB Hide Dot Files |
(SMB Only) Yes/No - Prevents clients from seeing the existence of “.*” files. |
SMB serial small IO workload Optimized |
(SMB Only) Yes/No |
SMB Store DOS Attributes |
(SMB Only) Yes/No - Preserve DOS attributes (hidden, archive, read-only, system) |
User Quotas |
(NAS Shares Only) On/Off - user quotas on volume. |
Group Quotas |
(NAS Shares Only) On/Off - group quotas on volume. |
Project Quotas |
(NAS Shares Only) On/Off - Project quotas on volume. |
NFS Root Squash |
(NFS Only) Yes/No - map requests from uid/gid 0 (root) to the anonymous uid/gid. Note: Set to “Yes” to block external root access to the volume. |
NFS All Squash |
(NFS Only) Yes/No - map requests from and uid/gid to the anonymous uid/gid. Note: Useful for inter server/application correlation or Public File shares |
NFS anonymous GID |
(NFS Only) explicitly sets a specific group id for the anonymous account |
NFS anonymous UID |
(NFS Only) explicitly sets a specific user id for anonymous account |
Extended Metering |
Yes/No – Enabling extended metering. When “Extended Metering” is disabled, the VPSA records the volume’s performance statistics of reads and writes operations. When “Extended Metering” is enabled, the VPSA also records performance statistics of other file operations, including create, delete, etc… Note: “Extended Metering” enabled puts extra load on the VPSA, and the metering DB might grow rapidly. It is recommended to use it for only limited period of time, for planning or troubleshooting purposes. |
WWID |
(Block Only) SCSI unique World-wide ID. Use this value on Linux Servers to identify the Volume device when multipathing is configured. |
Encrypted |
Yes/No |
Created |
Date & time when the Volume was created. |
Modified |
Date & time when the Volume was last modified. |
Snapshots
Lists the point-in-time Snapshots of this Volume. If you retain many Snapshots per Volume, you may want to use the Snapshot Filtering tool to find a specific Snapshot. For more details see here.
The following Properties are provided per Snapshot:
Attribute |
Description |
|---|---|
ID |
Snapshot ID |
Name |
Display Name. |
TimeStamp |
Snapshot creation time stamp |
Status |
Normal\Pending Deletion\Deletion |
Object Storage Snapshots
Lists the point-in-time Snapshots of this Volume which are stored in an Object Storage (e.g S3). These Snapshots are created by the Backup to Object Storage feature, as defined here Backup to Object Storage
The following Properties are provided per Object Storage Snapshot:
Attribute |
Description |
|---|---|
ID |
Snapshot ID |
Name |
Display Name. |
Region |
Object storage region |
Bucket |
Object storage bucket |
TimeStamp |
Snapshot creation time stamp |
Status |
Normal\Pending Deletion\Deletion |
SMB File History (SMB Only)
Lists the point-in-time Snapshots of this Volume which are kept for SMB File History recovery purposes. These Snapshots are created by the SMB File History mechanism. For details see here:.
The following Properties are provided per File History Snapshot:
Attribute |
Description |
|---|---|
ID |
Snapshot ID |
Name |
Display Name. |
TimeStamp |
Snapshot creation time stamp |
Status |
Normal\Pending Deletion\Deletion |
Pool |
Pool where the file history is kept |
Snapshot Policies
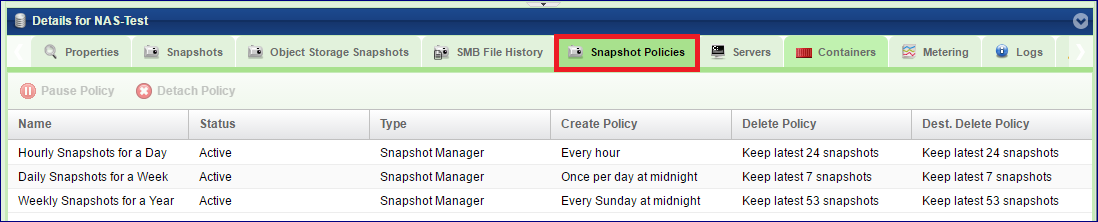
The Snapshot Policies tab lists the policies that are attached to the selected Volume. The following Properties are provided per Snapshot Policy:
Attribute |
Description |
|---|---|
Name |
Display Name. |
Status |
Active or Paused. |
Type |
The VPSA application controlling the Policy:
|
Create Policy |
Frequency of Snapshot creation. |
Delete Policy |
Number of Snapshots to retain. |
Dest. Delete Policy |
Number of Snapshots to retain on Remote Mirror destination Volume. |
For more details on Snapshot Policies management, see here:.
Servers
The Servers tab lists the Servers to which the Volume is attached. For Block Volumes the LUN Number associated with each Server is displayed. It also indicates if the server accesses the volume via iSCSI or FC.
Containers
Lists the Docker Containers that are able to access the selected Volume, along with their statuses. For details about attaching Volumes to Containers see Managing Container Services
Metering
The Metering Charts provide live metering of the IO workload associated with the selected Volume.
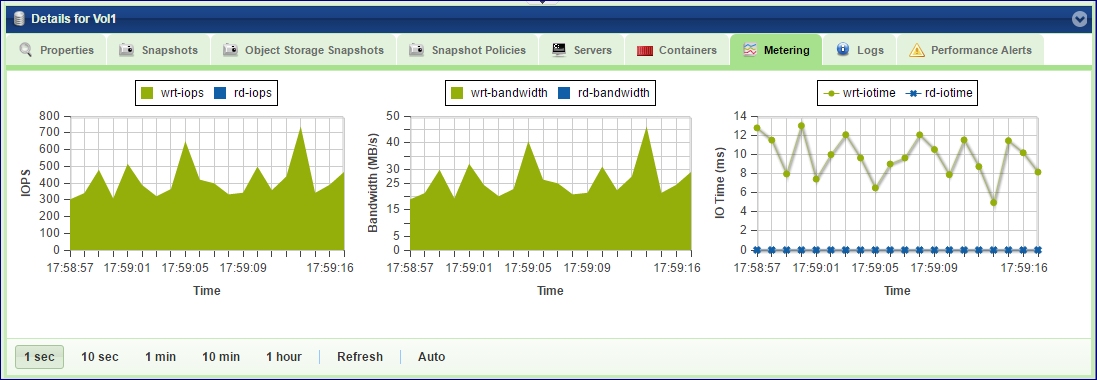
The charts display the usage data as it was captured in the past 20 “intervals”. An interval length can be set to one of the following: 1 Second, 10 Seconds, 1 Minute, 10 Minutes, or 1 Hour. The Auto button lets you see continuously-updating live metering info (refreshed every 3 seconds).
The following charts are displayed:
Chart |
Description |
|---|---|
IOPs |
The number of read and write SCSI commands issued to the selected Volume from all attached Servers. |
Bandwidth (MB\s) |
Total throughput (in MB) of read and write SCSI command issued to the selected Volume from all attached Servers. |
IO Time (ms) |
Average response time of all read and write SCSI command issued to the selected Volume from all attached Servers. |
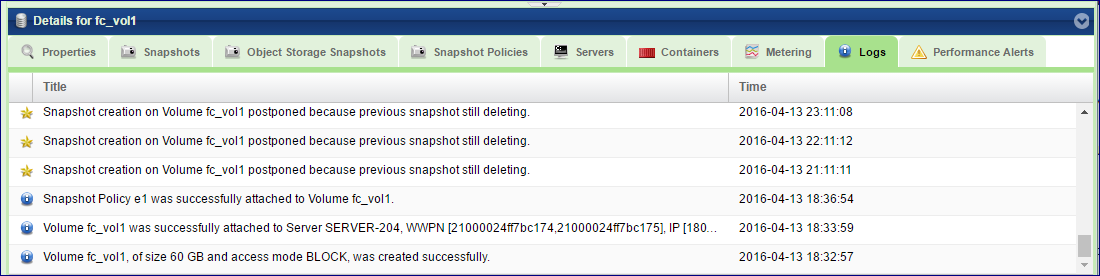
Logs
Displays all event logs associated with this Volume.
Performance Alerts
Displays Performance Alerts for the selected Volume.
Read IOPS Limit – Creates an alert when, during the past minute, the average read IOPS for the selected Volume exceeds a user-specified threshold.
Read Throughput Limit - Creates an alert when, during the past minute, the average read MB/s for the selected Volume exceeds a user-specified threshold.
Read Latency Limit – Creates an alert when, during the past minute, the average read latency for the selected Volume exceeds a user-specified threshold.
Write IOPS Limit – Creates an alert when, during the past minute, the average write IOPS for the selected Volume exceeds a user-specified threshold.
Write Throughput Limit - Creates an alert when, during the past minute, the average write MB/s for the selected Volume exceeds a user-specified threshold.
Write Latency Limit – Creates an alert when, during the past minute, the average write latency for the selected Volume exceeds a user-specified threshold.
Capacity Alerts
Displays capacity Alerts for the selected NAS Volume The Capacity Alerts tab lists the configurable attributes of the NAS Volume capacity Protection Mechanism, similar to the pool capacity alerts. See Managing Pool Capacity Alerts for more details.
Alert Threshold - Creates an alert when it is estimated that the Volume will be at full capacity in X Minutes.
Default Value: 360 minutes
Alert Interval - Calculates the estimated time until the Volume is full based on the capacity usage in the previous X minutes.
Default Value: 60 minutes
Emergency Threshold - Creates an alert when the volume is running out of free space and reaching the given threshold.”
Default Value: 1 GB
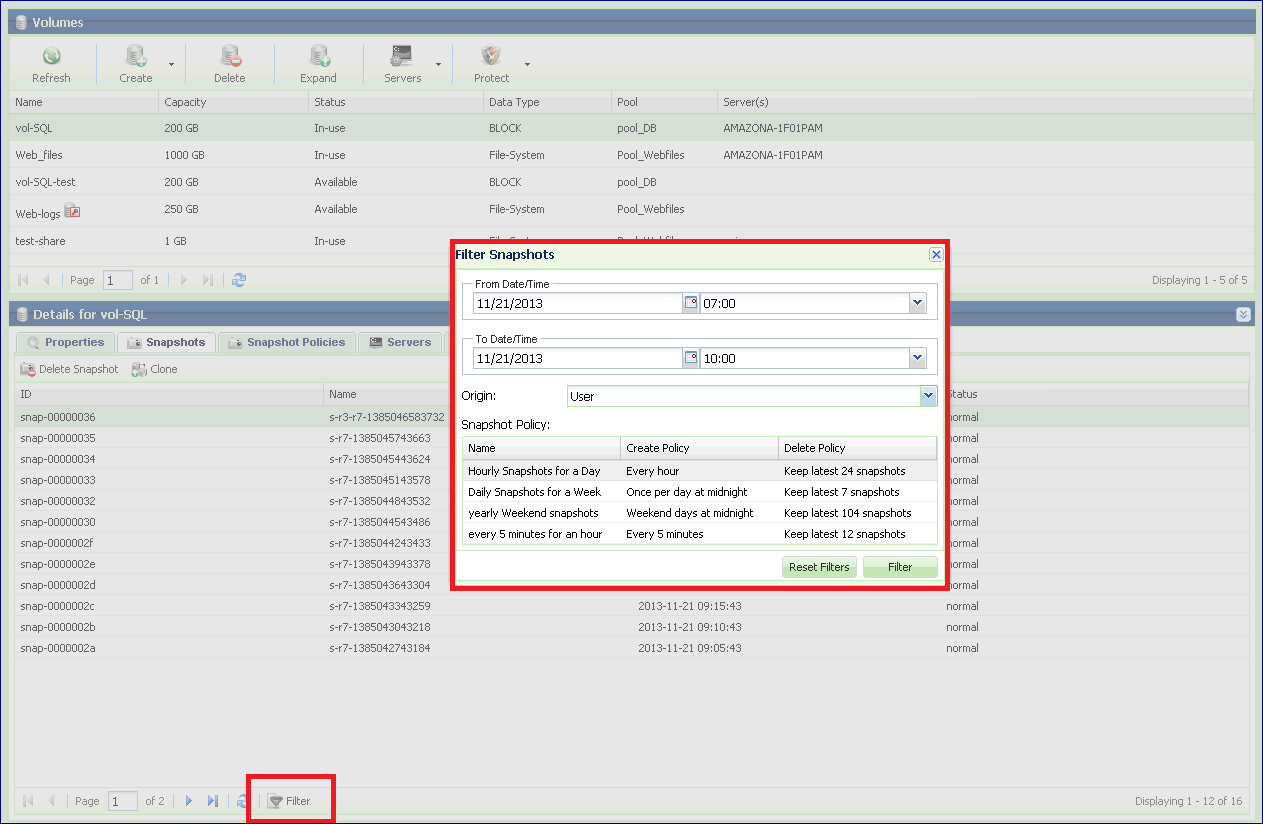
Filtering Snapshots
Snapshots can be created manually, by using Snapshot Policies, by Remote Mirroring or by Backup to Object Store. This can result in many Snapshots spread across multiple Volumes.
Finding a specific snapshot could therefore take some time. The “Filter Snapshot” option will help you to find the snapshot you need more efficiently
Go to The Volumes page, select a Volume and display the Snapshots tab in the South Panel. Press the Filter button at the bottom of the page. In the resulting dialog, define one or more of the following parameters:
You can define the From Date/Time and To Date/Time to filter only Snapshots that were created during that interval.
You can select the Origin of the Snapshot:
All – all Snapshots origins.
User – Snapshot created manually or via a Snapshot Policy which was attached to this Volume.
Mirror – Snapshots that were created by the Remote Mirroring application (using the Snapshot policy which was defined at the time of the Mirror creation).
Object Storage – Snapshots that were created by the Backup to Object Store (using the Snapshot policy that was defined at the time of the Backup definition).
Snapshot Policy – Select a Policy if you’d like to filter only Snapshots that were created by that specific Policy.