Managing Access Control
Adding & Deleting Users
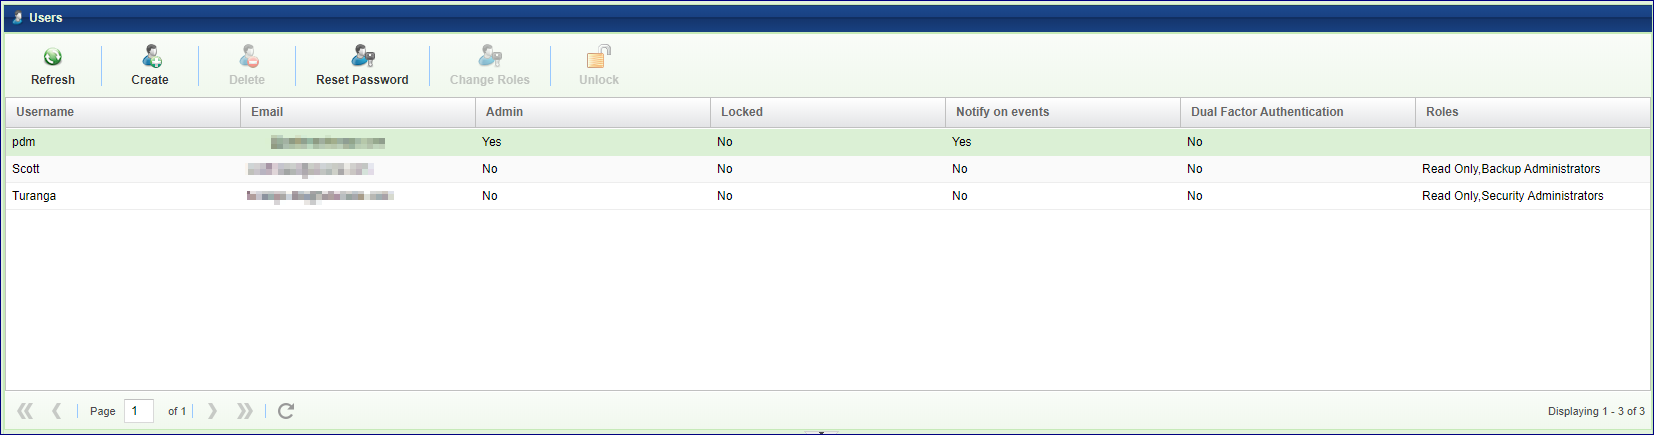
The VPSA’s User Management system supports multiple users. There are two distinct user types:
Admin - When the VPSA is created via the Provisioning Portal a default ‘admin’ user is created. This default ‘admin’ user cannot be deleted and the password associated with this account should be complex and stored securely. The email address could be a single person, but might be better if it was a distribution list. This Admin user can add, update and delete other Users and reset Users’ passwords through the VPSA GUI. It also has full control over all VPSA functions. This should not be confused with a standard User account which has been assigned the ‘Admin’ privilege.
User - A User who was added by the Admin User. This User has rights to manage the VPSA either through the GUI or REST API, according to their assigned Roles. Each User has its own Password and Access Key.
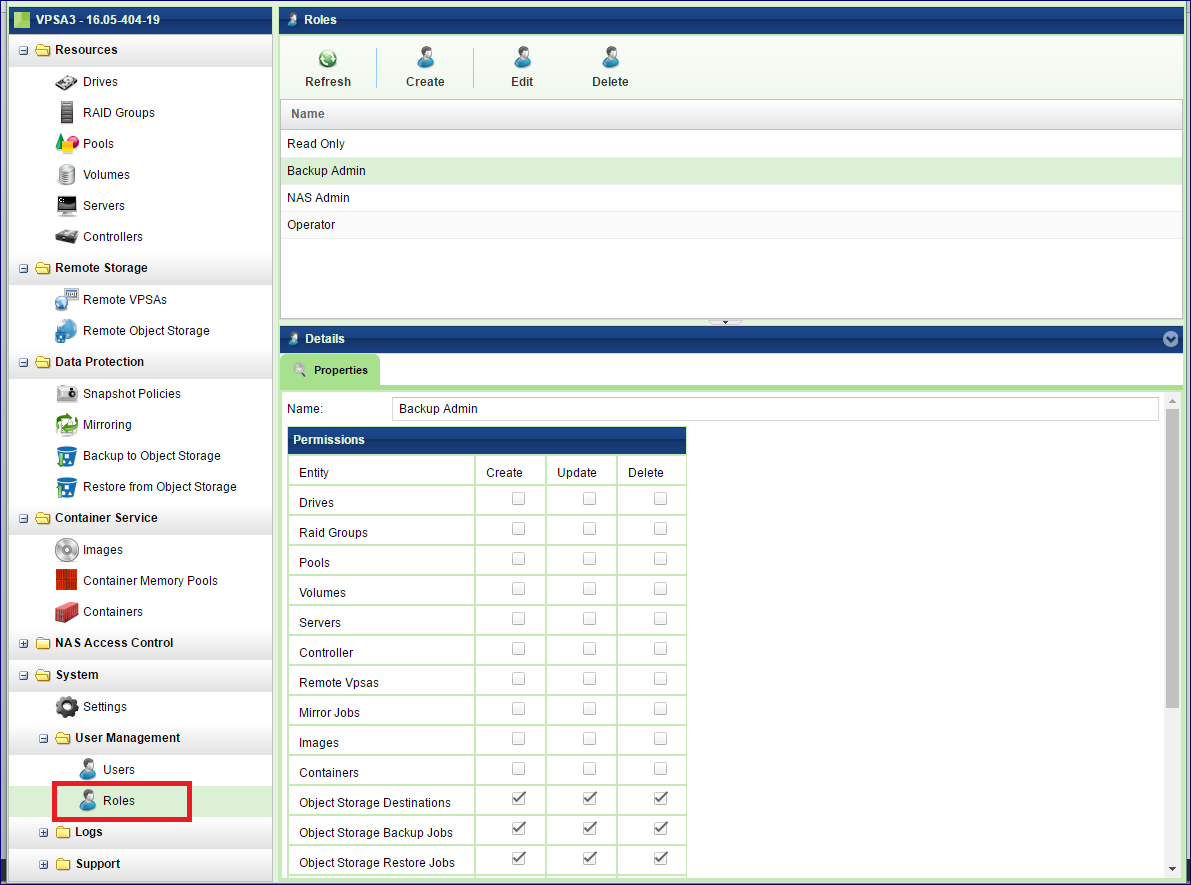
User Roles
User Roles define the access rights given to a User. By default, all Users have read rights to all Objects. In addition, the roles define the User’s create/update/delete rights for each object type (Pools, Volumes, Backups, etc.). Roles are assigned to each User at creation time and can also be updated later.
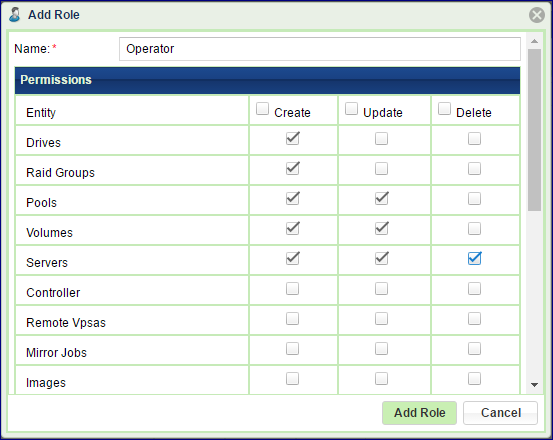
Creating a new User Role
When creating a new User Role, give it a name and select the access rights to be granted to the new role. Press the Add Role button.
Adding a new User
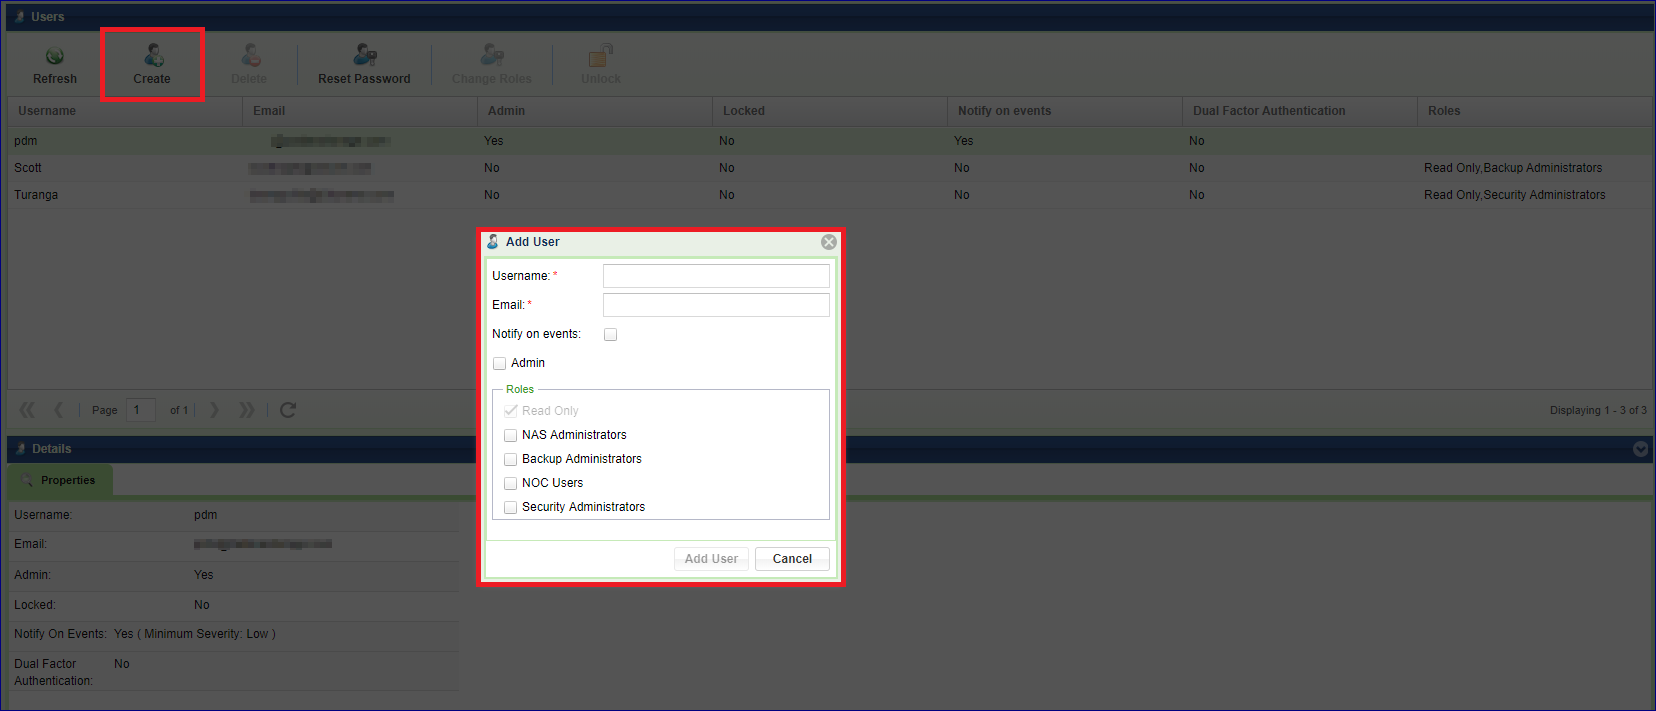
Log in to the VPSA the ‘admin’ user credentials, or as a User who has been assigned the ‘Admin’ privilege. Go to the Users page and click the Add User button.
Enter the Username and Email address and specify if this new User will be assigned the ‘Admin’ privilege (full control), or select specific Role. Select the Notify on events checkbox if you want this User to receive email notifications from this VPSA. Then press the Add User button to complete the operation.
Once the new User is created a dialog with a temporary passcode will appear. This passcode is also sent to the Admin User’s email. The new User will need to use this temporary passcode when logging into the VPSA for the first time.
Changing a User Role
The Roles of any given User can be changed at any time. Log in to the VPSA with the ‘admin’ user credentials, or as a User who has been assigned the ‘Admin’ privilege. Go to the Users page, select the User from the list and click the Change Role button.
Deleting a User
Log in to the VPSA with ‘admin’ user credentials, or as a User who has been assigned the ‘Admin’ privilege. Go to the Users page, select the User from the list and click the Delete User button.
The User will be deleted, but this operation will not affect any other entities that were created or managed by that User.
Managing User Passwords
The VPSA stores a cryptographic hash value (using a one-way SHA-3 hash function) of the VPSA User Password. When you log in to the VPSA the entered password’s hash value is compared with the one stored.
Changing your password
Log in to the VPSA and click your user name on the right upper corner of the screen. Your account page will open. Click the Change Password button.
Enter your current password, a new password and confirm the new password. Click Change Password to submit the operation.
Note
This operation is available to Admin and to all regular Users. Each User can only change their own password.
Resetting User Password
This operation is available only to the Admin User. The Admin User (or User with Admin privilege) can reset any User’s password. A new temporary passcode will be created and sent to the User’s email. The User will be requested to set a new password on next log in.
Log in to the VPSA with Admin User credentials. Go to the Users page, select a User from the list, and click the Reset Password button.
Resetting API Key
Zadara Storage employs a session-based authentication mechanism as a means to identify a user for every HTTP request to a VPSA.
You initiate a session by logging in with the VPSA User Password. Upon successful authentication a Secret API Token is sent back to the client application for any subsequent REST API communication with the VPSA to identify the authenticated User and validate the session.
At any time you can generate a new Secret API Token, thus invalidating the previous token and any sessions using it.
Log in to the VPSA, click your user name on the upper right corner of the screen. Your account page will open. Click Reset Access Key button.
Managing Password Policy
The VPSA Admin can control the VPSA Password Policy. For details, see VPSA settings Security .
Dual Factor Authentication
The VPSA’s User Management system supports Dual Factor Authentication (DFA) using Authenticator mobile application. It is a common practice to protect access in case of compromised password, as a password is not enough in order to login. Each user can turn Dual Factor Authentication on/off for herself. The VPSA admin can force Dual Factor Authentication on all users.
Enabling Dual Factor Authentication
To enable DFA open the current User Properties by clicking the user name on the upper right corner of VPSA GUI screen.
Click Activate or Deactivate. Close the properties dialog, and logout.
The first time you login again, the following screen will pop up.
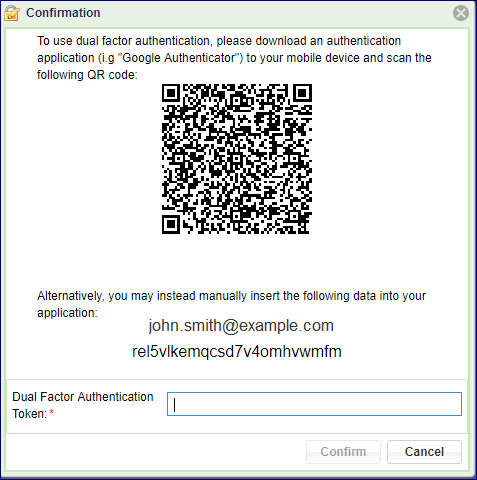
Install an Authenticator mobile app. (e.g. Google Authenticator) from Google Play or Apple AppStore, and scan the QR code. Enter the code you get on the Authenticator. You are now set.
Every login, from now on will require the temporary code from the Authenticator app.
Important
The mobile device that runs the Authenticator app is needed for login. In case the device was lost or replaced, the user must ask the VPSA admin to reset her DFA settings. VPSA admin must contact Zadara support for reseting the DFA.
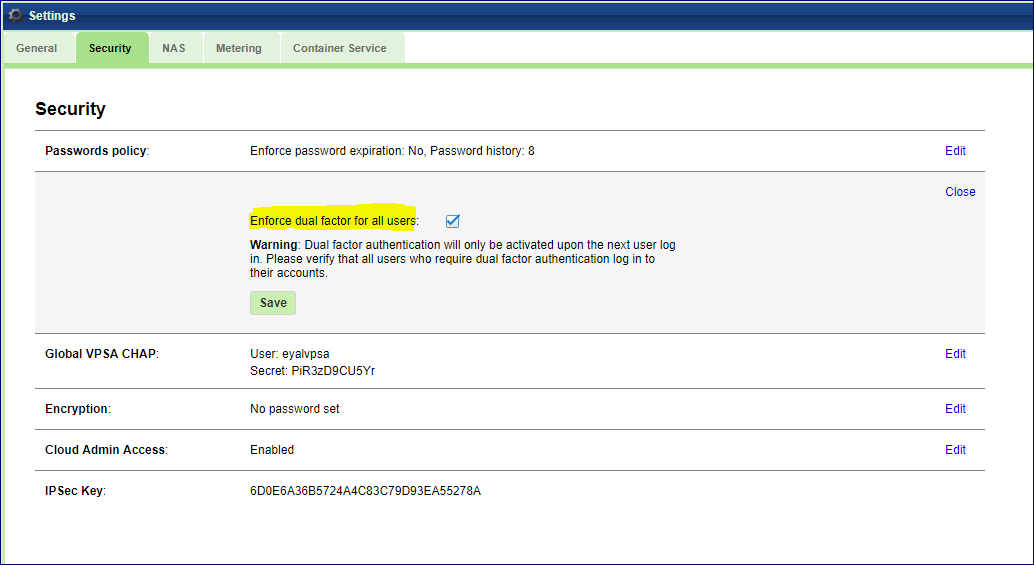
Enforcing Dual Factor Authentication
VPSA administrator can force DFA for all users. In setting/Security click Edit on the Dual Factor Authentication, check the checkbox and Save. This setting change doe not have immediate effect. Next time each user will login, she will be required to set her mobile device Authenticator app as described above.
Note
When DFA enforcement is removed, the users with DFA configured are still required to use the temporary code when logging in. However each user can change her settings in the user properties as described above.
Managing NAS Users Access Control
Creating NAS Users
By default “root” User and Group at the NFS client are mapped to “root” User and Group in the VPSA. To prevent remote “root” access to the Volume enable the “NFS Root Squash” setting, either at the time the Volume is created or later under Volumes > Properties. All other client-side Users are mapped to User “nobody” and Group “nogroup”.
To configure a basic NAS authentication so that Users and Groups on the NFS client will be mapped to the corresponding Users and Groups at the VPSA, perform the following steps:
Go to tab and press Edit for NFS Domain. The NFS Domain dialog will appear:

Enter the NFS domain name identical to the domain name set in the Client and press the Update button. Typically the default domain name on a Linux client is “localdomain” and is therefore also the default value in the VPSA.
Note
On a Linux client the domain name is usually set in the /etc/idmap.conf file. It is mandatory to have this value set.
Note
Make sure the “idmapd” service is running (Ubuntu = ‘imapd’, RHEL = ‘rpcidmapd’), and that /sys/module/nfs/parameters/nfs4_disable_idmapping is set to “N”. To make this setting persistent, set the following in ‘/etc/default/grub’ and then run ‘update-grub’:
GRUB_CMDLINE_LINUX_DEFAULT="nfs.nfs4_disable_idmapping=“N”
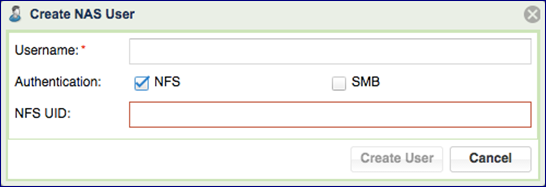
Go to and press the Create button.
Enter a Username.
Select the NFS checkbox for Authentication.
Enter a NFS UID (in the range 1-999,999).
- If you wish to grant this User access to SMB shares as well, also
select the SMB checkbox and enter a password (which will be used later when mounting the NAS Volume on a Windows Client).
Note
This can only be done at the time the User is created, it cannot be changed or added later.
Creating SMB Users
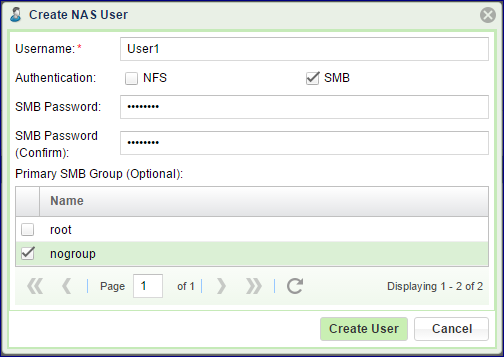
Go to and click the Create button.
Enter a Username.
Select the SMB checkbox for Authentication.
Enter a password. You will be asked to provide this username and SMB password when mapping a network drive on the Windows Client.
If you wish to grant this user access to NFS shares as well, also check the NFS checkbox and enter a NFS UID (in the range of 1-999,999).
Note
This can only be done at the time the User is created, it cannot be changed or added later.
Editing SMB Users Password
It is possible to edit the Password of a SMB User at any time. Go to the NAS Users page and select Edit SMB Password:
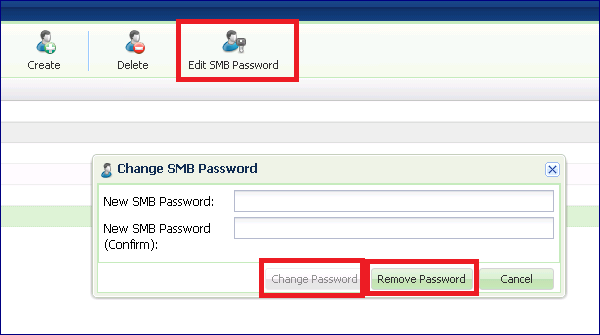
To change the SMB Password enter a new SMB Password, confirm the password and click the Change Password button.
If the User is also defined with a NFS ID you can press the Remove Password button to erase the User SMB Password.
Creating NAS Groups
You can create and view NAS Groups via the NAS Groups page.
To create a NAS Group go to and click the Create button.
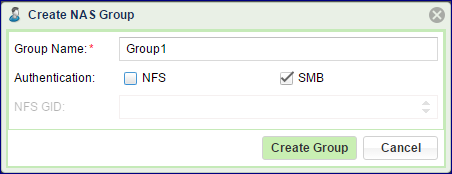
Enter a name for the NAS Group. This should match the Group name on the NFS client.
Select either NFS or SMB checkbox (or both) for Authentication.
If you are creating a NFS group also add a valid NFS Group ID (in the range of 1-999,999) that matches the Group Name and GID on your Linux Server.
Enabling Active Directory Authentication
By joining the VPSA to the Active Directory (AD), Users can use the same credentials that are stored in the AD to login to the SMB shares.
Note
Microsoft Active Directory requires the following ports for users and computers authentication:
Kerberos - 88(UDP/TCP)
Microsoft-DS - 445(UDP/TCP)
LDAP - 389(UDP/TCP)
RPC Endpoint mapper - 135(UDP/TCP)
RPC - Dynamically-assigned unless restricted, 49152-65535(TCP)
DNS - 53(UDP)
Warning
Active Directory cannot be used while the VPSA is configured to use the LDAP service. The transition from LDAP to Active Directory based authentication should be handled carefully, as existing NAS permissions may be affected.
Joining the VPSA to Active Directory
To join the VPSA to a Microsoft Active Directory Go to and click the Join button.
Enter the following information:
Active Directory Server Name
Domain Name
Domain NetBIOS Name
Administrator Name (of the AD Domain)
Administrator Password (of the AD Domain)
DNS IP - Up to three DNS servers IPs, used for domain name resolution.
Advanced options:
Active Directory UID Mapping - Use RFC2307 attributes, the UID/GID will be taken from Active Directory attributes(uidNumber, gidNumebr). In case UID mapping is required, it is required to specify the valid id range. In the case of trusted domains enabled it is required to specify the ID range for each trusted domain after joining the Active Directory and trusted domain discovery.
Allow trusted domains - allow users from a trusted domain to access SMB Volumes.
DNS Lookup realms - Indicate whether DNS TXT records should be used to determine the Kerberos realm of a host.
DNS Lookup KDC - Indicate whether DNS SRV records should be used to locate the KDCs and other servers for a realm. Once disabled, the KDC server IP should be provided manually.
Click the Submit button and then press OK to confirm the following warning message, which requests that you ensure proper permissions of files and folders created on the VPSA shares, prior to joining the AD Domain.
Note
The joining of the VPSA to the Active Directory may fail if the time on the VPSA and the Active Directory Domain Controller is out of sync by more than a few minutes. Sync the time and try again. Different time zones are not an issue.
Note
As of version 22.06-SP1, in order to avoid access issues - on top of the existing scheduled connectivity check (once in 10 minutes), in case a DC connectivity issue was detected the system will retry to establish connectivity in a 1 minute interval. After 10 attempts the VPSA AD service will be automatically restarted and in case the connectivity wasn’t restored the VPSA administrator will be notified.
Modifying an existing Active Directory connection
On an existing Active Directory connection, the following parameters can be modified:
DNS IP - Up to three DNS servers IPs, used for domain name resolution.
Advanced options:
DNS Lookup realms - Indicate whether DNS TXT records should be used to determine the Kerberos realm of a host.
DNS Lookup KDC - Indicate whether DNS SRV records should be used to locate the KDCs and other servers for a realm. Once disabled, the KDC server IP should be provided manually.
Warning
While a VPSA maintains an SMB connection, changing this setting might impact new authentication requests.
If you are considering this type of transition, contact the Zadara support team for additional information.
Changing Active Directory DNS
You can update the DNS servers associated with your Active Directory without leaving the domain. To update the DNS server Go to , Select the Domain you want to change and click the Configure button. Edit the DNS server(s) IP address(s).
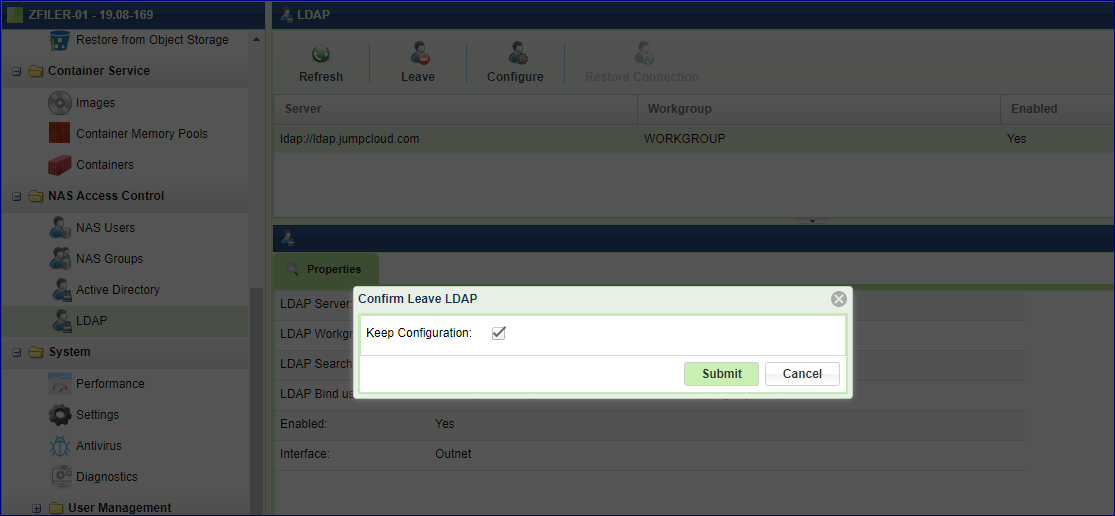
Leaving an Active Directory
To leave the Active Directory, Go to , Select the Domain you want to leave and click the Leave button (the Join and Leave button toggles depending on the current status).
Enter the Domain Administrator’s Name and Password and press Submit.
Press OK to confirm the following warning message, which requests that you ensure proper permissions of files and folders created using AD, before leaving it.
Sometimes there is a need to temporary leave the Active Directory, and re-join the domain at later time. In this case check the Keep Configuration. The domain’s details will be kept for future use.
Enabling LDAP Authentication
By integrating the VPSA with an LDAP service, NAS Users can use the same credentials that are stored in the directory service to login to SMB shares.
Starting from VPSA version 19.08, the VPSA SMB service can be configured to authenticate users against LDAP service (JumpCloud or similar).
Note
LDAP service requires port 389 for directory connectivity. The communication with the LDAP service would be done encrypted(TLS).
Warning
Using LDAP authentication cannot be used while the VPSA configured to use Active Directory, the transition from Active Directory to LDAP based authentication should be handled carefully, as existing NAS permissions may be affected. In case you are considering such transition, contact Zadara support team for additional information.
Configuring LDAP service for NAS authentication
To enable the LDAP service navigate to and click the Join button.
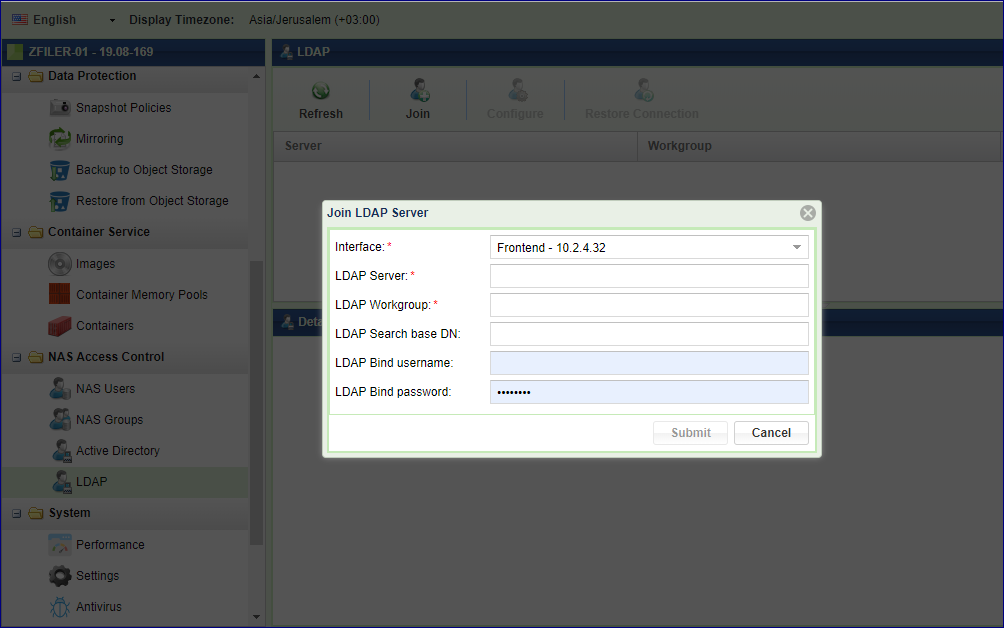
Enter the following information:
Interface - the VPSA network interface that will be used for LDAP connectivity In case of a public service (like JumpCloud), the interface selected must have a direct Internet connectivity. Select one of the following interfaces - Frontend, Public IP (if assigned to the VPSA), Outnet interface (if assigned).
LDAP Server - the directory service FQDN or IP. FQDN must be resolved by the default public DNS server. (the ldap:// prefix is mandatory).
LDAP WORKGROUP - as defined in the directory service.
LDAP Search Base - LDAP search scope DN.
LDAP Bind username - the DN for the bind user (samba service account)
LDAP Bind Password - password for the bind user (samba service account)
Note
In case of JumpCloud integration, Samba authentication should be enabled in the target directory. See https://support.zadarastorage.com/hc/en-us/articles/360036369912 for a KB article covering JumpCloud specific intergration.
Click the Submit.
Updating LDAP configuration
In case the existing configuration needs to be changed, the directory parameters can be updated directly from the VPSA GUI.
Navigate to and click the Configure button.
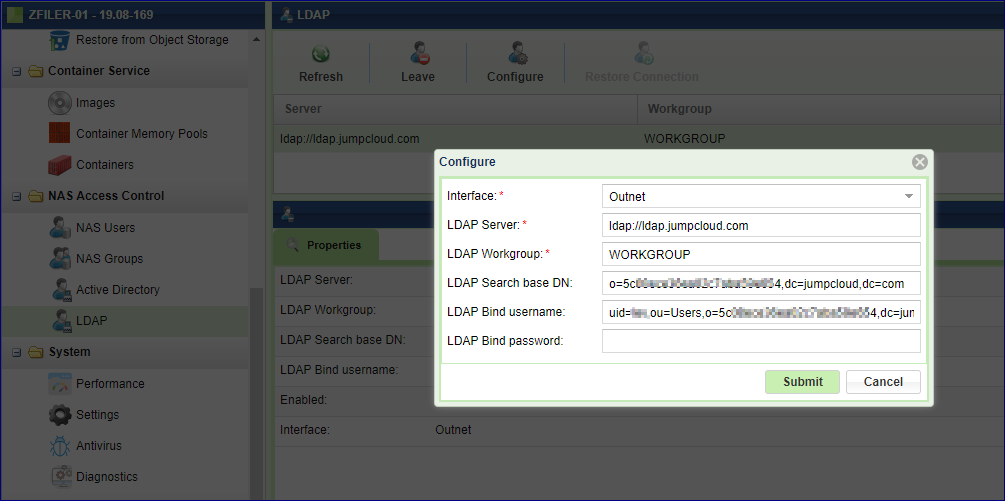
Once the configuration is submitted, the file services will be restarted in order to apply the new configuration.
Disable LDAP service SMB authentication
In case LDAP authentication is no longer needed, the LDAP authentication can be disabled from the VPSA GUI.
Navigate to and click the Leave button.
In case you intend to disable LDAP SMB authentication temporarily, you may want to keep the existing configuration for later.
You can restore the configuration by navigating to and click the Restore button.
Managing NAS Quotas
Enabling or Disabling User/Group/Project Quotas
To enable/disable Quotas on a given NAS share, open the and select the Volume on which you want to set Quotas. In the South Panel, scroll down to the User Quotas and Group Quotas lines and click the edit icon.
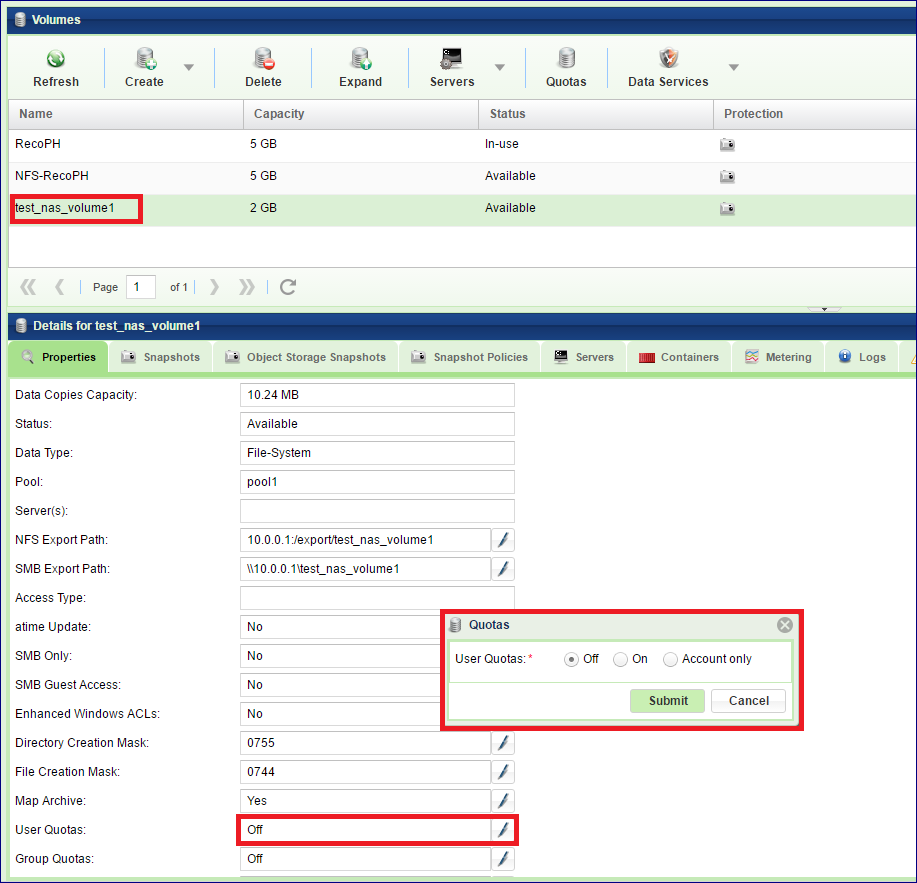
In the dialog that opens, select the Off or On option.
Note
It is not possible to change the state of Quotas (on/off) when the Volume is attached to a Server. The Volume must be detached from any Servers first.
Note
This can also be done on the Volumes tab, select the required Volume, then select Quotas. In here, select Settings > Change Quotas State. In here you can also import and export a Quotas configuration file. See below the format of the Quotas configuration file.
The same process applies for enabling Group and Project quotas.
Note
Group quotas and Project quotas cannot coexist on the same Volume.
Quotas Configuration File Format
This is a CSV file where each line sets the quota for a specific user or group.
The line syntax is the following:
type,is_user,id,usage,soft,hard,warns,name
Where:
type: 1-nfsid or 2-nasuser or 3-aduser
is_user: 0-groups or 1-users
id: uid or gid (if type=’aduser’ and id is still unknown, set to 0 and name will be translated to id
usage: 0
soft: 0
hard: hard limit in MB
warns: 0
name: AD name or NAS name
e.g.:
1,1,50001,0,0,28,0,-
3,1,2015348,0,0,24,0,ZADARA\user1
3,1,0,0,0,24,0,ZADARA\user2
Setting User/Group Quotas
To set quota limits on a given NAS Volume go to the , select the Volume where you want to set up Quotas and click Quotas

In the dialog that opens, you can set the Quotas for Users, Groups and Projects (as applicable).
If you want to define a default Quota for all Users on the selected Volume, enter the default limit and click the Update defaults button.
Automatic Users discovery:
Press the Refresh button. If this VPSA is connected to an Active Directory the system will scan the AD to find users that have data on this volume. They will all be added and given the default limit. You can edit and change the default value.
Note
Limit set to 0 (zero) means no limit.
If the VPSA is not connected to an Active Directory, a similar scan will be done against all locally defined Users.
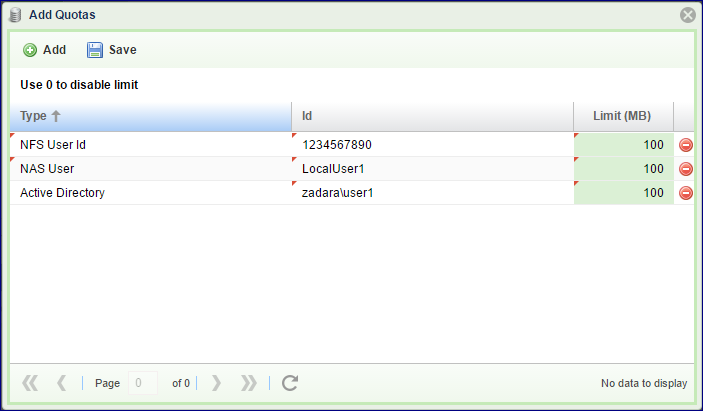
Adding User Quotas manually:
In addition, other Users can be added to the Quotas list even if they don’t currently have any files on the given volume. Click Add Quotas and then fill in the User details in the line that opens. The User ID should be entered according to the User type. There are 3 User types:
Active Directory user – the ID is the user name in this format: Domain\username
NAS user – the ID is the same name as defined in NAS Users.
NFS User – use the UID as defined in UNIX/Linux systems
Setting Groups Quotas is the same as described above for Users. Click the Groups tab and repeat the same process.
Note
For Group Quota accounting the capacity consumed by any individual user is counted against the user’s primary group
After making any additions or changes to Quota Limits, on the Quotas dialogue box press ‘Refresh’ to update the figures displayed.
Setting Project Quotas
Project Quotas are quotas set on a group of one or more folders. Setting these quotas is done in 2 steps: Defining the Projects and then setting the limits.
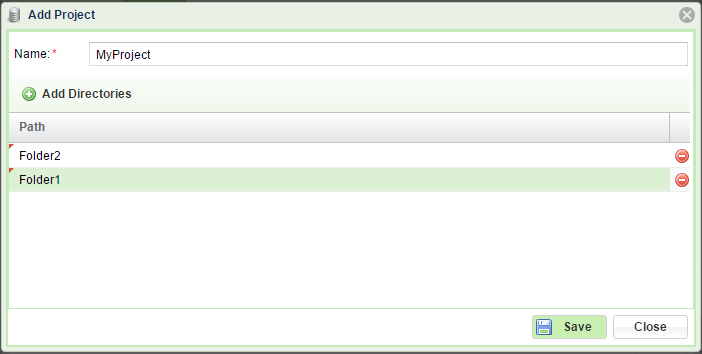
Defining Projects
To define a Project on a given NAS Volume open the page, select the Volume you want to set Quotas on and click Quotas. On the dialog that opens select the Projects and click Manage projects.
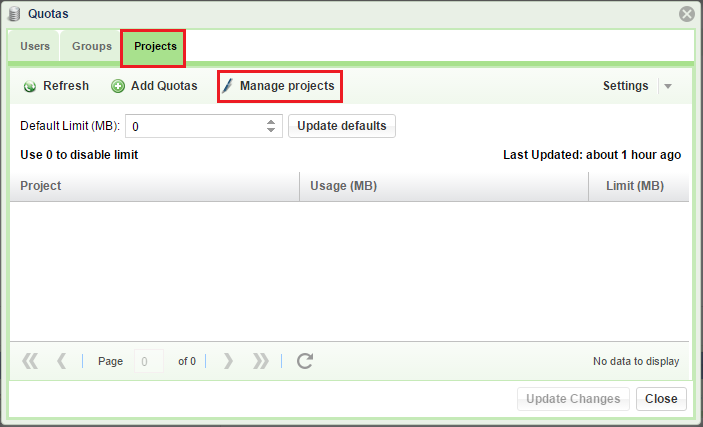
Click Add Project and add directories to this Project. When done click Save and close.
Note
The Folders must exist in the Volume, otherwise you will get an error at this point.
Setting Projects Quotas
Click Add Quotas, select the project of interest and set its quota limit. When done click Add Quotas and close.
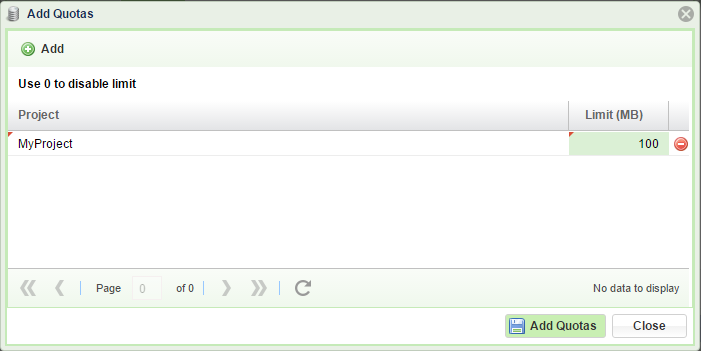
Finally, on the Quotas dialogue box, press Refresh to update the Quota Limits displayed.