VPSA Object Storage Console
VPSA Object Storage Console is a tool that gives users visibility into their Object Storage accounts for administration purposes. It is not a tool for read/write operations from/to the object storage. You can create/delete containers, view containers and list their content. You can also create and delete folders to better organized the objects, and set permissions.
When opening the Console for the first time after changing the default settings, you might get the following error message, as a result of wrong network configuration, or lack of SSL certification trust. Follow the instruction to fix the situation.

The VPSA Object Storage Console Window
The Console Window is built of the following:
Containers pane
Objects pane
Details south pane, where both properties and permissions can be found.

Note
The Accounts selector above the Containers pane is visible for the VPSA Object Storage Admin only. If you are an account admin/member your account context is well known, and there is no need to select it.
Encrypted Containers
Encryption management of Data-at-Rest (data on the Disk Drives) is applied by the Object Storage on a per-Container basis. Encrypted and unencrypted Containers can coexist in the same account.
A VPSA Object Storage generates a random 256-bit unique Encryption Key per encrypted Container and uses the Advanced Encryption Standard (AES) to encrypt and decrypt the objects data.
The Encryption Keys are stored on disk as ciphertext, using AES with a 256-bit Master Encryption Key, which is generated from a user-supplied Master Encryption Password.
The User owns the Master Encryption Password. It is never stored on any persistent media. Instead, only its SHA3 hash-sum is saved on disk for password validation.
Caution
Since the system does not keep the Master Encryption Password, you are fully responsible to retain and protect the Master Encryption Password.
During VPSA Object Storage operation, the Master Encryption Password itself is held in kernel memory of the VPSA. Core-dumping any User Mode process within the VPSA will not reveal the Master Encryption Key.
This method ensures that encrypted Data-at-Rest cannot be accessed without explicitly knowing the user-supplied Master Encryption Password, thus providing you full protection if you opt for Data-at-Rest Volume encryption.
The encryption attribute of a Container cannot be changed! If you’d like to encrypt the objects of a non-encrypted Container, or vice versa, you will need to create a new Container and copy the data.
Setting Encryption Password (VPSA Object Storage Admin)
To create a Master Encryption Password, go to the page, Security tab and press the Edit in the Encryption section. Read the instructions and warning. Type your Password and Save.
Store your Master Encryption Password in a secure place
Create Container
To create a new Container in the account open the Console, go to the Containers pane, and click Add.

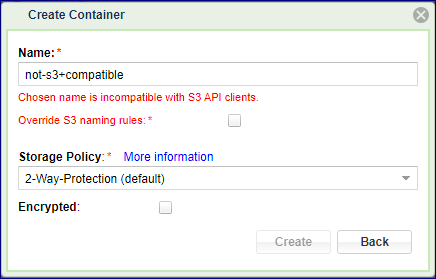
The system will prompt you for the Container’s name, and will let you select the storage Policy that will contain the newly created Container.
Warning
The VPSA Object Storage is both S3 and Swift API protocol compatible. S3 containers are expected to contain only lowercase letters, numbers, periods and dashed. The Swift API is less restrictive, container name can start with any character and contain any pattern. The container name cannot contain a slash (/) character because this character delimits the container and object name. The creation wizard will verify the proposed container name, a warning message will be displayed in case a non-s3 compatible name was chosen. This restriction can be overridden by checking the Override S3 naming rules checkbox.

The Policy that you have defined as “default” here Set default Policy (VPSA Object Storage Admin) will be automatically selected. Clicking on More information will display details about the selected policy including rates.
If you want this Container to be encrypted check the Encrypted checkbox.
Click Create.
The new container will show up in the Containers pane. See here Setting Container Permissions (Account Admin) regarding assigning permissions for the new Container.
Object Versioning
Object versioning is implemented by setting a flag on the container to tell the object storage to version all objects in the container. The value of the flag is the container where the versions are stored (commonly referred to as the “archive container”).
There are 2 types of versioning supported by the Object Storage: X-History-Location and X-Versions-Location. They differ by behavior when an Object is deleted.
Once the versioning flag is set to X-History-Location on a container, on DELETE operation the deleted Objects are moved to the Archive Container with a Deleted Marker for future restore.
Once the versioning flag is set to X-Versions-Location on a container, DELETE operation only removes the current version of the object. If any previous versions exist in the archive container, the most recent one is copied over the current version, and the copy in the archive container is deleted. As a result, if you have 5 total versions of the object, you must delete the object 5 times for that object to be removed.
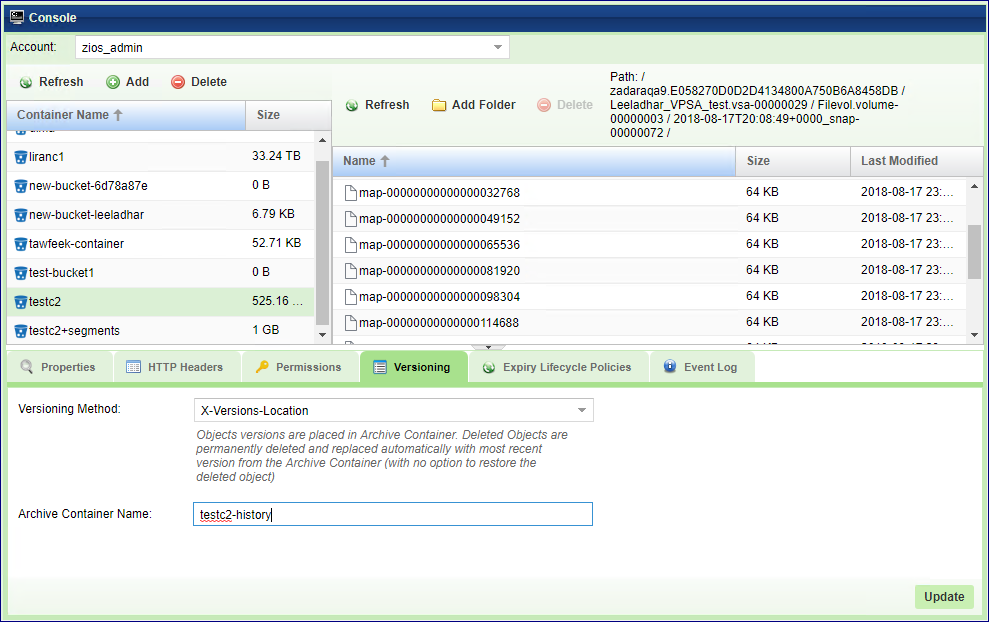
To set the versioning flag on a Container open the Console, go to the Containers pane, select the container of interest, go to the south pane, and select the HTTP Headers tab and click Add.

In the Versioning Method filed select: “X-Versions-Location” or “X-History-Location”
In the Archive Container Name field put the name of the container where you want to keep the previous versions.
Click Update
Setting Objects Lifecycle Policy
Zadara Object Storage supports retention period for objects. The period is set at the object creation time, and it will be automatically removed when expired. It is possible to set number of such policies per Container, for different types of objects.
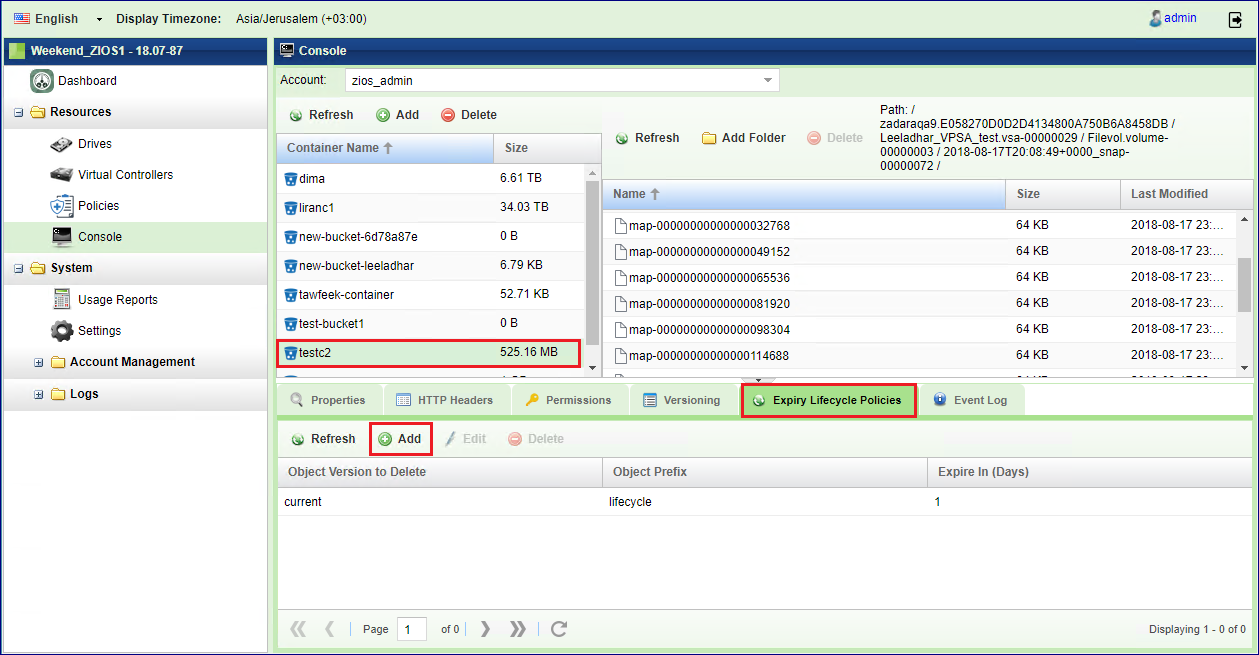
To create a new expiration policy in the account open the Console, go to the Containers pane and select the Container of interest. On the right lower hand pane click the Expiry Lifecycle Policies tab and click Add.

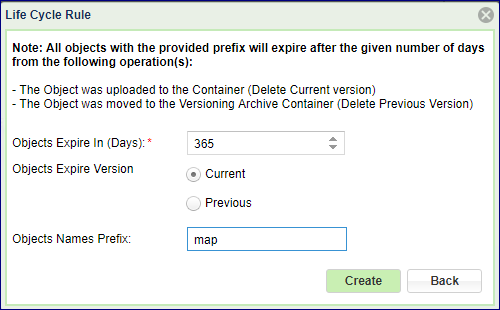
In the dialog that opens set the retention period in days, and you can add an object name prefix. If prefix is given only Objects with such names will be removed by this policy. If the field is left empty, all Objects are affected. If versioning is not enabled for this Container (See Object Versioning) the Lifecycle policy always affects the current version of the object. If versioning is enabled, you can set policies for both the current version of the object (in the current Container) and for the previous version (in the archive Container). For example, you can set policies that an object expires after 90 days, and every time the object is updated, the previous version is kept for week.
Click Create.

From now on every object that will be placed in this container will get an expiration date according to the defined policy.
You can modify the expiration date/time of an object by selecting the relevant object and clicking Edit in the Properties pane.

Lifecycle Policies can be modified by selecting the relevant policy and pressing Edit.
Lifecycle Policies can be removed by selecting the relevant policy and pressing Delete.
Note
Removing the life cycle rule, does not affect objects that were created while this rule was effective. To prevent deletion of these objects at the expiration date, you must explicitly remove the delete_at header of these objects.
Delete Containers
To remove a Container open the Console, go to the Containers pane, select the container to be deleted and click Delete. The system will prompt you for deletion confirmation. After confirming the container with all its content will be deleted.
Adding folders
By definition, containers are flat, and there is no hierarchy structure, for storing the objects. However, since many users are used to the folders tree concept of file systems, VPSA Object Storage Console gives you an option to simulate hierarchical structure within the Object Storage Containers.
To create a folder open the Console, select a Container in the Containers pane, Navigate to the hierarchy level where you want to create the new Folder, and click Add Folder. Give it a name and click Submit.

Navigation within the Container’s Folders tree is done in a way similar to the common user experience of file systems explorer. By double clicking a folder you enter it and see its content (Objects and sub Folders). By double clicking the .. at the top of the Objects pane, you navigate one level up to the parent Folder. The Path indicator above the Objects pane always show you current position in the tree.

Removing folders
To remove a folder, Navigate to its parent folder, select the folder to be removed and click Delete.

After confirmation the Folder with all its content will be deleted