How to Modify Cloud Image QCOW
Cloud images are images that are optimized to run on public clouds (EC2, OpenStack, etc). Those images are usually small – only necessary packages are installed. One of the installed packages is cloud-init. Cloudinit can be used to customize the initialization of the VM instance. Such initialization can include installation of additional packages, creation of users, configuration and more. Cloud images usually disable SSH using username/password, and allow SSH only using key-pair. To overcome this, cloudinit can be used to configure the authorized ssh keys. Since logging-in to an VM instance using username/password is usually disabled, we can’t spawn a VM instance from a cloud image in the regular way. We need to pass the authorized ssh key to cloudinit, and ssh the instance using key-pair. After connecting to the VM instance we can modify the image as we want. This guide describes the necessary steps for updating a cloud image qcow.
Requirements
ssh-keygen - will be used to generate key-pair.
genisoimage - will be used to create iso with the user-data for cloudinit.
virt-manager - will be used to spawn a VM instance from a cloud image.
Step-by-step Guide
Generate key-pair
First, we need to generate a key-pair that will be used to connect to the VM instance. This can be done using the ssh-keygen utility as follows:
ssh-keygen -m pem -f key.pem -t rsa -N ” -C ”
Create cloudinit user-data and metadata files
Next, you can use cloudinit to configure the authorized ssh key created in the previous step. To do this, create the following user-data file:
#cloud-config
ssh_authorized_keys:
ssh-rsa AAAAB3NzaC1yc2EAAAADAQABAAABAQDQAzK0lsWxn6Mrj6l60bHEjUUrKKK9KIxb+VfAtOUvx0Z95cnwlkBbx+9ilxEkHe5Mu/QE81cicpGl94Pu4ClHCOghrJ4rWIlP+A37DdIeAA8yNHFOwJHd3acRjPrO49Q76ZFiuTCRvodbq3D+0yS7g9+4aSIyRZD2rr9stFYFPl+jVDzNdVQcfpJSEO7iBXpITSK9apqJuozRr6x2vyinGCR3vwsGDUd9hwtcA3yRLzWyehURo/s/UcYNsed5jjaL5rHLT8jcVDY6f/t1k9RjqkPIp76i81L7n/pIzzLjqINAJomrUNqddWLHMSBKS43xwmdaZeSuJve6Cuizre9b
Replace the ssh key with key generated in the previous step.
You also need to supply a metadata file. A minimal metadata file to set the hostname of the VM instance, can be defined as follows:
instance-id: iid-local01
local-hostname: cloudimg
Generate iso image containing the user-data and meta-data files.
Since the image will not be run in a cloud environment, you should use the NoCloud mode for cloudinit.
In NoCloud mode, cloudinit will read the user-data file from a CDROM device (and not from the network).
genisoimage -output cidata.iso -volid cidata -joliet -rock user-data meta-data
Spawn a VM from the cloud image.
Use virt-manager to spawn the VM instance.
You should customize the configuration before the VM instance starts, and attach the VM to the default virtual network (NAT).
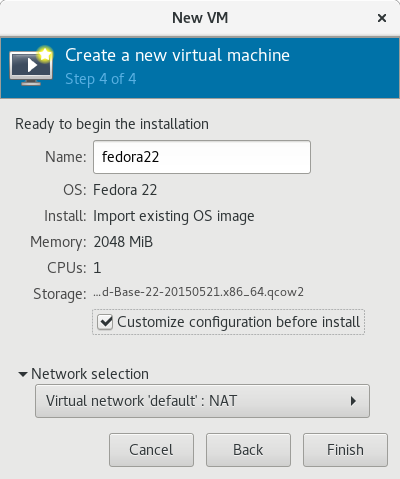
Click Finish. A custom configuration screen will open.
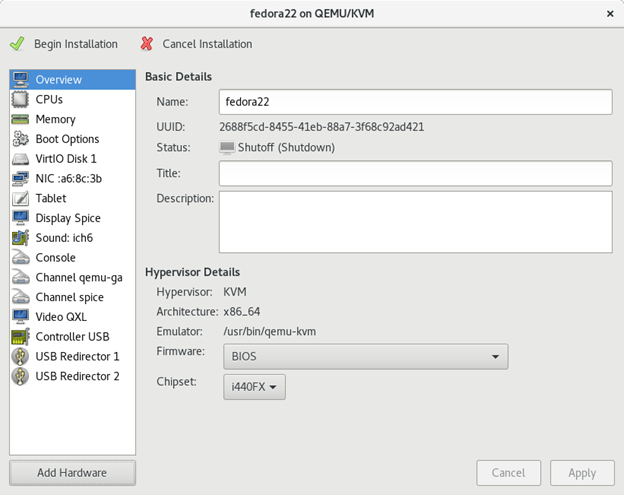
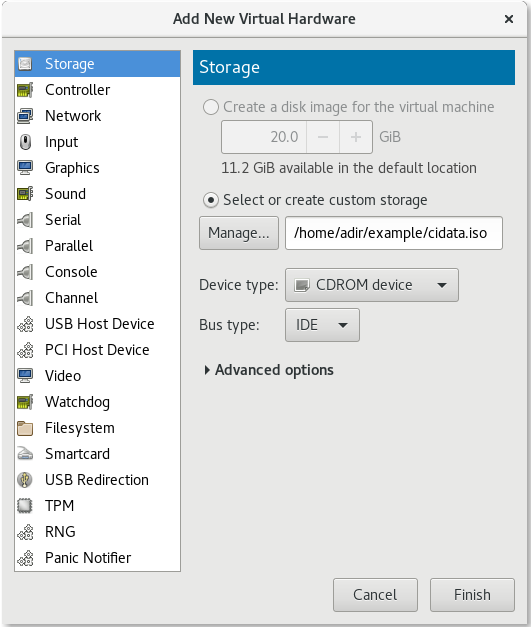
Choose Add Hardware, and add a CDROM device. You may attach the iso file created in the previous step.
You may now start the VM instance.
Connect to VM using SSH
First, you need to determine the IP address allocated to the VM instance. This may be done with the following virsh command:
sudo virsh domifaddr <vm-name>
For example, if the VM instance name is fedora22, then the command will be as follows:
sudo virsh domifaddr fedora22
And the output will be as follows:
Name    MAC address       Protocol    Address
——————————————————————————-
vnet0   52:54:00:a6:8c:3b    ipv4     192.168.122.99/24
Now you may connect to the VM instance using SSH:
ssh -i <path-to-key.pem> <username>@<ip>
Following the example above, the ssh command will be as follows:
ssh -i key.pem fedora@192.168.122.99
Modify the image
Once you connect to the VM instance, you may modify the image for the following:
Install packages.
Change configuration.
Modify directories/files.
etc.
Enable cloudinit for the next boot
Note that cloudinit won’t run in the next boot of a VM instance created from this image. In order to “reset” cloudinit and force it to run the full init process, delete cloudinit’s working directory as follows:
sudo rm -rf /var/lib/cloud/*
Shutdown the VM
Once you are satisfied with the modifications done in the previous steps, you can save all change by simply shutting down the VM instance as follows:
sudo shutdown -h 0
That’s it! Now the qcow of the cloud image contains all the desired modifications.