Initial Deployment Operations
This section describes steps used to create a VM instance with the Create VM Instance wizard. In addition, operations commonly used immediately following VM instance creation are also described.
Creating VM Instances
To create VM instances:
Navigate to the Compute > Instances view.
Click Create.
Note
Fields marked with a red asterisk are mandatory.
The Create VM Instance wizard starts including the following four tabs: Compute, Storage, Networking, Config.
Compute - defines the VM instances, their type, activation and quantity.
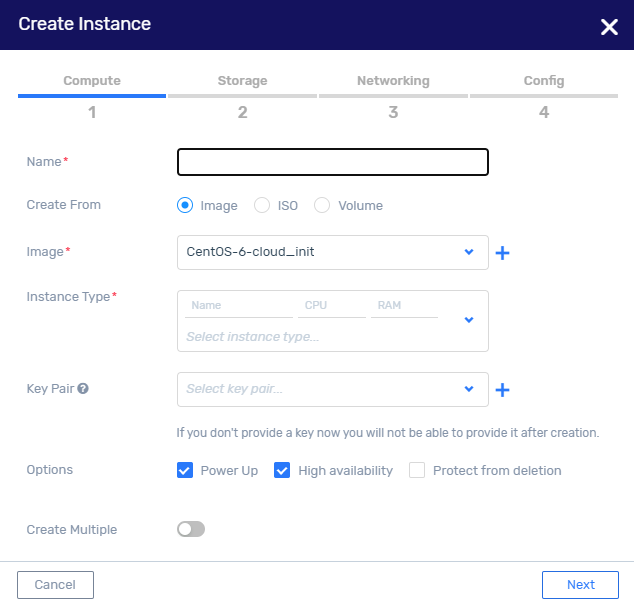
In the Compute tab, configure:
Name - the display name for the VM instance.
Create From - the source of the new VM instance. When you select one of the source options, the next field is updated as follows:
Image - select an image from available list. See Image Creation to create new image.
ISO - select Installation ISO from available list.
Volume - select Boot Volume from available list.
Instance Type - defines the amount of compute resource of the VM instance (CPU and RAM).
Key Pair - set of security credentials for ensuring the identity of the user connecting to the VM instance. Select existing key pair from pull down list or see Create New Key Pair to generate or upload a new key.
Options:
Power Up - launches the VM instance post creation.
High Availability - ensures the VM instance is restarted in case of failure.
Protect from deletion - protects the VM instance from accidental deletion.
Create Multiple - drag the button to the right to create multiple VM instances.
Click Next.
Storage - defines the storage requirements for the new VM instance.
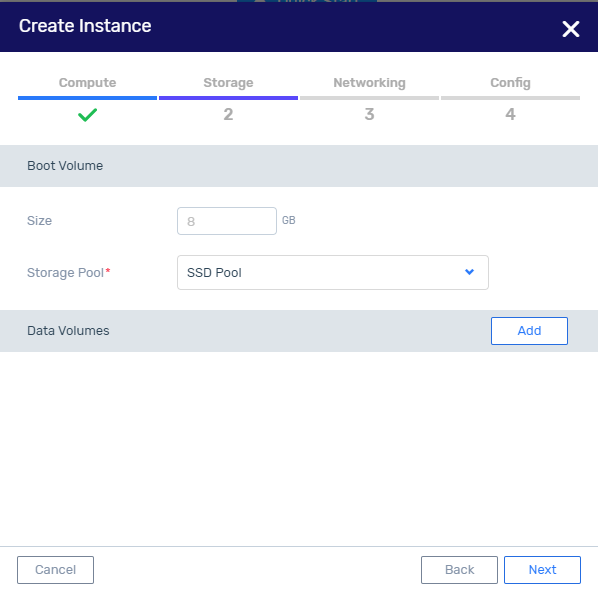
In the Storage tab, configure:
Boot Volume - disk size (GB) and storage pool that will be used for the boot volume of the VM instance.
Data Volumes (optional) - add new or existing data volumes. To add a new volume, click Add and + and configure the following:
Name - volume name.
Description - description of volume.
Storage Pool - storage pool for the volume.
Size - volume size (GB).
Protection Group - protection group for the volume.
Click Next.
Networking - defines the networking requirements for the new VM instance. For each VM instance, at least one network (Network 0) must be defined. Other networks can also be added to the VM instance by clicking Add.
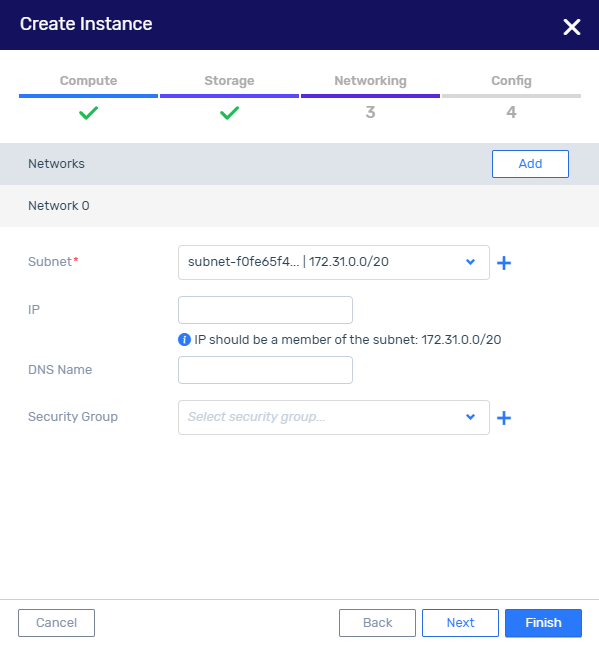
For each network configure:
Subnet - subnet used for VM instance connectivity. Select from the existing list of subnets or create a new subnet.
IP - IP address for the interface. The IP must be within the entered subnet.
DNS Name - DNS name for the new instance.
Security Group - security group that will be used to limit/allow connectivity to the VM instance.
Note
If a security group is not specified, a port is associated with a default security group. The default security group allows both ingress and egress traffic. Security rules can be added to the default security group to change the traffic behavior.
Important
The MTU size for VM Instances with a Windows OS that use VxLAN-based networks, must not be greater than 1450.
Click Next.
Config - allows configuration of optional settings for the new VM instance.

In the Config tab, enter the following:
Cloud-init - drag and drop a cloud-init file to be used to initialize the VM instance post creation.
Tags - select an existing tag or create a new tag.
Metadata - key-value set for additional metadata configuration.
Click Finish to end the create instance wizard.
Starting VM Instances
To start a VM instance:
In the Compute > Instances view, select the VM instance to run.
Click Start.
The status on the selected VM Instance changes to Spawning, and VM started appears. The selected VM instance is automatically placed on one of the nodes in the cluster and starts running, and its status changes to Active.
Connecting to a VM Instance
Connect and access a VM instance in Active state by using VNC.
To connect to a VM instance:
In the Compute > Instances view, select the VM instance to which to connect.
Click Connect.
In the displayed VM instance, click Send Ctrl-Alt-Del.
The VNC window is displayed.
Attach Floating IP to a VM Instance
If a floating IP is required, add it to the VM instance after creation as follows:
Navigate to Compute > Instances.
Select the desired VM instance from the displayed list to open the detailed view.
Click the Floating IPs tab.
Click Attach and select a floating IP from the list.
Secure SSH Access to a VM Instance
To connect via SSH to a VM instance, enter the following:
$ ssh -i <private_key_file> <default_username_for_image>@<floating_ip>
Example:
$ ssh -i id_rsa fedora@192.237.248.66
In the above example, the private key file is id_rsa, the default
username for the image is fedora and the floating IP is 192.237.248.66.
Creating Snapshots of VM Instances
To create a VM instance snapshot:
Navigate to the Compute> Instances view.
From the displayed list, select the VM instance for which the snapshot is to be created and click More.
In the More menu, select Snapshot.
In the displayed Create Snapshot window, enter a name for the new snapshot or accept the default name consisting of the original VM instance name and the date-time stamp of the snapshot creation.
(Optional) Enter the description of the snapshot.
Click OK. A new snapshot is created. It is displayed in the Compute > Snapshots view.
Protecting VM Instances
After creating a VM instance, protect it by assigning it to a Protection Group.
Protecting VM Instances via the Zadara Cloud Services GUI
Navigate to the Compute > Instances view.
From the displayed list, select the VM instance to protect and click More.
In the More menu, click Protect.
In the Protect Resource window, select a protection group from the dispalyed list and click OK.
In the Compute > Instances view, the protection column will be checked for the VM instance.
Note
This window can also be used to remove a protection group from a VM instance.
Protecting VM Instances via the Zadara Cloud Services CLI
To protect a VM instance resource, assign it to a protection group as shown in the example below for ‘VM-1’ assigned to Protection_Group-1’.
Note
The resource and the protection group must belong to the same project.
Retrieve the ID of the VM instance,’VM-1’, together with its project_id.
Zadara @ cloud_admin/default > `vm list -m columns='^id|^name|^project_id'`

+--------------------------------------+------+----------------------------------+
| id                                   | name | project_id                       |
+======================================+======+==================================+
| c4d017cf-04f4-4f85-9e21-1d067e1d384e | VM-1 | 08459aa189e849d0a47ddd985db594bd |
+--------------------------------------+------+----------------------------------+
Retrieve the ID of the protection group, Protection-Group-1, together with its project_id.
Zadara @ cloud_admin/default > *\ `protection groups list -m columns='^id|^name|^project_id'`Verify that the VM instance and protection group belong to the same project.
Protect the VM instance VM-1 by assigning it to the protection group Protection_Group-1.
Zadara @ cloud_admin/default > protection memberships create  0d6df1eb-0e3b-4b59-9669-ed620b6ad65d instance c4d017cf-04f4-4f85-9e21-1d067e1d384e

=============== ==========================================
Field           Value
=============== ==========================================
| id            | ff25527a-7b08-4b76-bbc7-b5715f9182c0
| account_id    | default
| created_at    | 2019-02-06T08:36:01.401731
| group_id      | **0d6df1eb-0e3b-4b59-9669-ed620b6ad65d**
| project_id    | 6666cfcf840f4a788cecfa6a3a00b2ee
| resource_id   | **c4d017cf-04f4-4f85-9e21-1d067e1d384e**
| resource_type | instance
| triggered_at  | none
| user_id       | admin
=============== ==========================================
The VM instance, ‘VM-1’ will now be protected according to the local backup schedule found in the protection group, ‘Protection-Group-1’.
Common VM Instance Management Operations
After a VM instance has been created, various operations allow you to stop, modify, or delete it.
Stop a VM Instance
To stop a VM instance:
Navigate to the Compute > Instances view.
From the displayed list, select a VM instance.
In top toolbar, click Stop.
The VM instance will stop, and its status will change from Active to Shutoff.
Modify a VM Instance
Modification of size and other parameters associated with a VM instance can only be done when the VM instance is in shutoff state.
To modify a VM instance:
Navigate to the Compute > Instances view.
From the displayed list, select the VM instance to be modified. If not already in shutoff state, click Stop.
In top toolbar, click Modify.
In the Modify VM window displayed, you can modify the following:
VM Instance Size
Firmware Type
Operating System
Deleting VM Instances
A VM instance may only be deleted in Shutoff status.
To delete a VM instance:
Navigate to the Compute > Instances view.
From the displayed list, select the VM instance to be deleted. The selected VM instance details appear at the bottom of the window.
If the VM instance is running, click Stop.
In top toolbar, click Delete.
The following appears: Are you sure you want to delete the VM?. Click OK.
Managing Networks for a VM Instance
VM instances cannot be created without a network, but networking changes can be made after creation. One network can be attached to numerous VM instances, and one VM instance can be attached to numerous networks.
Attaching Networks to VM Instances
Navigate to the Networking > Networks Interfaces view.
From the displayed list, select a network.
In the top toolbar, click Attach.
The Attach Network window is displayed with the VM instance list.
Select the VM instance to which the network should be attached and click OK.
The selected VM instance is now attached to this network, in addition to the network to which it was attached during creation.
Detaching Networks from VM Instances
Before detaching a network from a running VM instance, it is recommended to stop the instance. The network can be detached using the Networking view or Compute view.
To detach network using the Networking view:
Navigate to the Networking > Networks Interfaces view.
From the displayed list, select a network.
In the Networks view, select the VMs tab and then click Detach. The Network is detached from the current VM.
To detach network using the Compute GUI:
Navigate to the Compute > Instance view.
From the displayed list, select the VM instance to be detach from a network.
In the Actions menu, select Detach. The VM instances will be detached from the network.
Adding Storage to VM Instances
During VM instance creation, volumes can be attached to a VM instance. If additional storage is required after VM instance creation, new volumes can be created and attached to the VM instance, or the boot volume size may be extended.
Create New Volumes
To create a new volume:
Navigate to the Storage > Block Storage view.
Click +.
In the Create Volume window, enter volume name, description, storage pool, size, and protection group.
Click OK.
Adding Volumes
To attach an additional volume to a VM instance:
Navigate to the Storage > Block Storage view.
From the diplayed volume list, select the volume to attach to a VM instance.
In the top toolbar, click Attach. The Attach icon is available only for unmapped volumes.
In the Attach Volume window, select the VM instance to which the volume should be attached.
Click OK.
The VM instance must now be stopped and restarted. To stop the VM instance, navigate to Compute > Instances. Select the VM instance to be stopped and click Stop in the top toolbar.
Once the VM instance is stopped, click Start.
Note
A maximum of 24 volumes can be attached to an instance.
Extend the size of the volume
The size of an existing volume can be extended after creation whether or not it is attached to a VM instance. This can be performed using either the GUI or CLI.
Using the GUI
Navigate to the Storage > Block Storage view.
From the displayed list, select the name of the volume to extend.
In the More menu, click Extend.
In the Extend Volume window, specify the new size of the volume in GB. Note: The size cannot be decreased.
Click OK. The volume will be extended to its new size.
Using the CLI
If the volume is not attached to a VM instance, it may be extended to a new size greater than te previous size by entering the following:
volume extend volume_id size
If the volume is attached to a VM instance, use the ‘vm resize’ command, as follows:
vm resize vm_id [--volume-id VOLUME_ID] [--disk-size DISK_SIZE]
If the volume is attached to a VM instance, there is no need to stop and restart the VM instance after extension. Nevertheless, depending on the software application running on the VM instance, user action such as resizing partitions, logical volumes, and/or file systems may be necessary before the new capacity can be used.
Associating Security Groups with VM Instances
Security Groups can be associated with a VM instance after creation, in addition to the association included in the Create VM Instance wizard.
To associate a security group with a VM instance after creation:
Navigate to the Compute > Instances view.
From the displayed list, select a VM instance.
Click More > Attach > Security Group.
In the Attach Security Groups window, select the desired security group from the pull down list.
Click OK. The VM instance is now associated with the selected security group.
Recovering Windows VM Instances
If storage or network drivers do not inject properly for a Windows-based VM instance which was imported from VMware or Hyper-V, the VM instance will not start properly (it will start in a blue screen). When this happens, the VM instance must first be recovered.
To recover a Windows VM Instance:
Navigate to the Compute > Instances view.
From the displayed list, select the VM instance to be recovered.
Click More > Recovery Mode.
Click OK in the VM Recovery confirmation window.
The storage and network drivers will be installed on the VM instance.
Click Start to restart the VM instance.