Managing Servers
Servers Objects in the VPSA represent Cloud Servers that consume VPSA Volumes. A Server needs to be properly defined and connected in order to access the VPSA Volumes via iSCSI, FC, NFS or SMB/CIFS protocols.
Adding a Server
Establishing a connection between a Server and the VPSA involves the following steps:
Creating a Server Object in the VPSA database.
Setting the Server IQN for iSCSI connectivity and/or Servers FC Connectivity and/or the server IP address for NFS/SMB connectivity.
Establishing CHAP authentication handshake between the Server and the VPSA for iSCSI.
Registering Server OS information (optional).
Adding a Server for NAS access
Adding servers to the VPSA in order to access files over NFS/SMB requires introducing the server’s IP address to the VPSA.
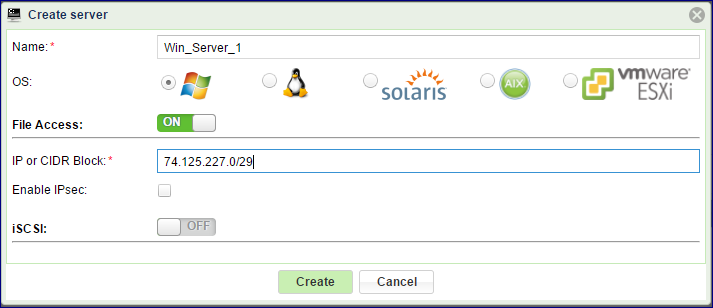
Go to Servers > Add and select Manual:
On the Create Server dialog give the server a name
Note
Objects names can be up to 128 chars long and can contain letters and digits, dashes “-” and underscores “_”
Select the server’s Operating System (optional)
Turn on File Access
Provide the IP address
Note
You can add a single server object to the VPSA representing an IP Network Range rather than adding each Server in the range separately. This is especially useful when attaching SMB/NFS shares to large number of servers in a subnet. Use the manual procedure shown below to add this type of Server while specifying the IP range in CIDR notation (e.g. 192.168.1.1/24)
If you want to secure the IP connectivity with an IPsec tunneling check select the Enable IPsec checkbox. Please note that your Server must be properly configured to utilize IPsec, and that performance is impacted.
An alternative to IPSec tunneling is SMB Encrypt that works for Windows servers that support it. SMB Encryption provides end-to-end encryption of SMB data and protects data from eavesdropping occurrences on untrusted networks. It has no requirements for Internet Protocol security (IPsec tunneling) and is much easier to configure. SMB Encryption can be configured on a per share basis. No setting is required on the VPSA. Just enable SMB Encryption on the Windows Server.
Note
iSCSI or Fiber Channel are not required for a NFS/SMB connection so these settings can be left OFF.
Note
The VPSA NAS services will require the following ports and protocols to be accessible from the servers to the VPSA:
NFS - 111(UDP/TCP), 2049(UDP/TCP), 3000(UDP/TCP), 4000(UDP/TCP), 4001 (UDP/TCP), 4045(UDP/TCP).
SMB - 137(UDP), 138(UDP), 139(TCP), 445(TCP).
To add a server for block storage access follow the procedure shown below:
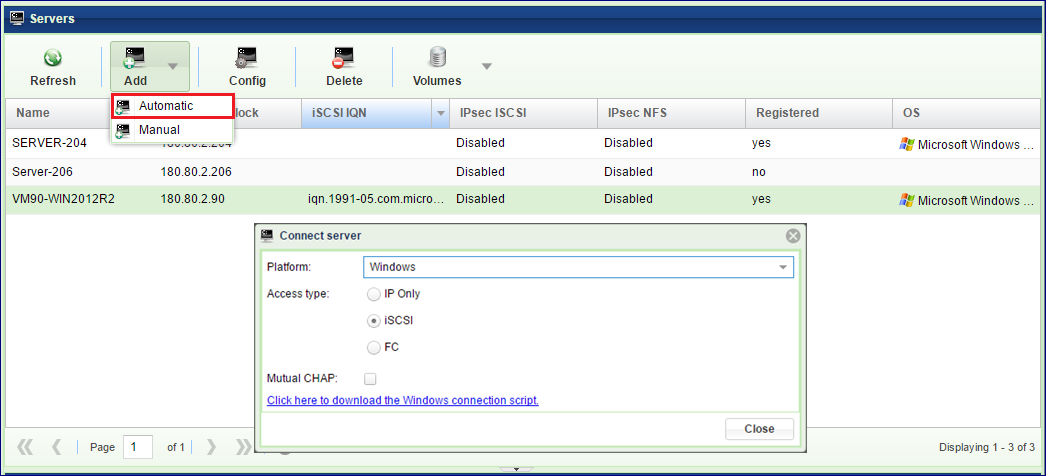
Adding a Server automatically
The VPSA automates the above steps for you via the “Connect Server” script. Go to and select Automatic:
Adding a Server automatically over iSCSI
To Add a Windows Server:
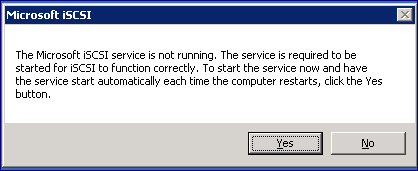
The first time you connect an iSCSI Volume to a Windows Server, you need to start the iSCSI service on the Windows Server before running the VPSA connect script.
In Windows Start->Run dialog, type iSCSI and select the “iSCSI Initiator” program. You will be prompted to start the service. Press Yes to confirm:
Open the VPSA GUI on the Windows Server
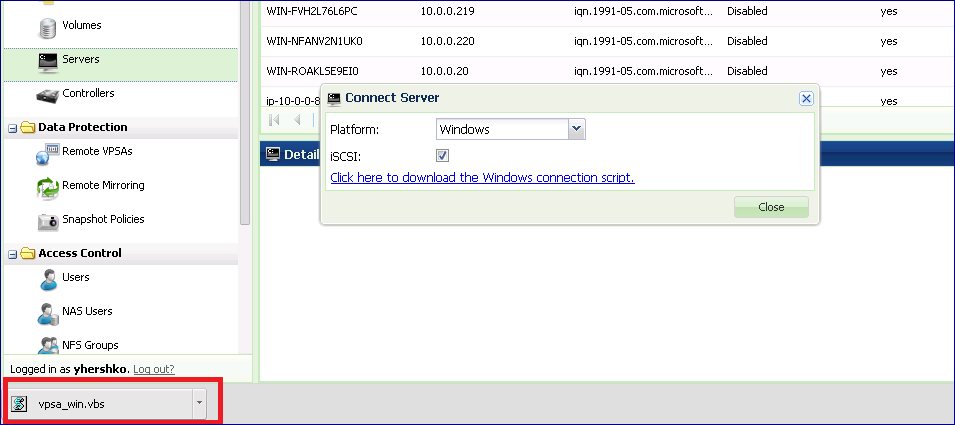
On the dialog, select platform: Windows.
Select the iSCSI checkbox if you wish to expose VPSA Block Volumes to this Server via iSCSI.
Click the download link to download the connect script from the VPSA to your Server.
Depending on your browser, locate the downloaded script, open and run it. The below screenshots are using the Chrome browser.
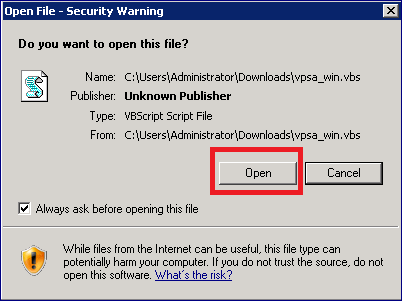
Once the connect script successfully completes, the new connected Server will be listed in the VPSA Servers page with status = “Active” Registered = “Yes” and the correct OS details.
To Add a Linux Server:
Verify that open-iscsi is installed on the Server:
On RedHat Servers do:
$ yum install iscsi-initiator-utils
On Ubuntu Servers do:
$ sudo apt-get update
$ sudo apt-get install open-iscsi open-iscsi-utils
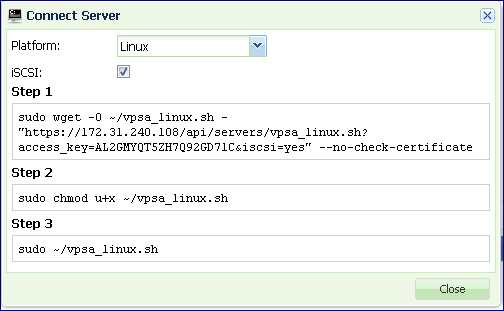
On the dialog, select platform: Linux.
Select the iSCSI checkbox if you wish to expose VPSA Block Volumes to this Server.
Run the three steps as detailed in the connect server dialog to execute the vpsa_linux.sh script.
Once the connect script completes successfully, the new connected Server will be listed in the page with status = “Active” Registered = “Yes” and the correct OS details.
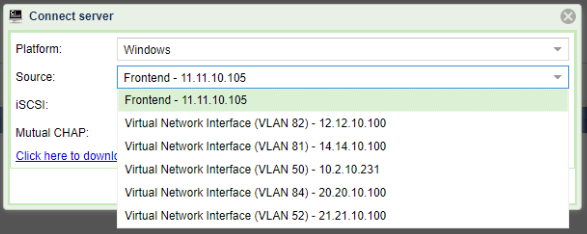
Multiple Virtual Networks:
If the VPSA has more than one Virtual Network assigned, the server can be assigned to it over any of them. Servers can be added using any VNI, automatic server registration in the presence of VNIs shows drop down list of available VNIs for you to select:
Adding a Server automatically over Fibre Channel
Before defining a server using FC connectivity, make sure to install and configure multipathing software on the server. Also make sure to setup the zoning on the FC switch to allow connectivity between the connecting server and the VPSA FC ports.
To Add a Windows Server:
The first step is to configure MPIO. Open the Windows MPIO dialog:
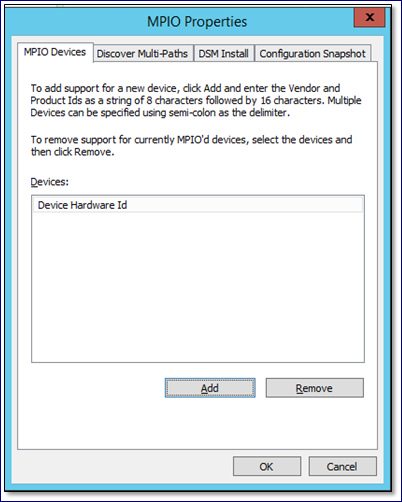
Enter the device HW ID as follows: “Zadara VPSA ” (“Zadara” followed by 2 blank spaces, and then “VPSA” followed by 4 blank spaces. 16 characters total) and press OK.
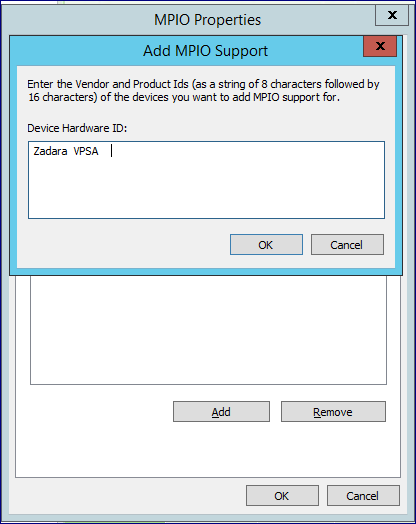
Note
Adding MPIO requires Windows server to reboot before you can proceed.
Open the VPSA GUI on the Windows Server
On the dialog, select FC access type and download the connection script
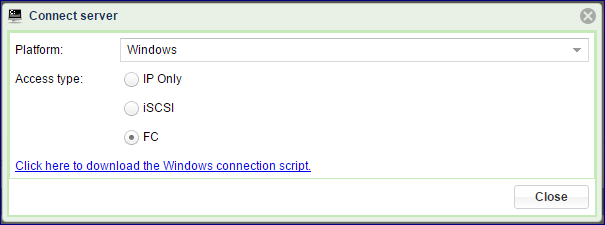
Run the script as described above in Adding a Server automatically over iSCSI.
To Add a Linux Server:
To add Linux Server over FC you need to set up the multipathing on the server. For detailed instructions follow this KB article:
Note
This change requires a restart of the MPIO service
On the VPSA GUI goto the dialog, select FC access type and download the connection script.
Run the three steps as detailed in the dialog to execute the vpsa_linux.sh script.
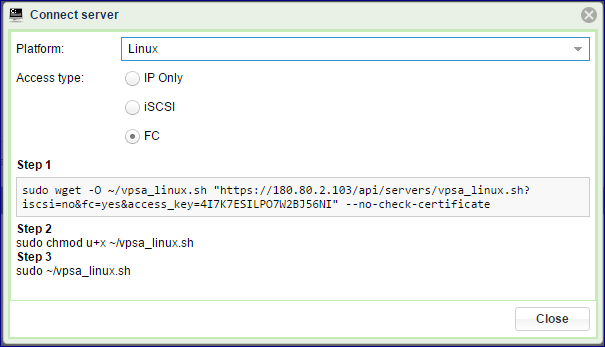
Once the connect script completes successfully, the new connected Server will be listed in the VPSA Servers page with status = “Active” Registered = “Yes” and the correct OS details.
Adding a Server manually
Establishing an iSCSI connection
If for some reason adding a server automatically doesn’t work, follow these steps to add the server manually. Go to and select Manual:
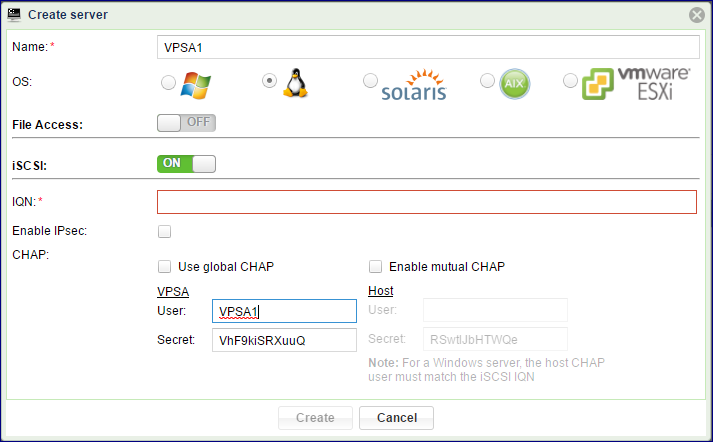
Enter the Server Name.
Note
Objects names can be up to 128 chars long and can contain letters and digits, dashes “-” and underscores “_”
Select the server OS
Enter the server iSCSI IQN
Check the “Enable IPSec” checkbox if you wish to secure iSCSI traffic between the Server and the VPSA. Please note that your Server must be properly configured to utilize IPsec and that performance is impacted.
To enable CHAP, select between global CHAP (for the VPSA) or per host.
Provide the CHAP user name and password (secret). Global CHAP parameters can be copied from here Viewing Controller Properties
After manually adding a Server you need to establish an iSCSI connection between the Server and the VPSA. Please note that you can skip this step if the Server was added automatically or if the Server is only consuming NFS/SMB type Volumes.
On Windows Servers:
Open iSCSI Initiator: In Windows Start->Run dialog, type iSCSI and select the “iSCSI Initiator” program. If this is the first time you have run iSCSI initiator on this Server you will be prompted to start the service. Press Yes to confirm.
The Windows iSCSI Initiator Properties dialog box will open, and the Targets tab will be displayed.
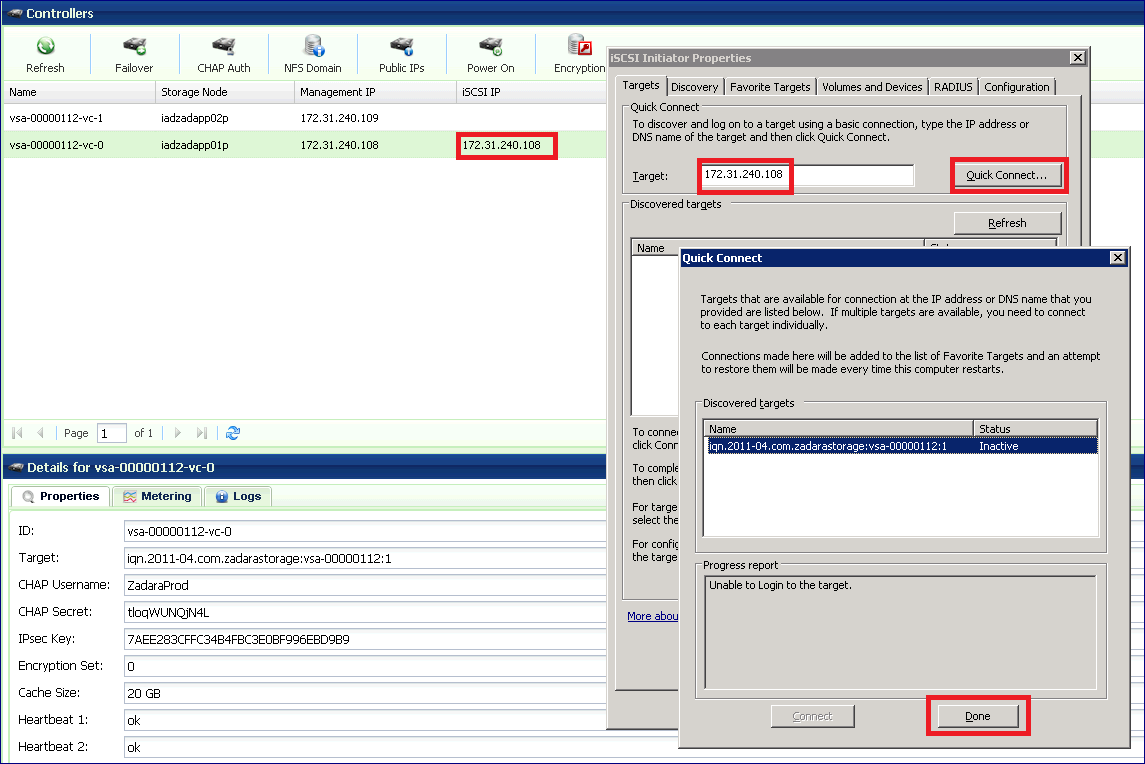
On the Targets tab, type the iSCSI IP address of the VPSA (which is displayed in the page) in the Quick Connect target text box and then click the Quick Connect… button.
The Quick Connect dialog box will be displayed, with the VPSA discovered iSCSI target in an “Inactive” status. Press Done.
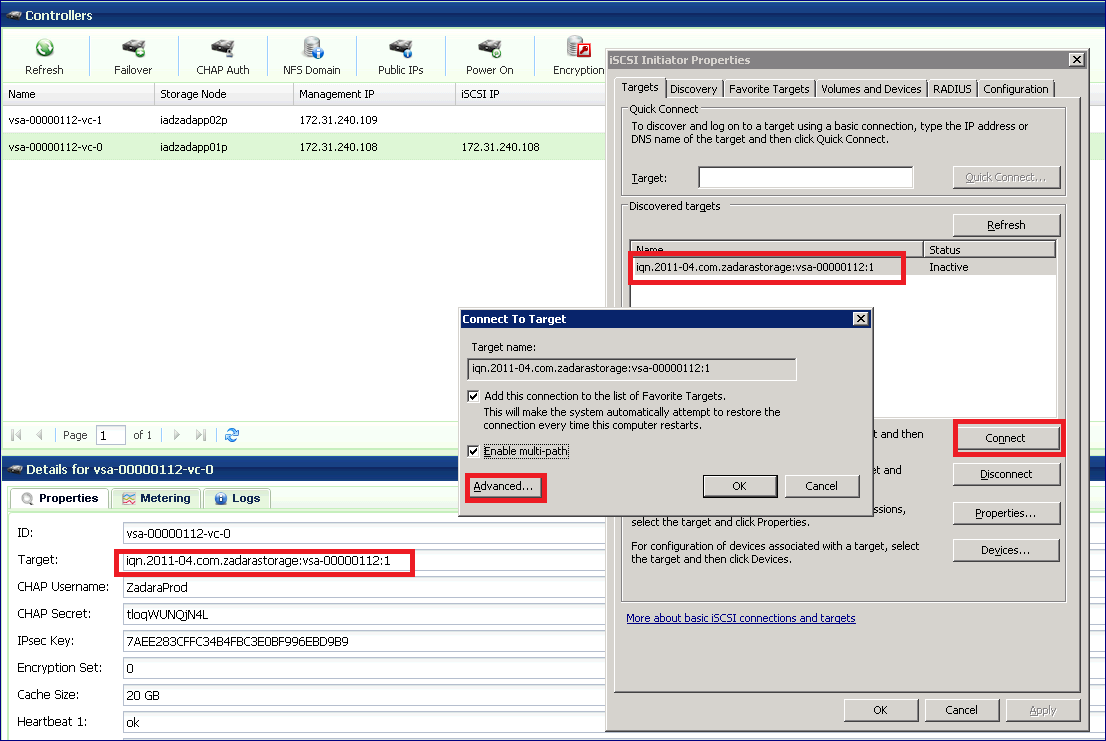
To activate the connection, select the VPSA target and press the Connect button. Please note that if you have multiple targets listed you can identify the VPSA target by its IQN name which is in the form of “iqn.2011-04.com.zadarastorage:vsa-xxxx” and is displayed in the Controller properties page in the VPSA GUI.
You may check the Enable multi-path check-box if you wish to use MPIO multi-pathing. Then, click Advanced…
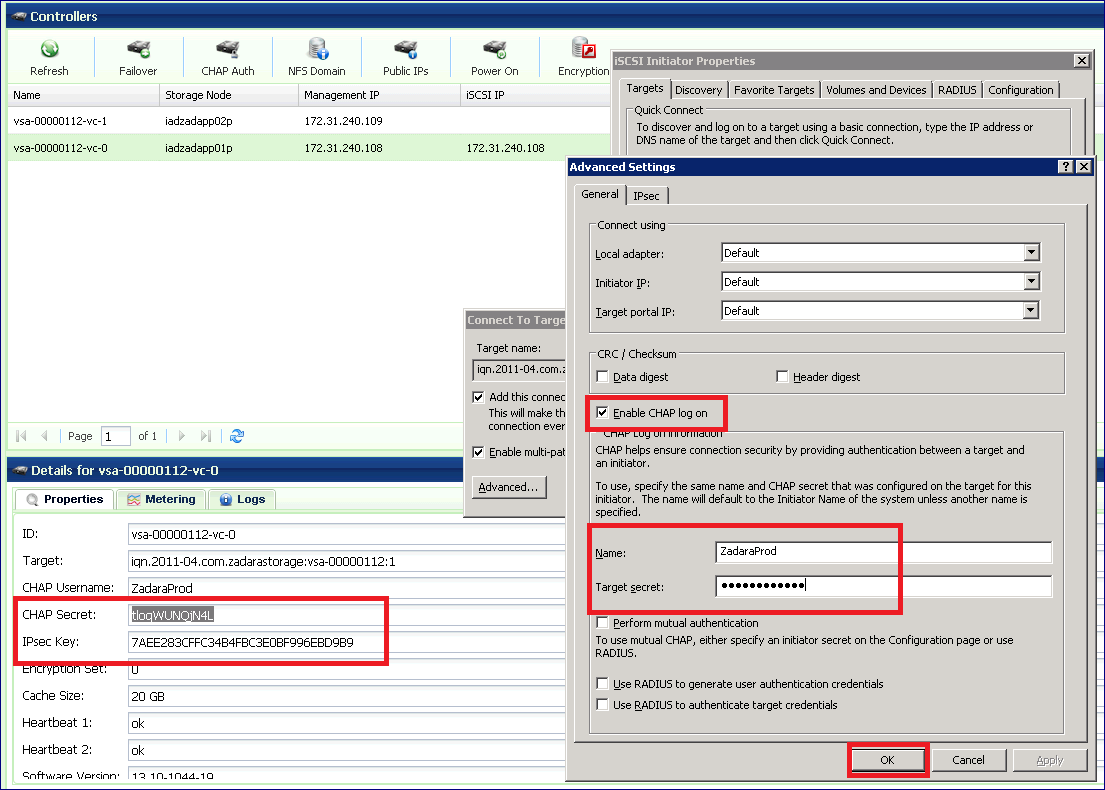
Check the Enable CHAP log-on check-box and enter the CHAP Username: and Target Secret. You can retrieve those values from the VPSA GUI, under the page, in the properties tab. Press OK to confirm the operation.
In the Targets tab you’ll see that the VPSA iSCSI target has moved from “Inactive” to “Connected” status. A new Server is created automatically in the VPSA and is displayed in the Servers GUI page. The name of the server is its iSCSI initiator IQN. You may change the Server Display Name.
Note
To achieve best performance it is recommended to use multiple sessions & MPIO. To enable MPIO please follow the instructions at
On Linux Servers:
Locate the VPSA iSCSI IP address and the CHAP Username and Password in the VPSA GUI Controller Properties Page:
Run the following commands to issue an iSCSI login using CHAP credentials:
$ iscsiadm -m node -T <VPSA-Target-IQN> -p <VPSA-Management-IP> --op new
$ iscsiadm -m node -T <VPSA-Target-IQN> -p <VPSA-Management-IP> --op update -n node.session.auth.authmethod -v CHAP
$ iscsiadm -m node -T <VPSA-Target-IQN> -p <VPSA-Management-IP> --op update -n node.session.auth.username -v <CHAP-username>
$ iscsiadm -m node -T <VPSA-Target-IQN> -p <VPSA-Management-IP> --op update -n node.session.auth.password -v <CHAP-secret>
$ iscsiadm -m node -T <VPSA-Target-IQN> -p <VPSA-Management-IP> --login
Where:
VPSA-Target-IQN – Target IQN of the VPA. Can be found in the page, Properties South Panel, Target parameter. It is of this format:
iqn.2011-04.com.zadarastorage:vsa-000009e5:1
VPSA-Management-IP - The iSCSI IP of your VPSA. Can be found in the page, under the iSCSI IP column.
To ensure automatic login of your Server to the VPSA after each reboot (or iscsid restart), run the following command on your Linux Server:
$ iscsiadm -m node -T <VPSA-Target-IQN> -p <VPSA-Management-IP> --op update -n node.startup -v automatic
Note
To achieve best performance, it is recommended to use multiple sessions & MPIO. To enable multi-sessions and MPIO, please follow the instructions at: http://support.zadarastorage.com/entries/21664397-How-To-setup-Multiple-iSCSI-sessions-and-MultiPath-on-your-Linux-Cloud-Server
On VMware ESX Servers:
On VMware ESX use the native multipathing. No special configuration is required.
Establishing FC connection
To add Servers (of any OS) connecting to the VPSA over Fibre Channel: Go to and select Manual:
Enter the Server Name.
Note
Objects names can be up to 128 chars long and can contain letters and digits, dashes “-” and underscores “_”
Select the server OS
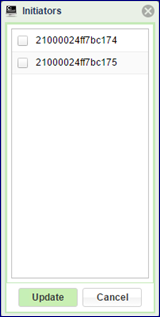
Turn on the FC connectivity:
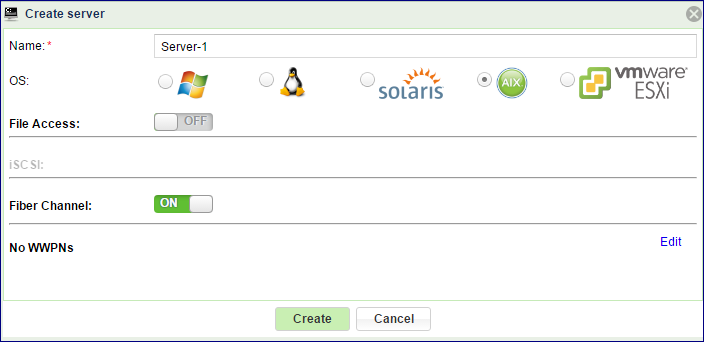
Click Edit and select the WWPN of your chosen Server
Before defining a Server using FC connectivity, make sure to install and configure multipathing software on the Server.
For Windows, Linux and ESX servers:
follow the instructions listed above Adding a Server automatically over Fibre Channel.
For Solaris server:
While on Solaris x86 multipath is a default, on SPARC servers it must be configured using:
bash-3.2# stmsboot -e
Note
A reboot is needed after issuing the command.
Multipathing parameters should be set in the following configuration file: /kernel/drv/scsi_vhci.con:
#load-balance="round-robin";
load-balance="none";
#
auto-failback="disable";
#
# For enabling MPxIO support for 3rd party symmetric device need an
# entry similar to following in this file. Just replace the "SUN     SENA"
# part with the Vendor ID/Product ID for the device, exactly as reported by
# Inquiry cmd.
#
device-type-scsi-options-list =
"Zadara  VPSA    ", "f_tpgs";
# Tunable for updating path states after a UNIT ATTENTION reset.
# There are arrays which do not queue UAs during resets
# after an implicit failover. For such arrays, we need to
# update the path states after any type of UA resets, since
# UA resets take higher precedence among other UNIT ATTENTION
# conditions. By default, scsi_vhci does not update path states
# on UA resets. To make scsi_vhci do that for such arrays, you need
# to set the tunable scsi-vhci-update-pathstate-on-reset to "yes"
# for the VID/PID combination as described below.
#
#       "012345670123456789012345",     "yes" or "no"
#       "|-VID--||-----PID------|",
#
scsi-vhci-update-pathstate-on-reset =
     "Zadara  VPSA    ",     "yes";
For AIX server:
For AIX server to connect to VPSA volumes using multipathing Veritas Dynamic Multi-Pathing (DMP) is required. Install DMP on the AIX server.
ODM Package (Zadara.aix.fcp.nonmpio.rte.1.0.0.0.bff) should be installed (to set the storage prameters to the OS) by running the following command:
# installp -ad <package_folder> -e <log_folder)/Zadara.aix.fcp.nonmpio.rte.
Note
After ODM installation you must reboot the AIX server.
Also make sure to setup the zoning on the FC switch to allow connectivity between the connecting Server and the VPSA FC ports.
Configure Server Attributes
For iSCSI Servers you can change the following Server Attributes using the Config Server dialog:
Server IQN
Server IP address
Enable/Disable IPSec
CHAP settings
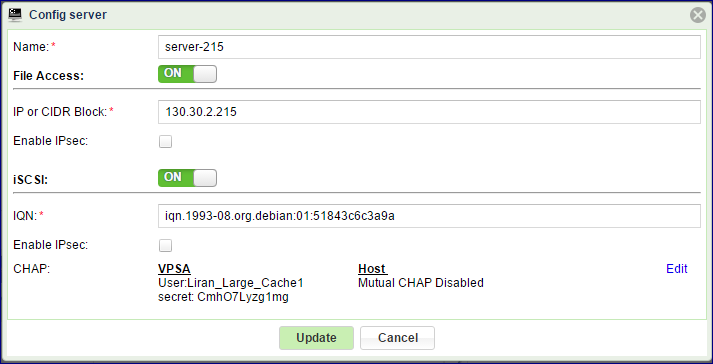
Both the server IQN and IP address must be unique. Therefore, the VPSA will block you from changing those attributes to conflicting values used by other Servers.
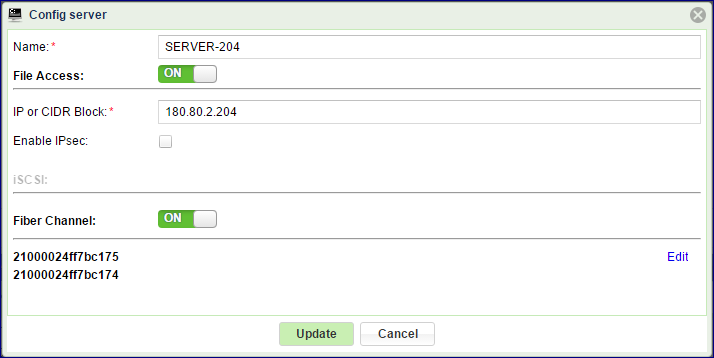
For FC servers you can change the following Server Attributes using the Config Server dialog:
WWPN’s
Viewing Servers Properties
The Servers Page displays a list of the available Server objects. You can view the following detailed information in the Servers details South Panel tabs:
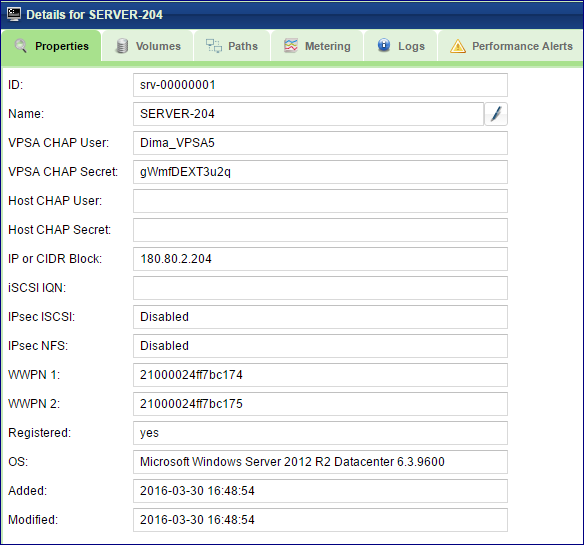
Properties
Each server displays the following properties:
Property |
Description |
|---|---|
ID |
An internally assigned unique ID. |
Name |
User assigned name. If the Server was created as a result of an iSCSI login, the VPSA will assign it a name similar to its IQN. Name can be modified anytime |
Comment |
User free text comment. Can be used for labels, reminders or any other purpose |
VPSA CHAP User |
VPSA CHAP User |
VPSA CHAP Secret |
VPSA CHAP Secret |
Host CHAP User |
Host CHAP User |
Host CHAP Secret |
Host CHAP Secret |
IP or CIDR Block |
IP Address or CIDR block of the Server(s). |
iSCSI IQN |
Unique “iSCSI Qualified Name” of the Server. |
IPSec ISCSI |
Enabled\Disabled |
IPSec NFS |
Enabled\Disabled |
WWPN1 |
WorldWide Port Name for FC connectivity |
WWPN2 |
WorldWide Port Name for FC connectivity |
Registered |
Yes – The Connect script was used to create the Server. No – The Server was created manually or via iSCSI login. |
OS |
OS version detailed string, such as: “Microsoft Windows Server 2008 R2 Datacenter 6.1.7601” Available only for registered Servers. |
Added |
Date & time when the Server object was added. |
Modified |
Date & time when the Server object was last modified. |
Volumes
A list of all the Volumes attached to this Server.
Paths
This tab lists all the paths between this Server and each controller of the VPSA. If multipathing is set it shows all paths, along with the number of active sessions.
For iSCSI connections the initiator and target IQNs are listed.
For Fibre Channel connections initiator and target WWPN are listed.
Metering
The Metering Charts provide live metering of the IO workload associated with the selected Server.
The charts display the usage data as it was captured in the past 20 “intervals”. An interval length can be set to one of the following: 1 Second, 10 Seconds, 1 Minute, 10 Minutes, or 1 Hour. The Auto button lets you see continuously-updating live metering info (refreshed every 3 seconds).
The following charts are displayed:
Chart |
Description |
|---|---|
IOPs |
The Number of read and write SCSI commands issued from this Server to all its attached Volumes. |
Bandwidth (MB\s) |
Total Throughput (in MB) of read and write SCSI issued from this Server to all its attached Volumes. |
IO Time (ms) |
Average response time of all read and write SCSI issued from this Server to all its attached Volumes. |
Logs
Displays all event logs associated with this Server.
Performance Alerts
A VPSA administrator has the option to set the following Server Performance Alerts:
Read IOPS Limit – Creates an alert when, during the past minutes, the average read IOPS for this Server exceeds a user-specified threshold.
Read Throughput Limit - Creates an alert when the average read MB/s during the past minute for this server exceeds a user-specified threshold.
Read Latency Limit – Creates an alert when, during the past minute, the average read latency for this server exceeds a user-specified threshold.
Write IOPS Limit – Creates an alert when, during the past hour, the average write IOPS for this server exceeds a user-specified threshold.
Write Throughput Limit - Creates an alert when, during the past minute, the average write MB/s for this server exceeds a user-specified threshold.
Write Latency Limit – Creates an alert when, during the past minute, the average write latency for this server exceeds a user-specified threshold.