Connecting an Account to a Microsoft Active Directory Identity Provider
zCompute accounts’ users can be authenticated using an external LDAP-compatible identity provider, such a Microsoft Active Directory domain. Once it’s set up, users and groups of the identity provider can be granted permissions to zCompute. To enable this, the zCompute account must be connected to Active Directory. Each zCompute account requires independent configuration for the Identity Provider connection.
Important
As a prerequisite, the zCompute cloud must have a route to the Active Directory domain controllers in order to connect a zCompute account to the Active Directory.
Tenants are advised to consult with their Managed Service Provider.
Connecting an Account to an Active Directory Identity Provider
Note
Before connecting the zCompute account to selected users in Active Directory, it is recommended to first create a dedicated group for them in Active Directory, and add them to that group.
This allows you to use the filters to select only those users that should be connected to the zCompute account.
To connect an account to an Active Directory Identity Provider:
Navigate to the Identity & Access > Accounts view, and highlight the row of the account that you wish to connect to the Identity Provider.
An Identity Provider button appears in the toolbar.
Click Identity Provider.
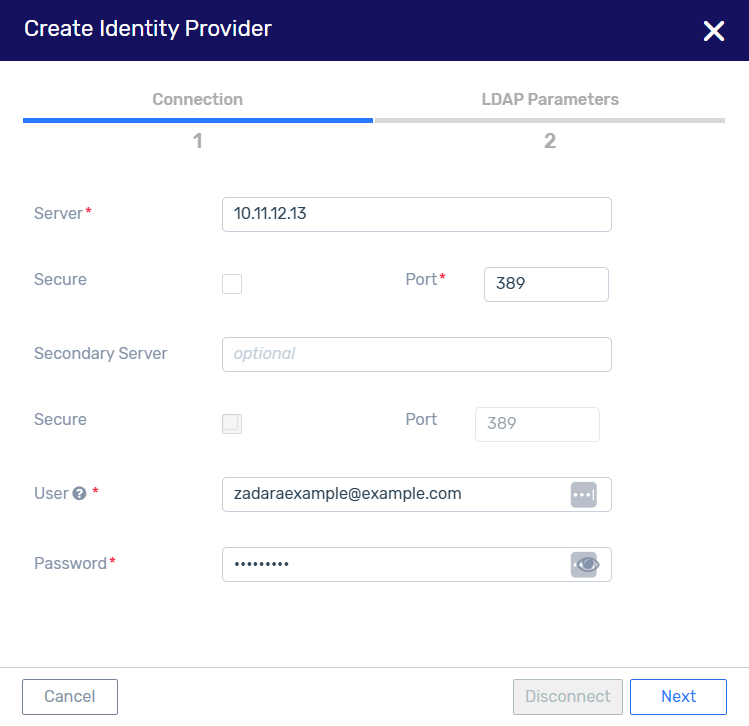
The Create Identity Provider dialog opens at the Connection step.
Note
An existing LDAP connection can be disconnected via the Disconnect button.
Enter the Active Directory domain controller (DC) details:
Server - The LDAP server or Active Directory domain controller’s IP address.
For example:
10.11.12.13Note
If that server has a public DNS name (FQDN), it is possible to use the DNS name instead of the IP address.
For example:
dc3.mydomain.com.Secure - Check this box if your LDAP server supports the secure LDAP protocol over SSL or TLS.
Port - The reserved port is 389 if the connection is not secure, or 636 if the connection is secure.
Secondary Server (optional) - A backup server if the first one is not available. The Active Directory Domain Controller address, expressed as an IP address or a DNS hostname.
For example:
10.11.12.14ordc4.mydomain.com.Secure - Check this box if your secondary LDAP server supports the secure LDAP protocol over SSL or TLS.
Port - The reserved port for the secondary server is 389 if the connection is not secure, 636 if the connection is secure.
User - This is the user principal name (UPN) or distinguished name (DN) of a user through which one can gain access to Active Directory Server.
DN example:
cn=zadaraexample,cn=Users,dc=example,dc=comUPN example:
zadaraexample@example.comNote
This user should not be an administrator of the domain.
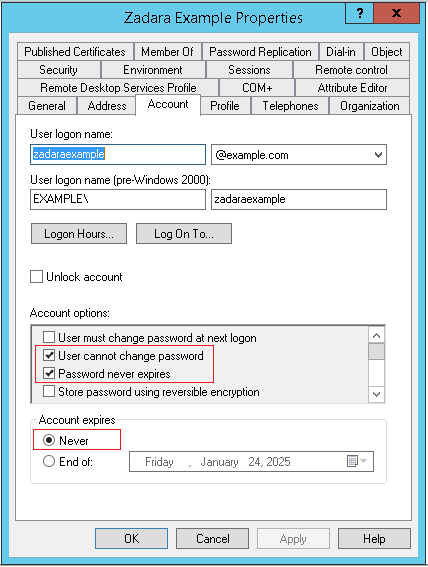
This user establishes the connection to Active Directory, and is used as a “service account” to sync zCompute with the Active Directory domain.
To guarantee a continuous operation with Active Directory, configure this user’s Active Directory account so that it never expires, and that its password never changes and never expires.
Password - The Active Directory password of the user.
Click Next.
After validating the connection to the Active Directory server, the dialog displays the LDAP Parameters step.
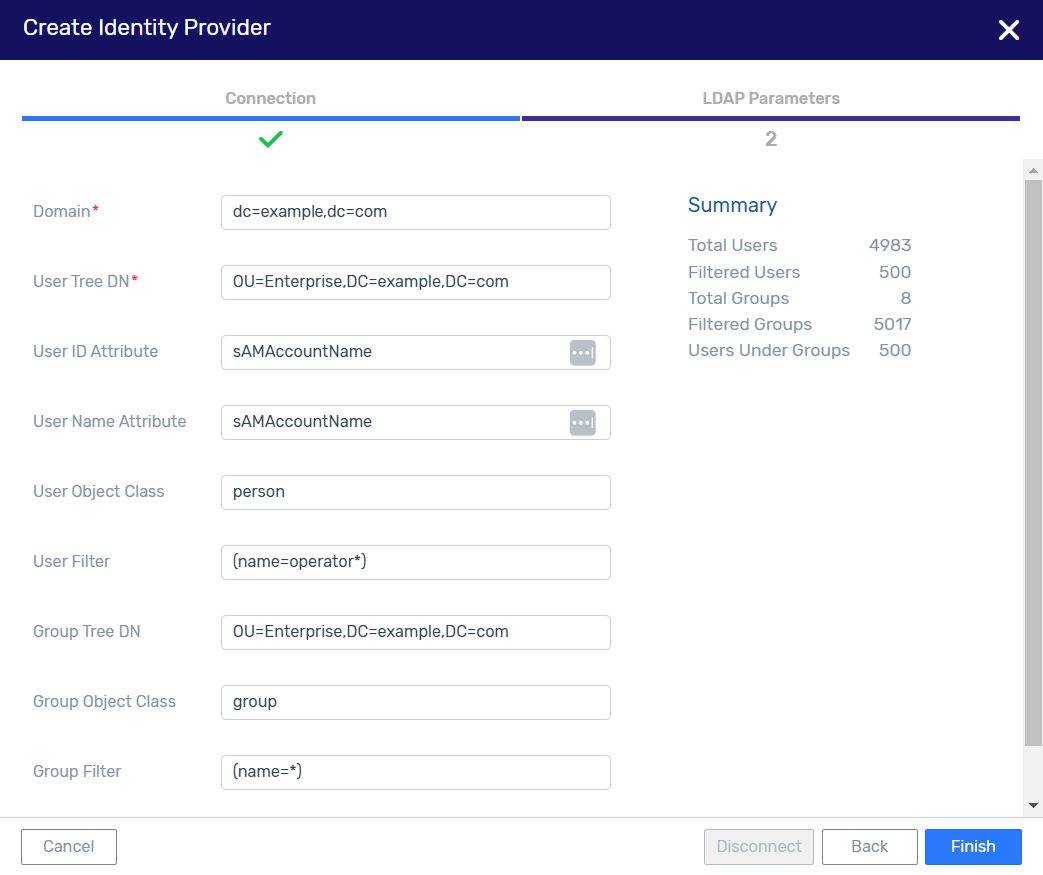
LDAP Parameters - All parameters are expressed in the LDAP syntax.
Note
A Summary of LDAP users and groups appears on the right, and updates dynamically as filters are applied.
Domain - The customer’s domain in Active Directory.
For example:
dc=example,dc=comUser Tree DN - The location in the Active Directory in which the users will be scanned.
For example:
OU=Enterprise,DC=example,DC=comUser ID Attribute: The attribute name in Active Directory that represents the User ID.
For example:
sAMAccountName.User Name Attribute: The attribute name in Active Directory that represents the User Name.
For example:
sAMAccountName.User Object Class: The objectClass property of a user object in Active Directory.
For example:
person.User Filter - Filters the users scanned in the User Tree.
For example:
(name=example-*)searches the User Tree for any user beginning withexample-.(memberOf=cn=grp-exampleldap,cn=Users,dc=example,dc=com)searches for all users who belong to the group
grp-exampleldapin the Active Directory with domain components matchingdc=example,dc=com.
Note
The input syntax for the User Filter parameter includes the parentheses.
Group Tree DN - The location in the Active Directory in which the groups will be scanned.
For example:
cn=Users,dc=example,dc=comCaution
If the Group Tree DN is left empty, the UI doesn’t display the LDAP users’ list.
In this case, it is still possible to grant permissions to individual users, but these users’ permissions don’t display in the UI.
Group Object Class - Active Directory’s group object class for the groups. Default:
groupGroup Filter - Filters the groups scanned in the Group Tree.
For example:
(name=grp-*)searches for all groups with the prefixgrp-.Note
The input syntax for the Group Filter parameter includes the parentheses.
Click Finish.
The selected account is connected to MS Active Directory.
Users matching the filters described above will appear as LDAP Users of the selected account. On completion of configuring Active Directory as an identity provider for the zCompute account, these users’ AD passwords will be used for authentication.
The groups matching the filters described above will appear as groups of the selected account, containing the users defined in Active Directory.
The account’s top pane Overview section displays the LDAP badge, and summarizes the number of LDAP Groups and LDAP Users.

Viewing LDAP Groups
To view the LDAP Groups:
In the account’s lower pane, click the Groups tab.
The LDAP Groups list displays.
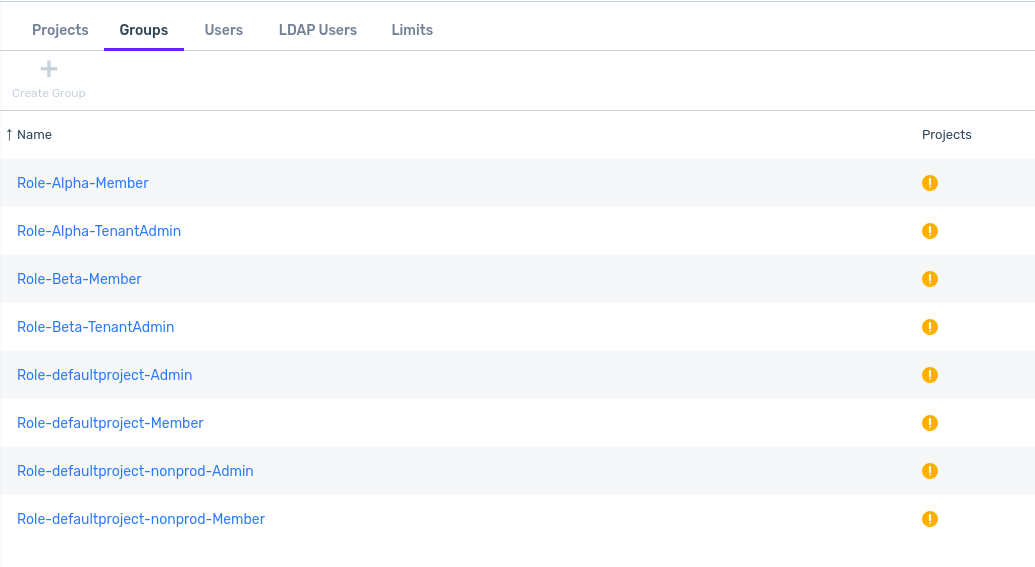
By default, users in a group can’t sign on until the group is assigned project permissions. The Projects column for groups without project permissions displays an alert symbol to indicate this.
To configure project permissions for a group, see Managing an LDAP Group’s Permissions.
Note
For a zCompute account that is connected to an Active Directory, new users and groups can only be created and managed in the Active Directory.
Important
As a best practice, it is recommended to have a single local (non-LDAP) tenant admin user for “break the glass” scenarios, in the event of LDAP connection loss or malfunction.
Managing an LDAP Group’s Permissions
To assign permissions to an LDAP group and its members:
In the account’s lower pane, click the Groups tab.
The LDAP Groups list displays.
Highlight the row of the group to apply permissions.
In the lower pane menu bar, click Manage Policies.
The Manage Permissions for Group dialog opens.
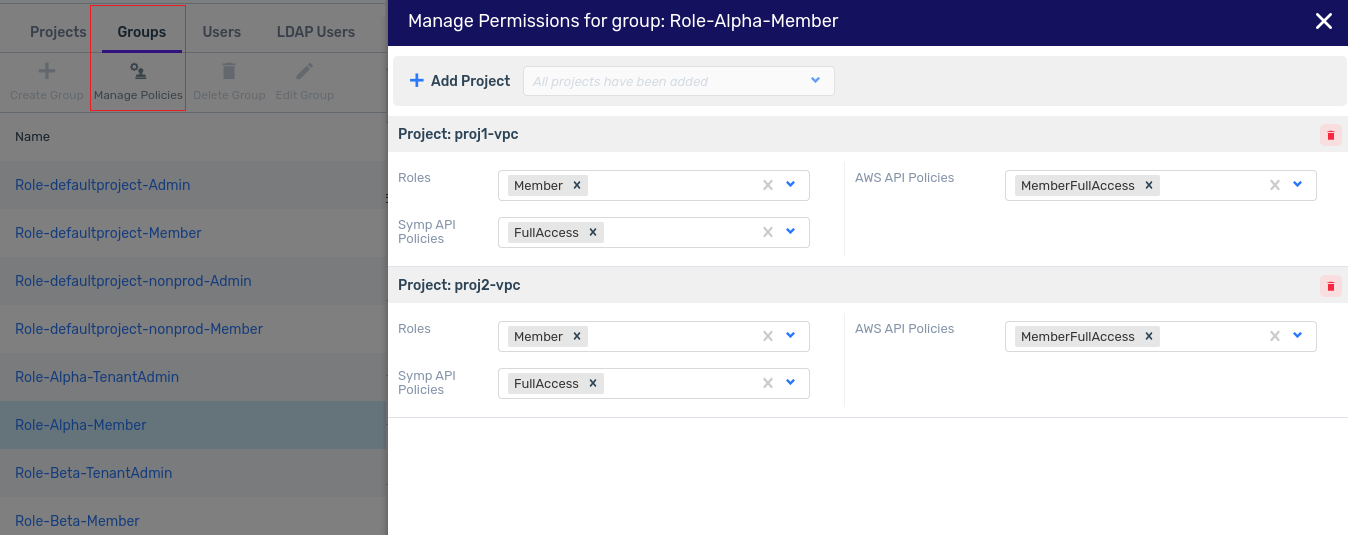
Configure the projects and and their permissions for the group
Click Finish.
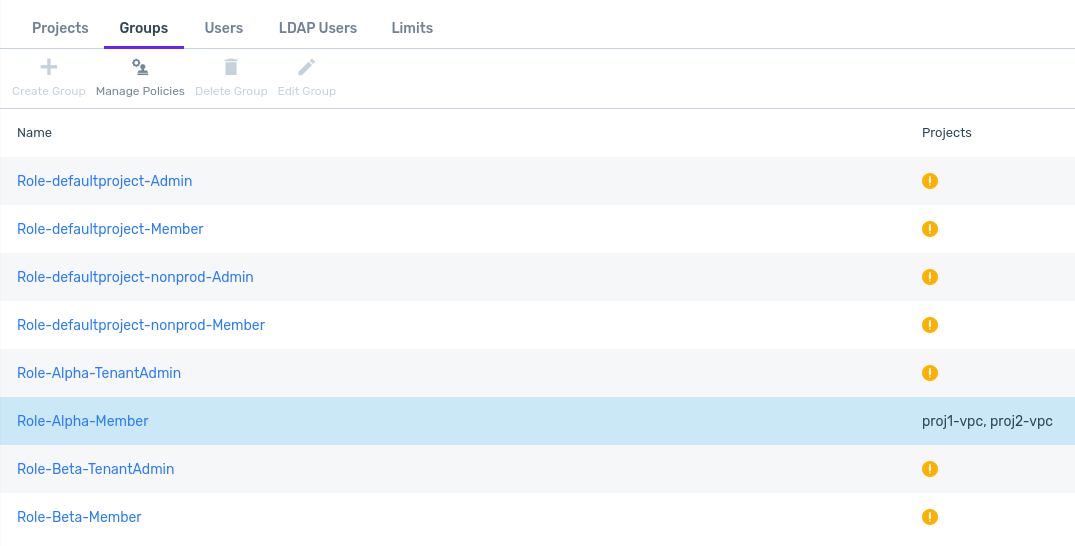
The updated projects appear in the Projects column for the group, in the Groups tab.
Viewing LDAP Users
To view the LDAP Users:
In the account’s lower pane, click the LDAP Users tab.
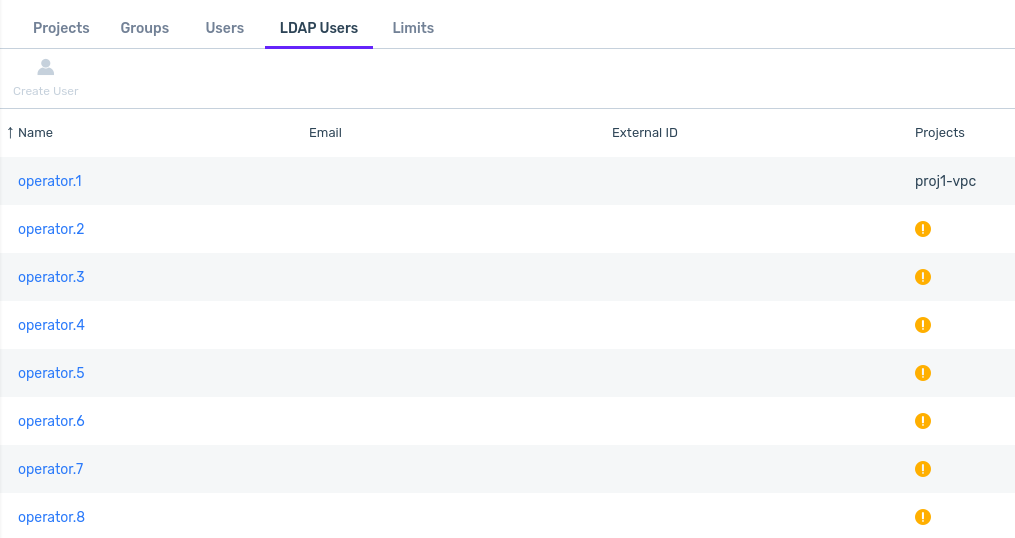
The LDAP Users list displays.
Note
LDAP user passwords and email addresses cannot be modified within zCompute.
Assigning Project Roles and zCompute Policies
Before these users will be able to work with zCompute, you must first assign a project to each user, either individually or via the groups of which they are members, together with the group’s zCompute role and policies.
Users who are members of groups configured with project permissions have their associated projects listed in the Projects column. For other users, the Projects column displays an alert symbol, indicating that the user cannot sign on until project permissions are assigned. User permissions can be assigned individually or as a member of a group with configured permissions.
Assigning zCompute Roles and permissions to an Active Directory User - UI
The following UI actions are recommended for assigning the Account and Project ‘Admin’ roles and permissions to a user added to zCompute via Active Directory:
Locate the new user added to zCompute via Active Directory.
On the Identity & Access > Accounts <account> view for the requested account, click the LDAP Users tab.
The list of users for that account displays.
Click the user to assign zCompute permissions.
The user’s Project Permissions tab displays the user’s role and policies per project.
Assign a project to the user with a project role and zCompute policy.
In the user’s upper menu bar, click Manage Permissions.
The dialog box Manage Permissions for User opens.
From the + Add Project dropdown list, select the project.
In the section that opens for the project, complete the user’s permission settings:
The Roles, AWS API Policies and Symp API Policies have descriptive names that reflect the role or policy scope.
Roles - From the dropdown, select the role.
Multiple roles can be applied.
AWS API Policies - From the dropdown, select the policy.
Multiple AWS API policies can be applied.
Symp API Policies - From the dropdown, select the policy.
Multiple Symp API policies can be applied.
Optionally, repeat these steps to assign roles and policies to the user for additional projects.
Click Finish to save the user’s roles and policies per project.
The user’s Project Permissions tab in the lower pane displays the user’s role and policies per project.
Assigning zCompute Roles and permissions to an Active Directory User - CLI
The following CLI commands are recommended for assigning the Account and Project ‘Admin’ roles and permissions to a user made available to zCompute via Active Directory:
Note
In this example the assumption is that the zCompute account,
new_account, which is connected to a domain in Active Directory,
already contains the project, new_project.
Use symp’s user list command to locate the user.
user list -c id -c name -c domain_id

+----------------------------------+----------+----------------------------------+
| id                               | name     |   domain_id                      |
+==================================+==========+==================================+
| c8a63b29558d4765a6cd78760729a2f7 | new_user | 2d27e2fe6d8a4398b901c4d84c478777 |
+----------------------------------+----------+----------------------------------+
| admin                            | admin    | default                          |
+----------------------------------+----------+----------------------------------+
Note the user’s domain ID.
Use symp’s user list command to verify that the user
new_userfrom the Active Directory list, does not already appear in another zCompute account.Note
A username can appear in more than one zCompute account, but each user’s ID is unique even though the username might appear more than once.
user list --name new_user -c id -c name -c domain_id

+-----------+----------------------------------+
| id        | c8a63b29558d4765a6cd78760729a2f7 |
| name      | new_user                         |
| domain_id | 2d27e2fe6d8a4398b901c4d84c478777 |
+-----------+----------------------------------+
Use symp’s
domain listcommand to list the domains with their IDs and names.domain list -c id -c name +----------------------------------+---------------+ | id | name | +==================================+===============+ | 2d27e2fe6d8a4398b901c4d84c478777 | new_account | | default | cloud_admin | +----------------------------------+---------------+Use symp’s project list command to list the projects with their IDs, names and domains.
project list -c id -c name -c domain_name

+----------------------------------+-------------+---------------+
| id                               | name        | domain_name   |
+==================================+=============+===============+
| 4bd79a2fa9574af2a4b9a7a87195f144 | default     | cloud_admin   |
| 1569c28e3a344ee2b3989640499b8eca | new_project | new_account   |
+----------------------------------+-------------+---------------+
Use symp’s role list command to list all roles in zCompute.
role list

+--------------------+--------------------+
| id                 | name               |
+====================+====================+
| admin              | admin              |
| tenant_admin       | tenant_admin       |
| _member_           | member             |
+--------------------+--------------------+
Use symp’s project list-roles-on-project command to check if user
new_userhas already been assigned a role in the projectnew-project.Syntax:
project list-roles-on-project <project_id> <user_id>project list-roles-on-project 1569c28e3a344ee2b3989640499b8eca c8a63b29558d4765a6cd78760729a2f7 +--------------+--------------+ | value | tenant_admin | +--------------+--------------+If the user is already assigned a role other than
adminin the projectnew_project, use the project revoke-role command to remove the role fromnew_user.Syntax:
project revoke-role <project_id> <user_id> <role_id>project revoke-role 1569c28e3a344ee2b3989640499b8eca c8a63b29558d4765a6cd78760729a2f7 tenant_admin +-------+---------+ | value | Success | +-------+---------+Use symp’s project grant role command to assign the admin role to user
new_userin the projectnew_project.Syntax:
project grant-role <project_id> <user_id> <role_id>project grant-role 1569c28e3a344ee2b3989640499b8eca c8a63b29558d4765a6cd78760729a2f7 admin +-------+---------+ | value | Success | +-------+---------+Use symp’s project list-roles-on-project command to verify that the role of
new_userinnew_projectisadmin.Syntax:
project list-roles-on-project <project_id> <user_id>project list-roles-on-project 1569c28e3a344ee2b3989640499b8eca c8a63b29558d4765a6cd78760729a2f7 +--------------+--------------+ | value | admin | +--------------+--------------+
LDAP User Sign-on to zCompute
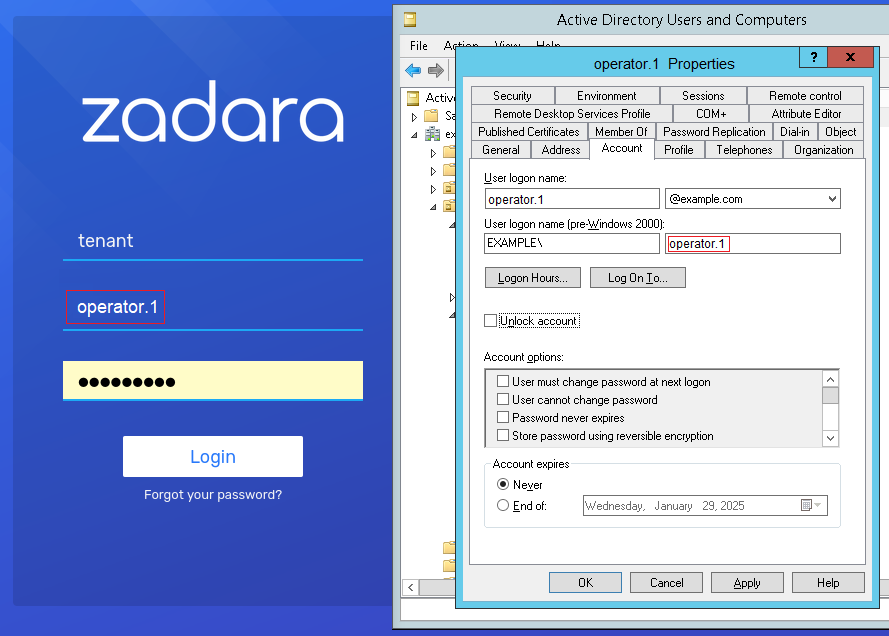
After LDAP users’ project and permission assignments are configured in zCompute, the users can sign on to zCompute using their short username, as registered in zCompute, and listed in the account’s LDAP Users tab.

In this example:
The zCompute account name is
tenant.For this example, this is the account where the administrator loaded LDAP users and groups, and assigned them zCompute projects and permissions.
The LDAP user’s username is
operator.1.This is the short username of the LDAP user, imported into zCompute based on the mapping of the LDAP User Name Attribute
sAMAccountName. The mapping was configured in the LDAP Parameters step of the Create Identity Provider dialog.
