VPSA Object Storage Console
VPSA Object Storage Console provides management access for Object Storage accounts. It is not a tool for read/write operations from/to the object storage. With the console, you can create/delete and view containers, and list their content, create and delete folders to better organize the objects, and set permissions and other management configurations.
The VPSA Object Storage Console Window
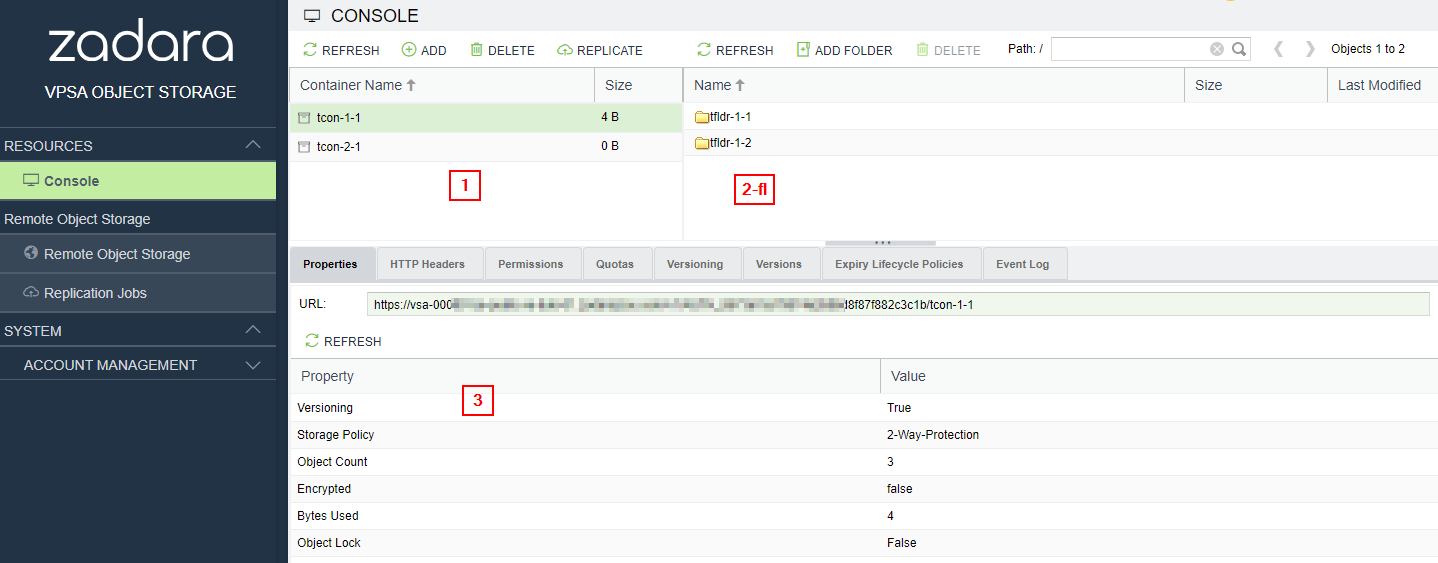
The Console Window is built of the following:
Containers pane - shown on left in diagrams below.
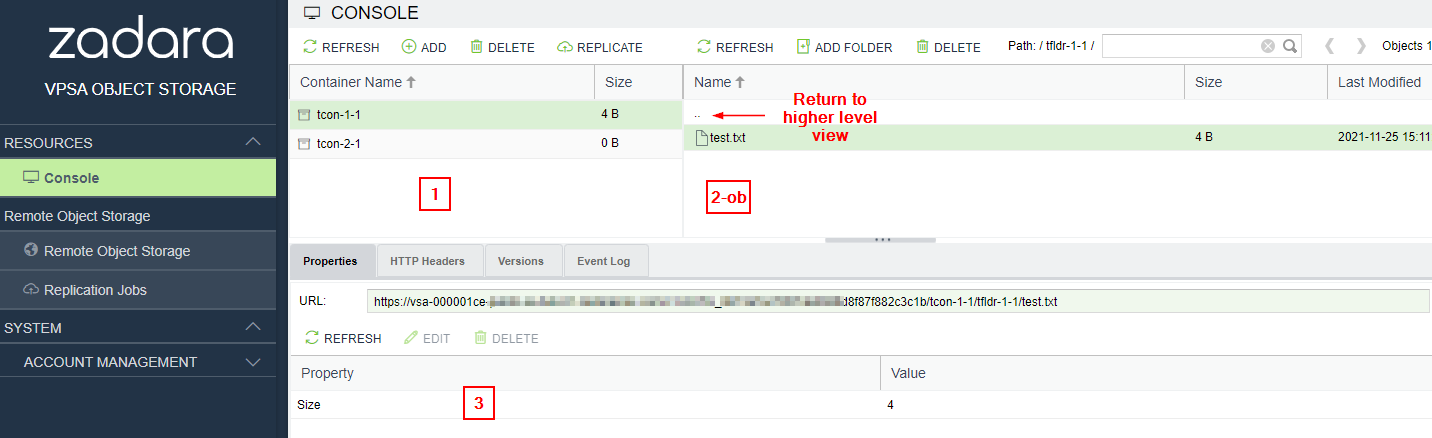
Folders / Objects pane - shown on right in diagrams below. Note the view shows either folders or objects. Click on a container to display the content folders (2-fl in diagram below). Click on a folder to display the content objects (2-ob in diagram below). To return from object view to folder view, or in case of nested folders to move back within the folder hierarchy, click on .. above the object pane as shown in diagram below.
Details pane shown on bottom in diagrams below. Details display shows different properties and permissions depending on whether a container, folder, or object is selected in the top pane.
Folder View
Object View
Encrypted Containers
Encryption management of Data-at-Rest (data on the Disk Drives) is applied by the Object Storage on a per-Container basis. Encrypted and unencrypted Containers can coexist in the same account.
A VPSA Object Storage generates a random 256-bit unique Encryption Key per encrypted Container and uses the Advanced Encryption Standard (AES) to encrypt and decrypt the objects data.
The Encryption Keys are stored on disk as ciphertext, using AES with a 256-bit Master Encryption Key, which is generated from a user-supplied Master Encryption Password.
The User owns the Master Encryption Password. It is never stored on any persistent media. Instead, only its SHA3 hash-sum is saved on disk for password validation.
Caution
Since the system does not keep the Master Encryption Password, you are fully responsible to retain and protect the Master Encryption Password.
During VPSA Object Storage operation, the Master Encryption Password itself is held in kernel memory of the VPSA. Core-dumping any User Mode process within the VPSA will not reveal the Master Encryption Key.
This method ensures that encrypted Data-at-Rest cannot be accessed without explicitly knowing the user-supplied Master Encryption Password, thus providing you full protection if you enable Data-at-Rest Volume encryption.
Caution
The encryption attribute of a Container cannot be changed! If you’d like to encrypt the objects of a non-encrypted Container, or vice versa, you will need to create a new Container and copy the data.
Setting Encryption Password (VPSA Object Storage Admin)
To create a Master Encryption Password, go to the Settings page, Security tab and click Edit in the Encryption section. Read the instructions and warning. Enter your password and click Save.
Store your Master Encryption Password in a secure place.
Create Containers
To create a new Container in the account, open the console, and click Add in the toolbar above the console pane. The Create Container dialogue will open.
Enter the following information:
Name - Enter container name. Note the VPSA Object Storage is both S3 and Swift API protocol compatible. S3 containers are expected to contain only lowercase letters, numbers, periods and dashes. The Swift API is less restrictive; container names can start with any character and contain any pattern. The container name cannot contain a slash (/) character because this character delimits the container and object name. The creation wizard will verify the proposed container name, a warning message will be displayed in case a non-s3 compatible name was chosen. This restriction can be overridden by checking the Override S3 Naming Rules option.
Storage Policy - the target storage policy for the container creation
Encrypted - select if container should be encrypted.
Object Lock - selecting object lock will prevent the deletion or modification of any object prior to its retention period expiration. For more information on Object Lock, see Overview.
Click Create. The new container will show up in the Containers pane.
Delete Containers
To remove a container, open the console, go to the containers pane, select the container to be deleted and click Delete. The system will prompt you for deletion confirmation.
Note that containers with Object Lock cannot be deleted directly from the console. To do so, please contact your VPSA Object Storage provider. For more information on Object Lock, see Overview.
Caution
After deletion confirmation, the container with all its content will be deleted. This operation is permanent and the data can not be recovered.
Adding folders
By definition, containers are flat and there is no hierarchy structure for storing the objects. However, since many users are accustomed to the folders tree concept of file systems, VPSA Object Storage Console gives you an option to simulate hierarchical structure within the Object Storage Containers.
To create a folder, open the console, select a container in the containers pane, navigate to the hierarchy level where you want to create the new folder, and click Add Folder. Give it a name and click Submit.
Navigation within the container’s folders tree is done in a way similar to the common user experience of file systems explorer. By double clicking a folder, you enter it and see its content (objects and sub-folders). By double clicking the .. at the top of the objects pane, you navigate one level up to the parent Folder. The path indicator above the objects pane always show you current position in the tree.
Removing folders
To remove a folder, navigate to its parent folder, select the folder to be removed and click Delete from the toolbar above the folder pane.
After confirmation, the folder with all its content will be deleted.
Details Pane
The details pane at the bottom of the console screen includes the following tabs:
Properties - displays read only properties of selected container, folder, or object.
HTTP Headers - display, edit, add, or delete the HTTP headers used in the object storage operations.
Permissions - for information on assigning permissions to containers, see Setting Container Permissions (Account Admin).
Quotas - quotas allow placement of limits on size (in GiB) or count of objects per container (Console view) or per account (Account view). For more information on quotas, see Account Quota Management (VPSA Object Storage Admin or Account Admin).
Versioning - if enabled, versioning supports storing multiple versions of an object in the same container thus allowing recovery from unintended actions or failures. Note that once versioning is enabled for a container it cannot be disabled.
Versions - displays versions for all folders and objects within a container. Note this tab is only available for containers for which versioning is enabled.
Expiry Lifecycle Policies - allows setting policy to automatically delete object after configurable time. For more information, see Setting Objects Lifecycle Policy.
Event Log - displays log of events related to selected container.
Setting Objects Lifecycle Policy
Zadara Object Storage supports retention period for objects. The period is set at the object creation time, and the object will automatically be removed when expired. It is possible to set a number of such policies per Container, for different types of objects.
To create a lifecycle policy:
In console view, select a container. From the details pane at the bottom, select Expiry Lifecycle Policies.
Click Add from the toolbar in the details pane.
In the Lifecycle Rule dialogue which opens, enter the following:
Object Expire in (Days)
Object Names Prefix - if a prefix is given, only objects with this prefix will be removed by this policy. If no prefix is entered, all objects are affected.
Click Create.
Note:
In case a prefix is defined, multiple rules can be defined with different prefixes.
In case a rule is defined with no prefix, and then a second rule is also defined with no prefix, the second rule replaces the first rule.
In case a rule is defined and then deleted, or the expiry time is changed, the new policy affects only objects created after the change. Objects created before the policy change will continue to behave as per the policy rules which were in effect at the time of their creation. To change deletion time of an object after creation, you must explicitly modify delete_at header deletion time for the object.