Key Pairs
Key pairs refer to security credentials used for ensuring the identity of a user connecting to a VM instance.
Create a new key pair
Navigate to the Main menu > Compute > Key Pairs view.
Click Create in the top toolbar.
In the Generate Key Pair > Details tab, select Generate a key pair and download the private key.
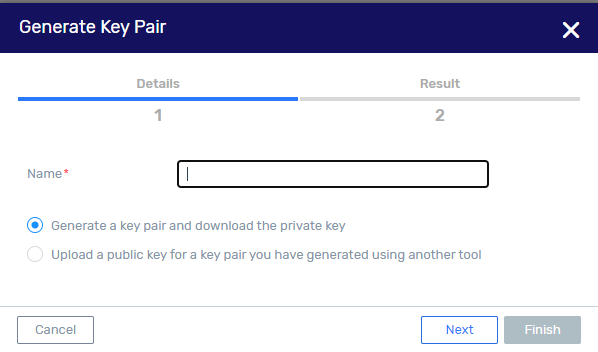
Enter a unique name consisting of letters, numbers, spaces, underscores, periods and dashes. It must begin and end with a letter, number or an underscore.
Click Next.
In the Generate Key Pair > Result tab, the following is displayed:
Name of key pair.
Fingerprint of public key.
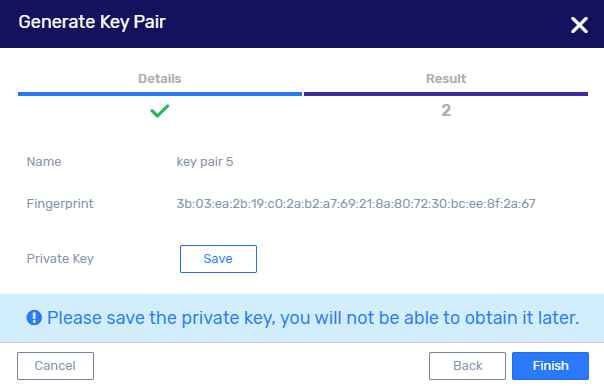
Click Save to download the private key to your browser’s default download location. The private key file is named:
<name>.pemwhere<name>is that specified for the key pair in the Details tab.Click Finish.
Upload an externally generated key pair
Use a tool of your choice to generate a key pair (public and private key), and change the file permissions on the private key to 400 or 600 to secure the key.
Note
From version 23.08.1, zCompute supports use of ECDSA keys for VMs.
For key pair creation, it is possible to import and successfully use a public key in SSH or RSA (PEM) formats.
In version 23.08.0 and earlier, zCompute does not accept keys for VMs in SSH formats, but only in RSA (PEM) format.
Examples of
ssh-keygencommands:To generate keys in RSA and EDCSA formats:
Usage:
ssh-keygen -t <type> -b <bits> -f <output file>ssh-keygen -t rsa -b 4096 -f id_rsa_4096 ssh-keygen -t rsa -b 3072 -f id_rsa_3072 ssh-keygen -t rsa -b 2048 -f id_rsa_2048 ssh-keygen -t rsa -b 1024 -f id_rsa_1024 ssh-keygen -t ecdsa -f id_ecdsa ssh-keygen -t ed25519 -f id_ed25519To convert a key to RSA format, run the following command. This will update the key in place:
ssh-keygen -p -N "" -m pem -f <path_to_private_key_file>To generate and secure (read-only) a 3KB RSA key:
ssh-keygen -t rsa -b 3072 -f id_rsa_3072
chmod 400 id_rsa_3072
Navigate to the Main menu > Compute > Key Pairs view.
Click Create in the top toolbar.
In the Generate Key Pair > Details tab, select Upload a public key for a key pair you have generated using another tool.
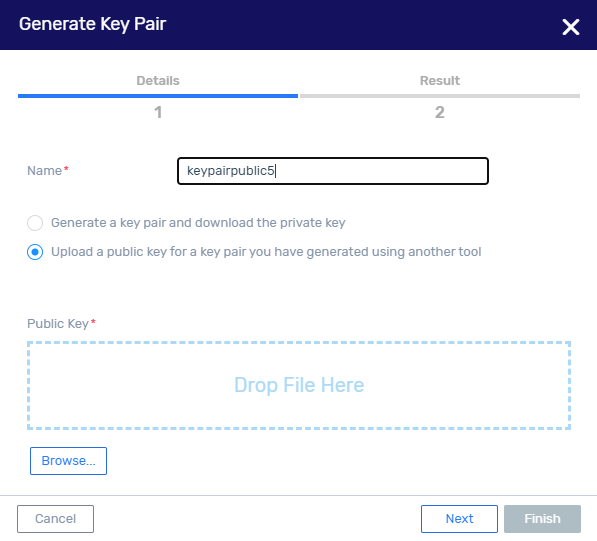
Drag and drop the public key file into the window, or click Browse and navigate to it.
Click Next. The system displays the Result tab.
Click Finish.
Get a Windows instance password
Important
For Windows password recovery (Get Windows Password dialog), the UI only accepts keys in RSA (PEM) format.
To be able to get a Windows instance password, a key pair must be associated with the the Windows instance at creation of the instance. See Creating VM Instances.
This flow returns the admin password of the Windows instance, which is a long and complex string. The zCompute UI Instance Connect option does not permit pasting the password at the login prompt. It requires manual entry of the password, which is not recommended, due to the complexity and length of the string. Instead, it is highly recommended to connect to the VM instance via a Remote Desktop client using an Elastic IP, which will allow pasting the password.
Go to Compute > Instances.
Locate the Windows instance.
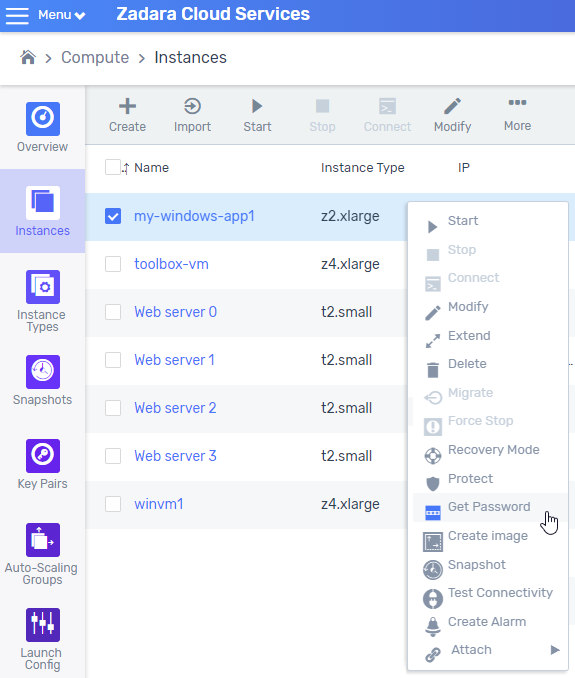
Right-click on the Windows instance row and click Get Password on the context menu, or go to … More > Get Password. The Get Windows Password dialog opens.
Locate the private key file (
<name>.pem) of the key pair associated with the Windows instance. Either upload the private key file, or copy and paste its contents in the place provided.Click Next. The Retrieve Password tab displays the Windows instance’s admin password.
Copy the admin password string.
Either:
In your RDP client admin user session configuration, paste and save the copied password.
In your RDP session, on signing on as the admin user in the Windows VM instance, paste the copied admin password at the password prompt.
Convert a private PEM key to PPK (PuTTY) format
To connect to a Linux VM instance using the PuTTY terminal emulator, your private key must be converted to PuTTY’s PPK format. The PuTTY download package includes the PuTTYgen utility for this purpose.
In PuTTYgen, under Actions > Load an existing private key file click Load.
In the File Explorer that opens:
Change the file type selection filter from PuTTY Private Key Files (*.ppk) to All Files (*.*), so that
*.pemfiles are displayed.Select the PEM file to convert to PPK format, and click Open to return to the PuTTYgen screen.
A message displays that the PEM file was loaded successfully.
In PuTTYgen, for Parameters > Type of key to generate select RSA. If your version of PuTTYgen does not include this option, select SSH-2 RSA.
Click Save private key.
In the dialog that opens, warning about saving the key without a protective passphrase, click Yes.
In the Save private key dialog:
File name: Enter the same name that was used for the key pair.
Save as type: Select PuTTY Private Key Files (*.ppk) (default).
Click Save.
Using PuTTY, you can connect to your Linux VM instance with the PPK key.
Generate a public key from a private key
A public key can be derived from a private key, using the ssh-keygen
utility.
This can be useful when there is a requirement to move the public key of a
key pair between zCompute clusters.
By default, ssh-keygen generates the public key output to standard
output, which can be redirected to a file.
Usage:
ssh-keygen -y -f <private_key_file> > <public_key_file>
For example:
ssh-keygen -y -f $HOME/.ssh/mykeyfile > $HOME/.ssh/mykeyfile.pub
Generate a public key in PEM format
To generate a public key in PEM format from a private key, use the
ssh-keygen utility with the -e -m pem options.
Usage:
ssh-keygen -y -f <private_key_file> -e -m pem > <public_key_file.pem>
For example:
ssh-keygen -y -f $HOME/.ssh/mykeyfile > $HOME/.ssh/mykeyfile.pem