Migrating Hyper-V VMs to zCompute
The V2Z migration tool migrates VMs directly from Hyper-V Windows Server to zCompute.
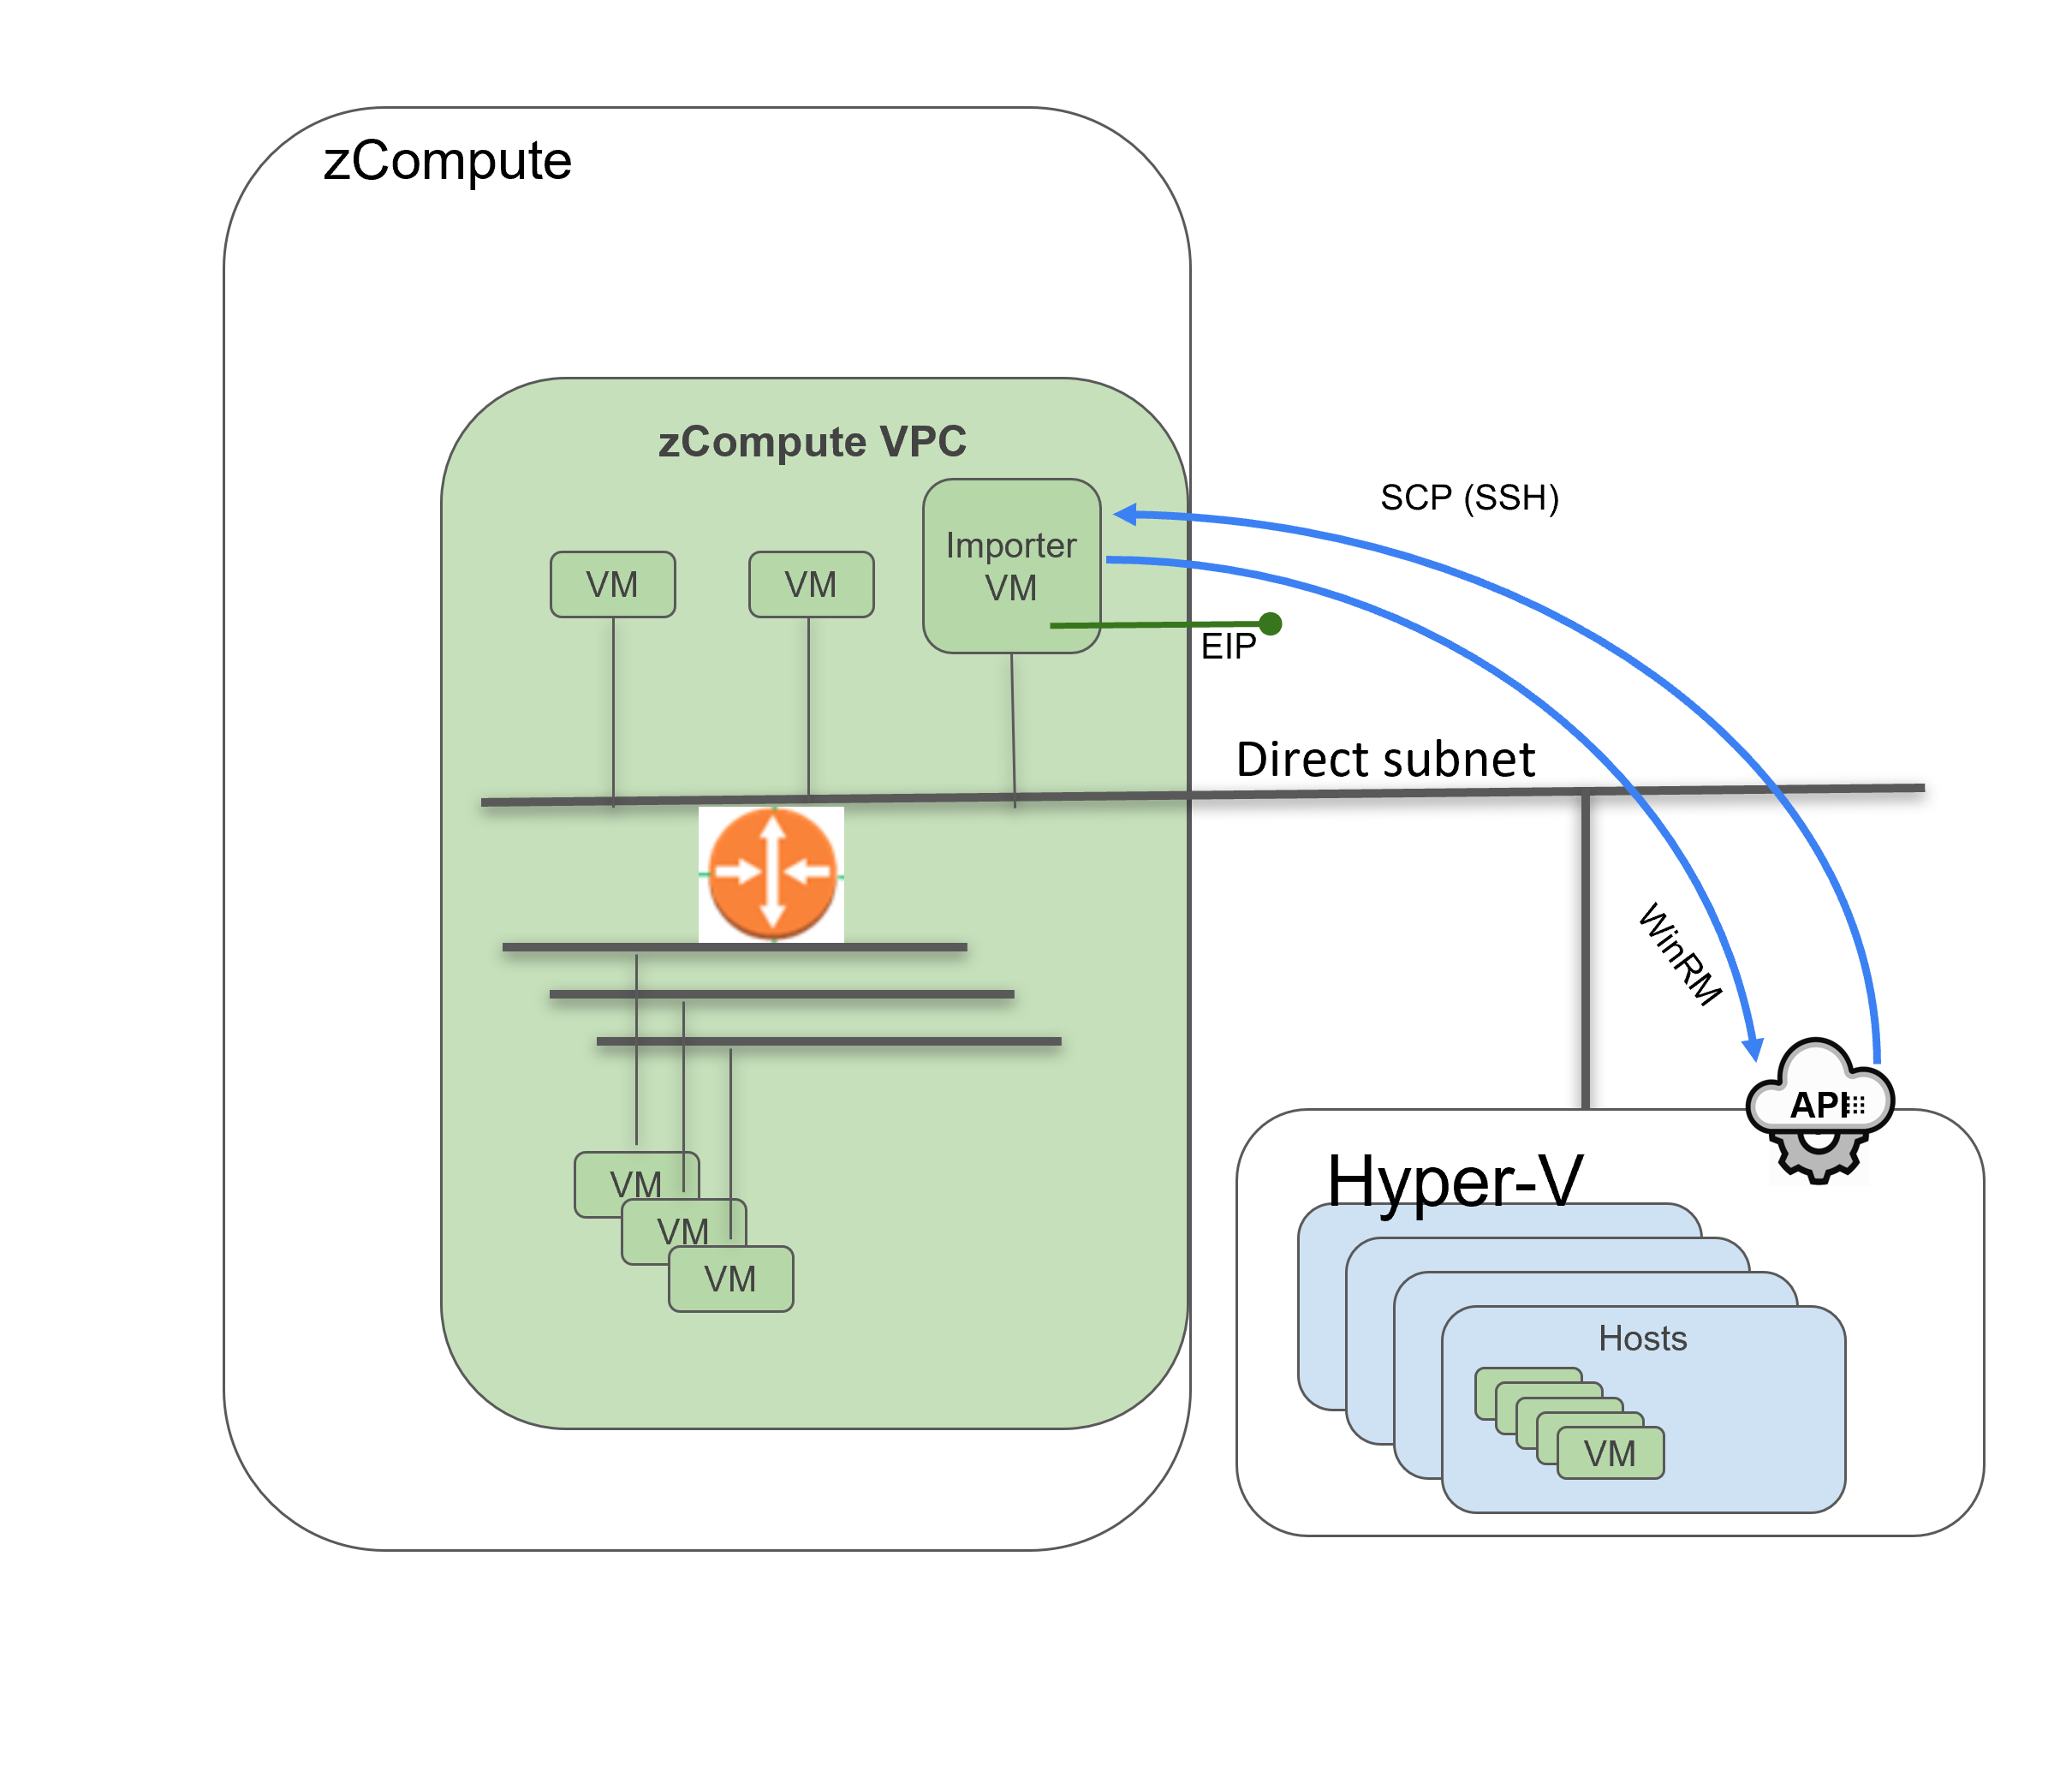
The migration process:
The importer VM connects to Hyper-V via WinRM, and initiates
pscpcommands to migrate the VM’s vhds/vhdxs.The VM’s disks are then imported using the
ddcommand into zCompute block devices and a VM is created using these block devices.
Prerequisites
All vhd/vhdxs must be configured as fixed-size disks.
The V2Z migration tool must be installed and configured, with attention to source and target prerequisites. See V2Z migration prerequisites.
Migrate Hyper-V VMs
In Hyper-V Manager:
Confirm that the VM is safely shut down.
Go to Actions > Power > Shut down guest OS.
Confirm that all vhd/vhdxs are fixed-sized disks.
On the VM, right-click > Settings.
On the Hardware section, click each virtual Hard drive, and click Inspect.
The Properties window that opens, should display Type: Fixed size virtual hard disk.
If the disks are of a different type, convert them:
Click Edit.
In the dialog that opens, go to Choose action > Convert. Click Next.
For Choose Disk Type, choose Fixed size. Click Next. Click Finish.
In the importer VM:
View or reconfigure the V2Z configuration, using the
v2z configcommand.For example:
[fedora@toolbox1 centos]# v2z config
Logs for this migration will be available in /var/log/v2z/20220913102040.log
20220913102040|INFO|ID:ba7583f1-f94b-4d6d-bd52-1ad9f0dd0208|Getting config data from user
Select V2Z source type:
1 - vSphere
2 - Hyper-V
Please select source type (1 or 2): 2
Hyper-V Host Name or IP  [<hostname or IP>]:
Hyper-V username  [<username>]:
Hyper-V password  []:
zCompute hostname or IP  [<hostname or IP>]:
zCompute user  [<username>]:
zCompute password  []:
zCompute project name  [<project name>]:
zCompute storage pool  [<pool name>]:
zCompute Domain Name  [<domain>]:
zCompute importer VM Id [<importer VM Id>]:
zCompute importer VM IP Address [<importer VM IP>]:
zCompute importer VM username [fedora]:
zCompute importer VM password []:
20220913102045|INFO|ID:ba7583f1-f94b-4d6d-bd52-1ad9f0dd0208|Successfully get the config from user
20220913102045|INFO|ID:ba7583f1-f94b-4d6d-bd52-1ad9f0dd0208|Modifying V2Z config file
20220913102045|INFO|ID:ba7583f1-f94b-4d6d-bd52-1ad9f0dd0208|Successfully modified V2Z config file
Note
The V2Z migration uses the Hyper-V credentials to connect to the host. The importer VM’s credentials and Elastic IP address are configured for the Windows VM to connect to the importer VM via
pscp.Domain Name refers to the zCompute Account Name.
From zCompute 23.08, the
zCompute storage poolparameter in the config file must have the Volume Type’s value.
Confirm connectivity to Hyper-V by running the command
v2z hyperv vm-info <VM_NAME>The
v2z vsphere vm-info <VM_NAME>command displays information of a VM that you want to migrate. For example:[fedora@toolbox1 centos]# v2z hyperv vm-info centos1disk Logs for this migration will be available in /var/log/v2z/20220913102820.log 20220913102820|INFO|ID:102a64f6-b55f-4057-a31b-98515fba7329|Fetching Hyper-V VM info for VM: centos1disk 20220913102822|INFO|ID:102a64f6-b55f-4057-a31b-98515fba7329|Successfully fetched the VM info for VM: centos1disk Info: {'vm_name': 'centos1disk', 'vm_id': '125da45d-2454-4bd0-beef-1f1539c98cdf', 'cpu_usage': 0, 'memory_assigned': 4096, 'processor_count': 1, 'hard_drive': [{'Path': 'D:\\Centos1disk.vhdx', 'DiskNumber': None, 'MaximumIOPS': 0, 'MinimumIOPS': 0, 'QoSPolicyID': '00000000-0000-0000-0000-000000000000', 'SupportPersistentReservations': False, 'WriteHardeningMethod': 0, 'ControllerLocation': 0, 'ControllerNumber': 0, 'ControllerType': 0, 'Name': 'Hard Drive on IDE controller number 0 at location 0', 'PoolName': 'Primordial', 'Id': 'Microsoft:125DA45D-2454-4BD0-BEEF-1F1539C98CDF\\83F8638B-8DCA-4152-9EDA-2CA8B33039B4\\0\\0\\D', 'VMId': '125da45d-2454-4bd0-beef-1f1539c98cdf', 'VMName': 'centos1disk', 'VMSnapshotId': '00000000-0000-0000-0000-000000000000', 'VMSnapshotName': '', 'CimSession': 'CimSession: .', 'ComputerName': 'WIN-1G19HSS2UGU', 'IsDeleted': False}], 'vm_status': 'Operating normally', 'power_state': 3, 'generation': 1} { "vm_name": "centos1disk", "vm_id": "125da45d-2454-4bd0-beef-1f1539c98cdf", "cpu_usage": 0, "memory_assigned": 4096, "processor_count": 1, "hard_drive": [ { "Path": "D:\\Centos1disk.vhdx", "DiskNumber": null, "MaximumIOPS": 0, "MinimumIOPS": 0, "QoSPolicyID": "00000000-0000-0000-0000-000000000000", "SupportPersistentReservations": false, "WriteHardeningMethod": 0, "ControllerLocation": 0, "ControllerNumber": 0, "ControllerType": 0, "Name": "Hard Drive on IDE controller number 0 at location 0", "PoolName": "Primordial", "Id": "Microsoft:125DA45D-2454-4BD0-BEEF-1F1539C98CDF\\83F8638B-8DCA-4152-9EDA-2CA8B33039B4\\0\\0\\D", "VMId": "125da45d-2454-4bd0-beef-1f1539c98cdf", "VMName": "centos1disk", "VMSnapshotId": "00000000-0000-0000-0000-000000000000", "VMSnapshotName": "", "CimSession": "CimSession: .", "ComputerName": "WIN-1G19HSS2UGU", "IsDeleted": false } ], "vm_status": "Operating normally", "power_state": 3, "generation": 1 }Make sure that the temporary directory (usually
/home/fedora/data) has double the capacity of the boot vmdk.Format and make a mount point for the disk connected to the importer VM. This disk was created earlier as an additional data volume with free space that amounts to double the used capacity of the largest boot disk.
lsblk
sudo mkfs.ext4 /dev/vdX
sudo mount /dev/vdX /home/fedora/data
sudo chmod a+w /home/fedora/data
Migrate the VM using the
migrate-hyperv-vm-via-block-devicecommand. This command automatically determines details such as disk and instance types.Usage:
v2z hyperv migrate-hyperv-vm-via-block-device <VM_NAME> <OUTPUT_PATH>For example:
v2z hyperv migrate-hyperv-vm-via-block-device centos1disk /home/fedora/data
Post-migration configuration
After the VM migration has completed, start up the migrated VM and complete its network setup.
In the zCompute UI, go to Compute > Instances.
Select the migrated VM, and click Start.
The Attach Interface dialog opens, prompting you to attach a network to the VM. It is possible to specify a subnet, an existing NIC or the VM’s MAC address.