Migrating VMware VMs to zCompute
VMware VMs are migrated to zCompute by converting the boot disk using
virt-v2v and migrating the other disks intact, as block devices.
There are two methods to migrate VMware VMs to zCompute:
Migrate VMWare VMs from NFS share
Tip
Recommended migration method
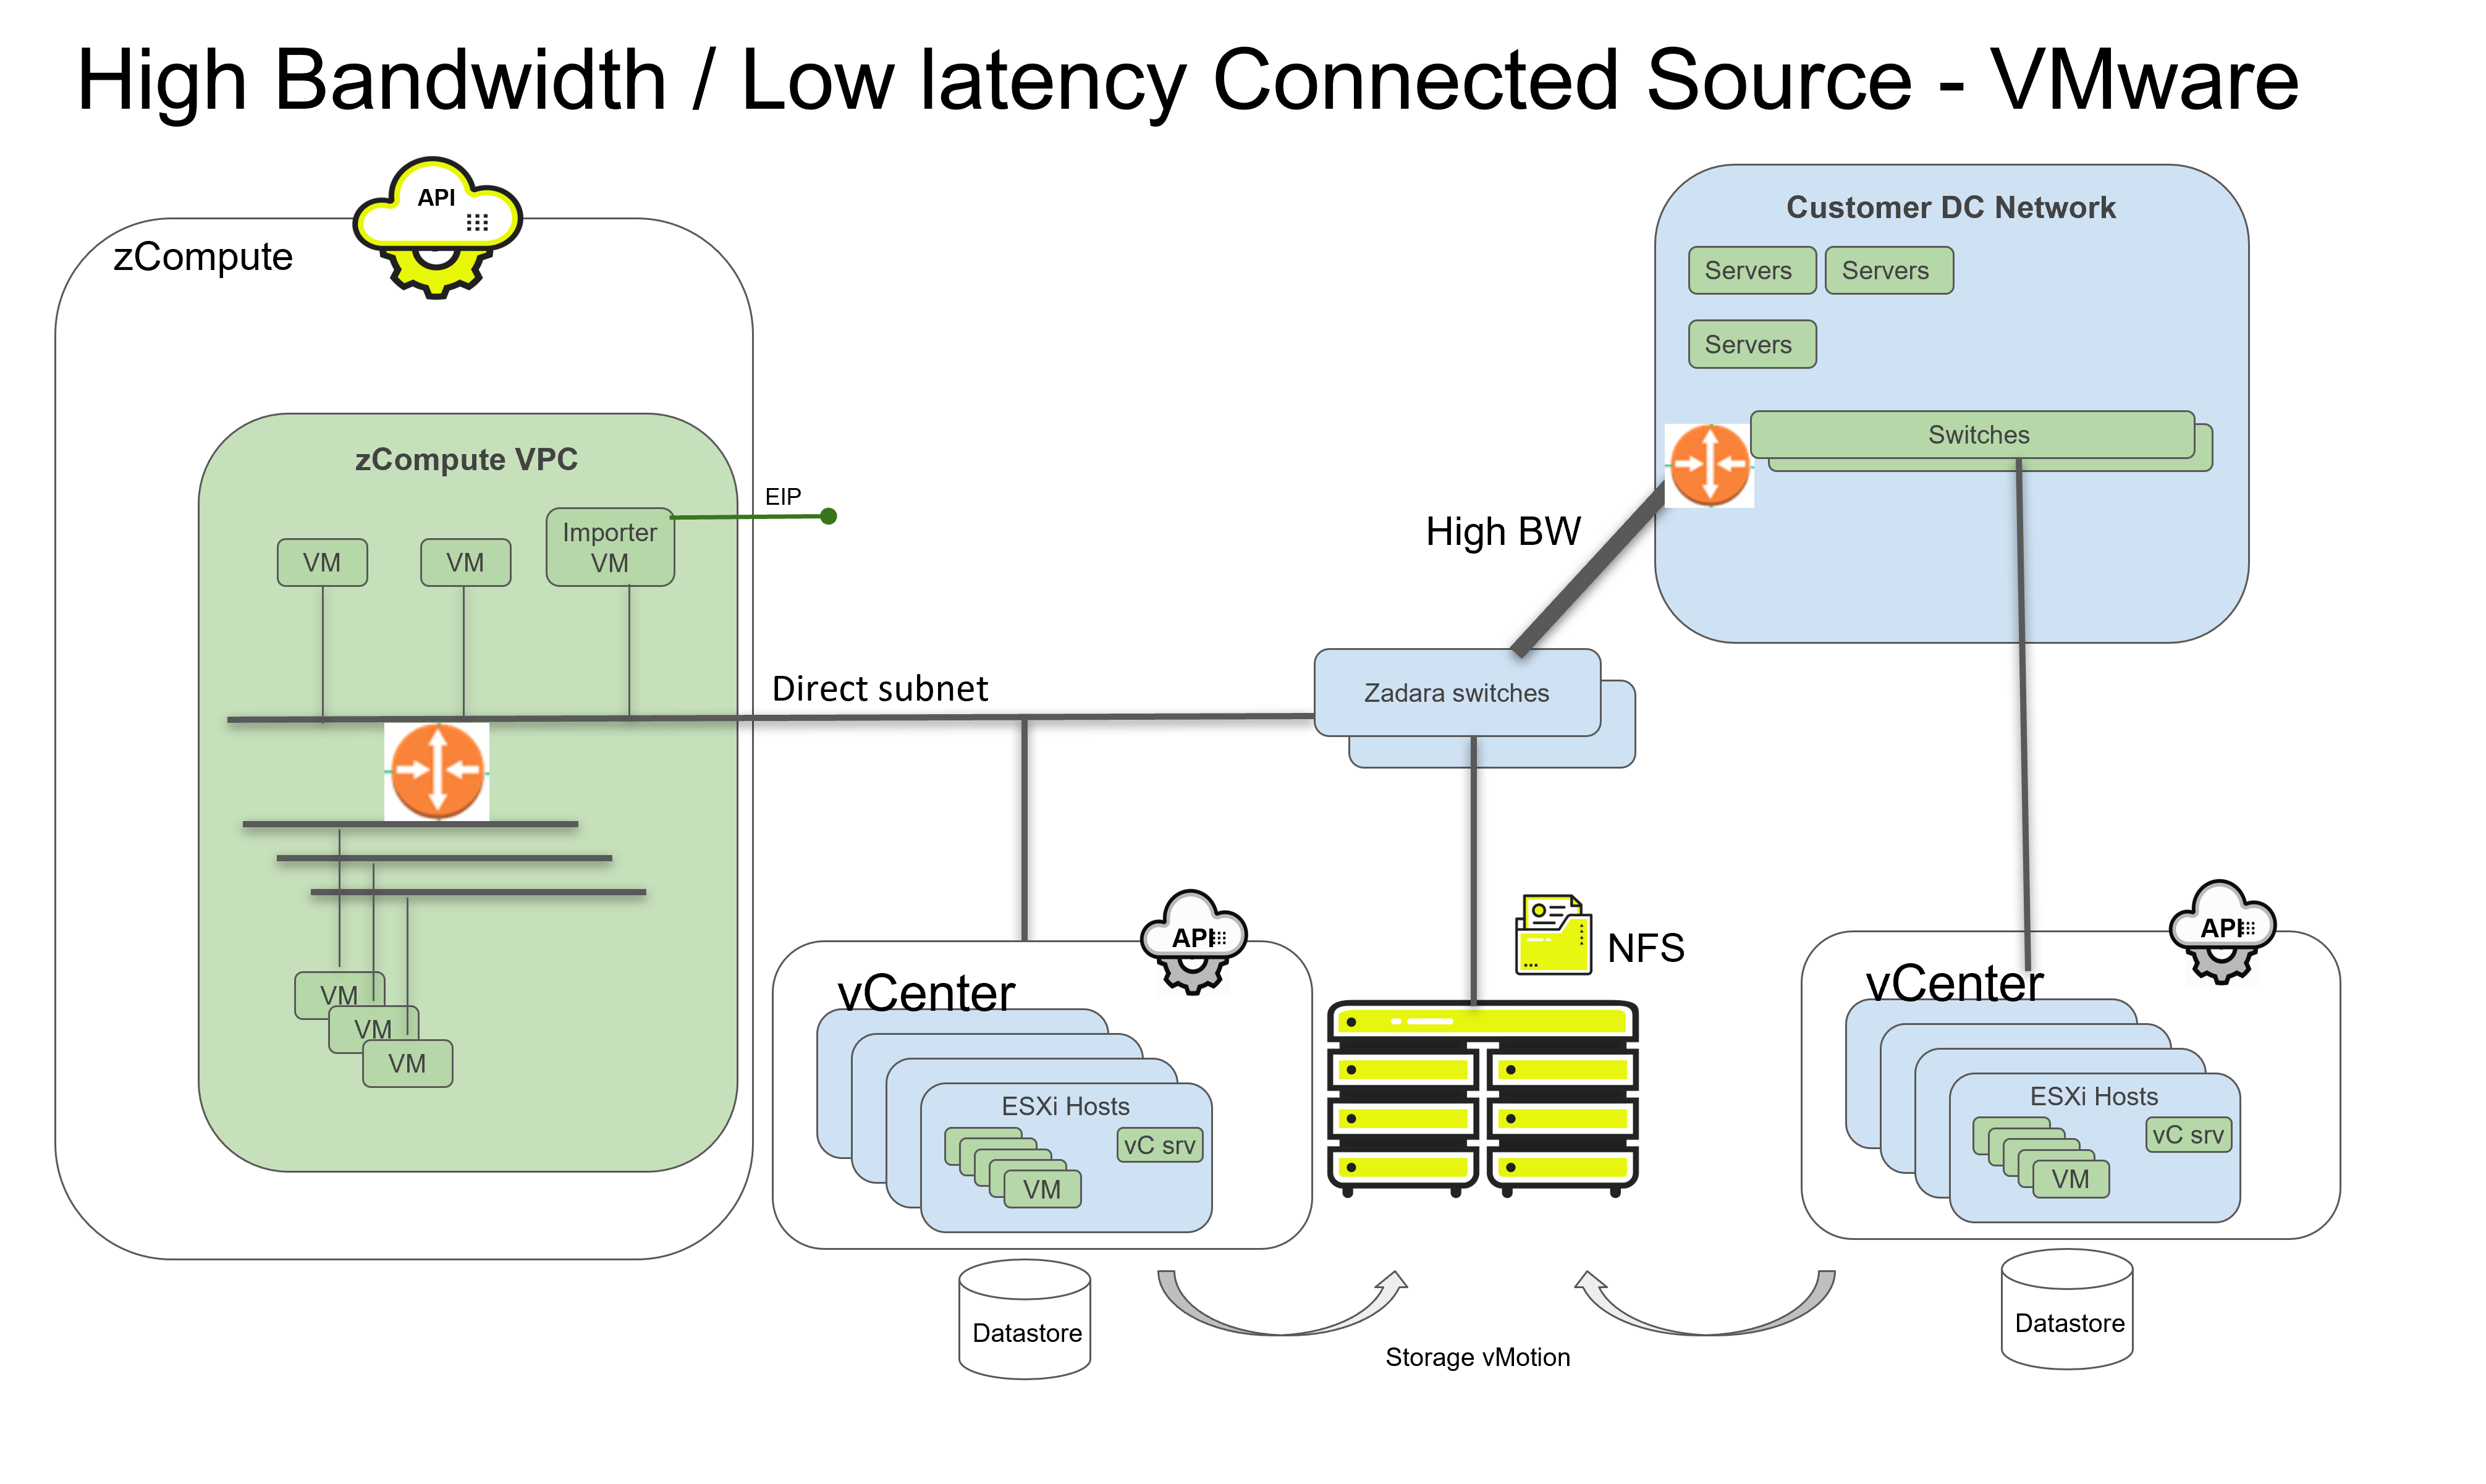
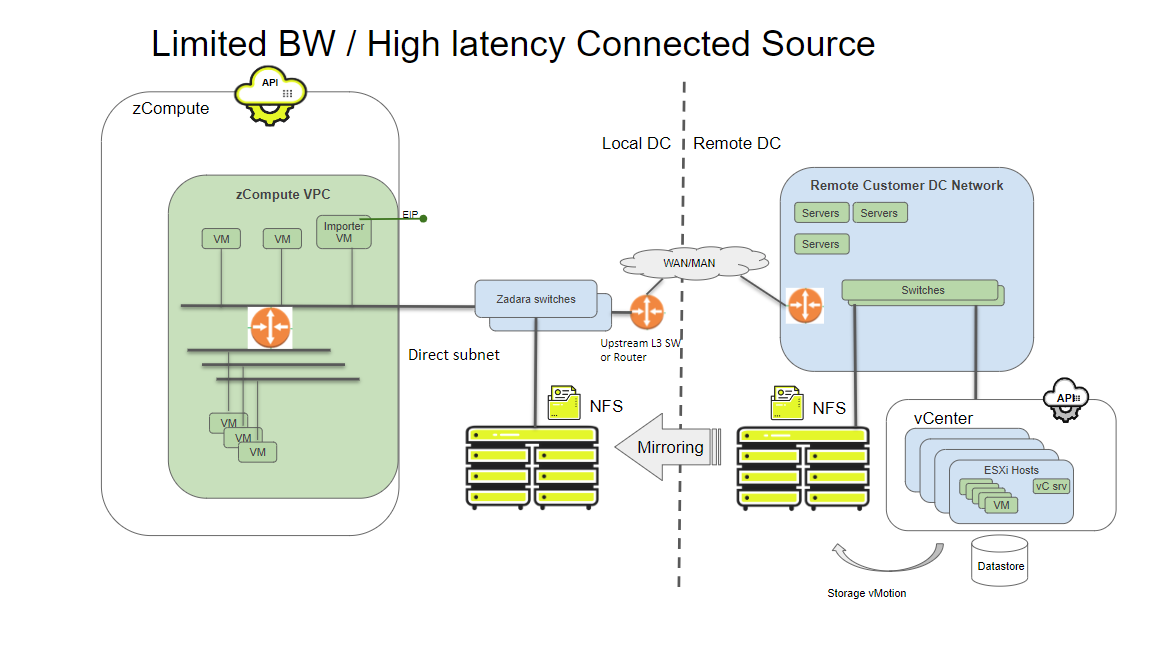
The recommended migration option includes an NFS volume that is accessible to both the source virtualization platform (e.g. as a datastore for Vmware ESXi hosts) and to the importer VM over a direct subnet to which it’s attached.
High bandwidth / low latency connected source:
Limited bandwidth / high latency connected source:
Migrate VMs using the VMware API
Other, slower options involve copying the source VM’s virtual disks to the zCompute cloud from the virtualization platform’s management interface (e.g. HTTP copy of vmdk files from vCenter or ESXi hosts).
Prerequisites
The V2Z migration tool must be installed and configured, with attention to source and target prerequisites. See V2Z migration prerequisites.
Important
Migration using the V2Z tool requires infrastructure preparations.
Contact Zadara’s Operations team for coordinating the migration’s planning and infrastructure setup stages.
Migrate VMWare VMs from NFS share
Note
This is the preferable migration method, in terms of speed and minimal downtime.
In vCenter:
Go to Actions > Migrate.
In Select the migration type, choose Change storage only and click Next.
In Select storage, choose the VPSA NFS that will be connected to the importer VM and click Next.
In the importer VM:
Run this entire procedure with
rootprivileges:sudo su -Format and make a mount point for the disk connected to the importer VM.
This disk was created earlier as an additional data volume, with free space that amounts to double the used capacity of the largest boot disk.
In the following example, “X” in “vdX” is the number of the volume block device previously added to the VM:
lsblk
mkfs.ext4 /dev/vdX
Update the zCompute toolbox VM’s
fstabfile (/etc/fstab) with entries:# Configure mount point for the disk connected to the importer VM /dev/vdX /home/fedora/data ext4 defaults # Mount the local NFS share as read-only <NFS-server-IP>:/export/<export-name> /home/fedora/nfs_mount nfs user,noauto,ro,nfsvers=3Remount all entries in
fstab:mount -aIn the Symp CLI, export the zCompute user’s login token as an environment variable, so that it will be used instead of the user password. This avoids an issue with larger VMs that take a longer time to import.
export SYMP_TOKEN=`symp -k --url https://<cluster-api-ip> -d <account> -u <user> -p <password> --project <project> login <user> <password> <account> <project> -f value`Note
For account and project names that include spaces, enclose the account and project name strings in double quotes in the assignment to the SYMP_TOKEN environment variable.
For example, in the SYMP_TOKEN environment variable for an account named
Account 123and a project namedApp Project 1:export SYMP_TOKEN=`symp -k --url https://<cluster-api-ip> -d "Account 123" -u <user> -p <password> --project "App Project 1" login <user> <password> "Account 123" "App Project 1" -f value`Before running the V2Z migration process, change the current working directory to
/home/fedora/data:cd /home/fedora/dataMigrate the VM using the
migrate-vmdk-via-block-devicecommand, with the syntax according to your Toolbox version.Important
The syntax of the
migrate-vmdk-via-block-devicecommand for Toolbox Fedora 2.3.1 and later differs from the syntax for Toolbox 2.3.0 and earlier.For implementations using Toolbox Fedora 2.3.1 or later, use the syntax that specifies the target VM’s
INSTANCE_TYPE:Usage:
v2z vsphere migrate-vmdk-via-block-device [OPTIONS] <VM_NAME> <INSTANCE_TYPE> <BOOT_VMDK_PATH> <OUTPUT_PATH>

Options:
  --other-vmdk-paths TEXT
  --config-path TEXT
  --uefi TEXT              [default: False]
  --help                   Show this message and exit.
For example:
v2z vsphere migrate-vmdk-via-block-device win2012r2-bios-2disk z4.large /mnt/vmdk_nfs/win2012r2-bios-2disk/win2012r2-bios-2disk-flat.vmdk /home/fedora/data --other-vmdk-paths /mnt/vmdk_nfs/win2012r2-bios-2disk/win2012r2-bios-2disk_1-flat.vmdkFor implementations using Toolbox 2.3.0 or earlier, use the syntax that specifies the target VM’s number of CPUs and RAM (in MB):
Usage:
v2z vsphere migrate-vmdk-via-block-device <VM_NAME> <CPU> <RAM_MB> <BOOT_VMDK_PATH> <OUTPUT_PATH> [--other-vmdk-paths <2nd_VMDK_PATH> [n_VMDK_PATH] ]For example:
v2z vsphere migrate-vmdk-via-block-device win2012r2-bios-2disk 2 8192 /home/fedora/vmdk_nfs/win2012r2-bios-2disk/win2012r2-bios-2disk-flat.vmdk /home/fedora/data --other-vmdk-paths /home/fedora/vmdk_nfs/win2012r2-bios-2disk/win2012r2-bios-2disk_1-flat.vmdk
The examples above, for either Toolbox Fedora 2.3.1 and later or Toolbox 2.3.0 and earlier, will create a zCompute VM with the following:
The VMware VM will be migrated to a zCompute VM named
win2012r2-bios-2diskThe migrated VM on zCompute will have 2 CPUs, 8GB (8192MB) RAM
The boot disk to migrate is
win2012r2-bios-2disk-flat.vmdkThe second disk to migrate (
--other-vmdk-paths) iswin2012r2-bios-2disk_1-flat.vmdkThe output path will be
/home/fedora/data
Note
The V2Z command line in Toolbox Fedora 2.3.5 and later supports VM and volume names that contain spaces, by enclosing the VM or volume name between single quotes.
In symp, for VMs that boot using BIOS, run the following configuration:
vm update --hw-firmware-type bios <vm-id>Note
This configuration is required for VMs booting using BIOS, because they migrate as UEFI VMs.
Continue with Post-migration configuration.
Migrate VMs using the VMware API
This is the simplest migration method but slower than the NFS share alternative, thus increasing downtime.
In this migration process, the vSphere API is accessed, and after the vmdk is detected, the vmdk files are migrated into the importer VM using HTTP GET.
The boot disk has to be converted using virt-v2v and additional disks are migrated directly into a zCompute block device, using HTTP GET.
The V2Z migration tool accesses the vSphere API based a configuration file that is populated with the vSphere host and credentials.
Prerequisites
V2Z should already be configured for first usage during the V2Z installation
and configuration phase, using the v2z config command.
See Installing the V2Z migration tool.
The configuration can be viewed and modified using the v2z config command.
Migration
Confirm connectivity to vSphere by running the command
v2z vsphere vm-info <VM_NAME>The
v2z vsphere vm-info <VM_NAME>command displays information of a VM that you want to migrate. For example:[fedora@fedora-36-zadara-toolbox-d9cbc89-vm ~]$ v2z vsphere vm-info win2016-bios Logs for this migration will be available in /var/log/v2z/20220913141833.log 20220913141833|INFO|ID:cc34dc1c-d447-4d07-9085-45c602d70a2a|Fetching VM information for VM win2016-bios 20220913141833|INFO|ID:cc34dc1c-d447-4d07-9085-45c602d70a2a|Successfully fetched the VM info for VM: win2016-bios Info: {'name': 'win2016-bios', 'instance_uuid': '503f5ac2-77ae-11f5-a6a1-02c05943c5f7', 'bios_instance_uuid': '423ffb10-d395-5168-9b1f-13d944d0b27f', 'cpu': 1, 'guest_os_name': 'Microsoft Windows Server 2012 (64-bit)', 'memory': 4096, 'power_state': 'poweredOff', 'firmware': 'bios', 'virtual_disk': [{'file_name': '[VPSA_gen3_rnd_prod] win2016-bios/win2016-bios.vmdk', 'datastore_name': 'VPSA_gen3_rnd_prod', 'size_in_kb': 41943040}]} { "name": "win2016-bios", "instance_uuid": "503f5ac2-77ae-11f5-a6a1-02c05943c5f7", "bios_instance_uuid": "423ffb10-d395-5168-9b1f-13d944d0b27f", "cpu": 1, "guest_os_name": "Microsoft Windows Server 2012 (64-bit)", "memory": 4096, "power_state": "poweredOff", "firmware": "bios", "virtual_disk": [ { "file_name": "[VPSA_gen3_rnd_prod] win2016-bios/win2016-bios.vmdk", "datastore_name": "VPSA_gen3_rnd_prod", "size_in_kb": 41943040 } ] }Make sure that the temporary directory (usually
/home/fedora/data) has double the capacity of the boot vmdk.Migrate the VM using
v2z vsphere migrate-vsphere-vm-via-block-device:For Toolbox Fedora 2.3.1 and later, this command automatically determines details such as disk and instance types.
Usage:
Usage: v2z vsphere migrate-vsphere-vm-via-block-device [OPTIONS] VM_NAME OUTPUT_PATH

Options:
   --config-path TEXT
   --help              Show this message and exit.
For example:
v2z vsphere migrate-vsphere-vm-via-block-device win2012r2-bios-2disk /home/fedora/dataNote
After the VM is created, and while it is powered off, the instance type can be changed.
Continue with Post-migration configuration.
Post-migration configuration
After the VM migration has completed, start up the migrated VM and complete its network setup.
In the zCompute UI, go to Compute > Instances.
Select the migrated VM, and click Start.
The Attach Interface dialog opens, prompting you to attach a network to the VM. It is possible to specify a subnet, an existing NIC or the VM’s MAC address.
Migrating to a DVS project
VMware VMs that are migrated to zCompute using the V2Z migration process result in VMs in a rich VPC networking type project rather than in the simpler DVS networking alternative.
Tenants that prefer the simpler DVS networking model can further migrate their newly migrated zCompute VPC VMs to a DVS project.
See Migrating a VM to a DVS project in the Networking Guide.