Initial Deployment Operations
This section describes steps used to create a VM instance with the Create VM Instance wizard. Operations commonly used immediately following VM instance creation are described in Common VM Instance Management Operations.
See the video demonstrating the basics of creating and management of zCompute Instances:
Creating VM Instances
To create VM instances:
Navigate to the Compute > Instances view.
Click Create.
Note
Fields marked with a red asterisk are mandatory.
The Create VM Instance wizard starts including the following four tabs: Compute, Storage, Networking, Config.
Compute - defines the VM instances, their type, activation and quantity.
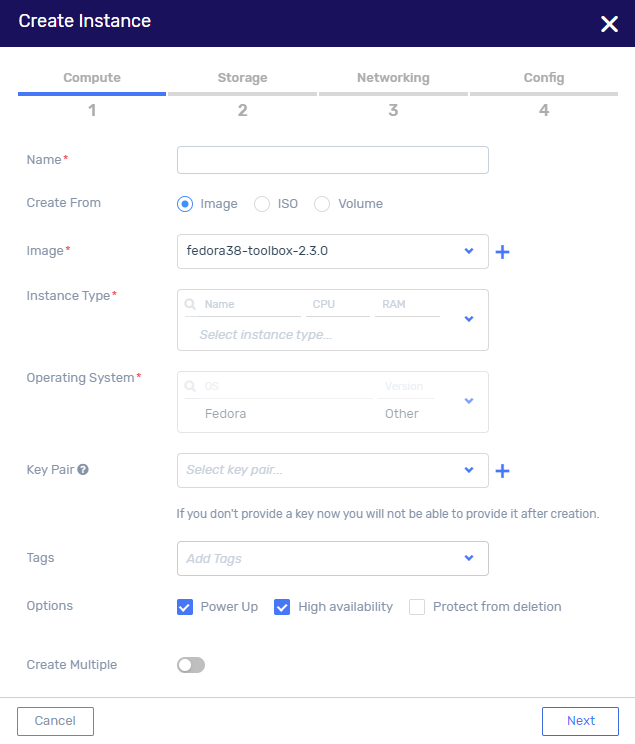
In the Compute tab, configure:
Name - the display name for the VM instance.
Create From - the source of the new VM instance. When you select one of the source options, the next field is updated as follows:
Image - select an image from available list. See Image Creation to create new image.
ISO - select Installation ISO from available list.
Volume - select Boot Volume from available list.
Note
From version 24.03, zCompute automatically populates the Operating System field, by detecting the OS of the selected source Image, ISO or Volume.
The Operating System field is read-only.
In the event of mismatch or undetected OS, open a ticket for Zadara support to override the auto-populated Operating System.
Instance Type - defines the amount of compute resource of the VM instance (CPU and RAM).
Key Pair - set of security credentials for ensuring the identity of the user connecting to the VM instance. Select existing key pair from pull down list or see Create a new key pair to generate or upload a new key.
Tags - select an existing tag or create a new tag.
Options:
Power Up - launches the VM instance post creation.
High Availability - ensures the VM instance is restarted in case of failure.
Protect from deletion - protects the VM instance from accidental deletion.
Create Multiple - drag the button to the right to create multiple VM instances.
Click Next.
Storage - defines the storage requirements for the new VM instance.
zCompute block storage provides persistent storage for virtual machines, (VMs) and is managed through predefined Volume Types, which define performance characteristics and configurations.
Key aspects include:
Volume Types:
Starting in version 23.08, block storage is organized using Volume Types, that include definitions such as media type and performance.
Other public cloud providers refer to these as disk types.
Integration with VMs:
Block storage volumes are attached to VMs. These volumes can be configured with parameters such as volume type and size.
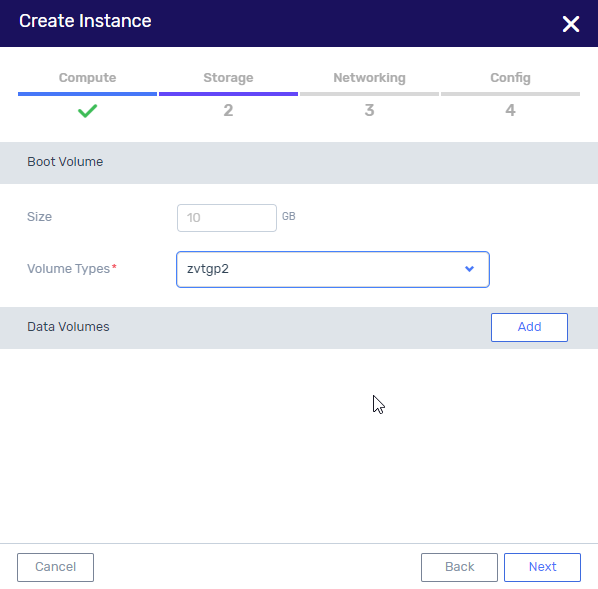
In the Storage tab, configure:
Boot Volume - disk size (GB) and Volume Type that will be used for the boot volume of the VM instance.
Data Volumes (optional) - add new or existing data volumes. To add a new volume, click Add and + and configure the following:
Name - volume name.
Description - description of volume.
Volume Type - select the Volume Type from the dropdown list.
Size - volume size (GB).
Protection Group - protection group for the volume.
Click Next.
Networking - defines the networking requirements for the new VM instance. For each VM instance, at least one network (Network 0) must be defined. Other networks can also be added to the VM instance by clicking Add.
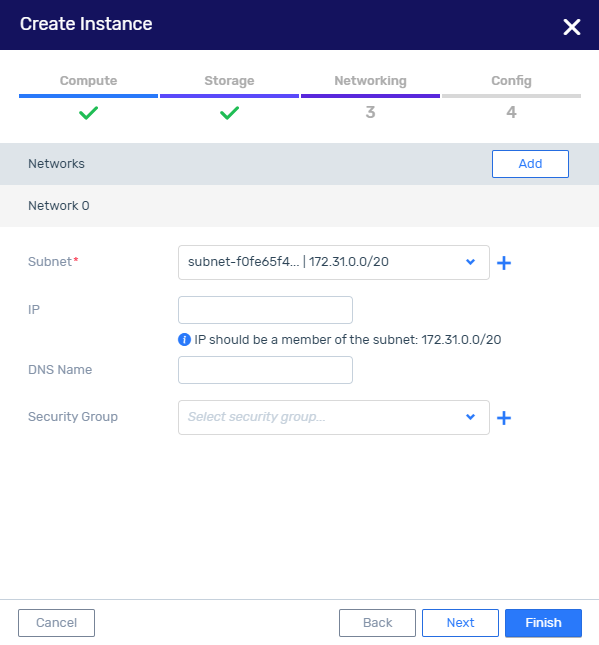
For each network configure:
Subnet - subnet used for VM instance connectivity. Select from the existing list of subnets or create a new subnet.
IP - IP address for the interface. The IP must be within the entered subnet.
DNS Name - DNS name for the new instance.
Security Group - security group that will be used to limit/allow connectivity to the VM instance.
Note
If a security group is not specified, a port is associated with a default security group. The default security group allows both ingress and egress traffic. Security rules can be added to the default security group to change the traffic behavior.
Important
The MTU size for VM Instances with a Windows OS that use VxLAN-based networks, must not be greater than 1450.
Click Next.
Config - allows configuration of optional settings for the new VM instance.
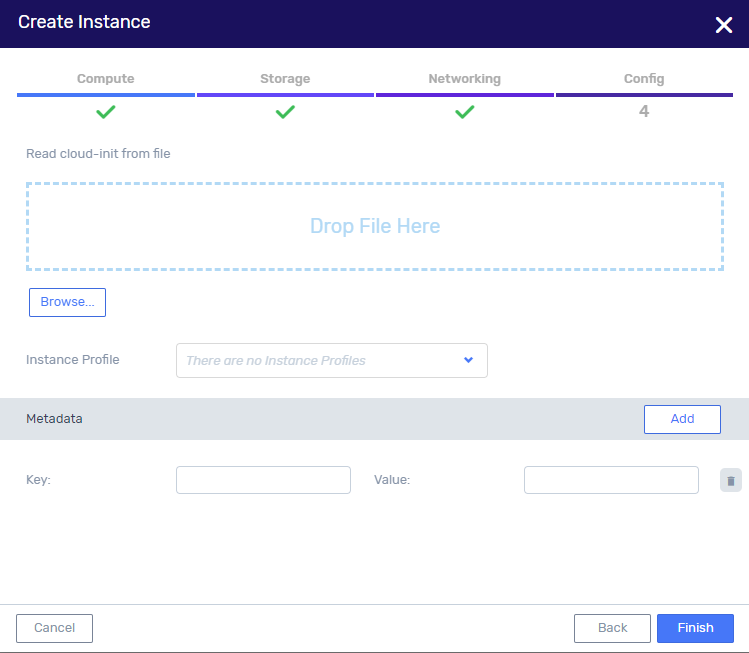
In the Config tab, enter the following optional settings:
Cloud-init - drag and drop a cloud-init file to be used to initialize the VM instance post-creation.
Instance Profile - to pass role information to an instance when the instance starts, select an instance profile from the dropdown.
To create an instance profile, and for further details about instance profiles, see Instance Profiles in the Identity & Access guide.
Metadata - key-value set for additional metadata configuration.
Click Finish to end the create instance wizard.
Starting VM Instances
To start a VM instance:
In the Compute > Instances view, select the VM instance to run.
Click Start.
The status on the selected VM Instance changes to Spawning, and VM started appears. The selected VM instance is automatically placed on one of the nodes in the cluster and starts running, and its status changes to Active.
Connecting to a VM Instance
Connect and access a VM instance in Active state by using VNC.
To connect to a VM instance:
In the Compute > Instances view, select the VM instance to which to connect.
Click Connect.
In the displayed VM instance, click Send Ctrl-Alt-Del.
The VNC window is displayed.
Note
Operating System login credentials are required.
Only the US-EN layout keyboard is supported with the VNC VM view.
It is possible to work around this by changing the keyboard layout to access the VM using VNC.
It is possible to use SSH for Linux VMs or Remote Desktop (RDP) for Windows VMs without changing the keyboard’s layout.
Attach Elastic IP to a VM Instance
If an elastic IP is required, add it to the VM instance after creation as follows:
Navigate to Compute > Instances.
Select the desired VM instance from the displayed list to open the detailed view.
Click the Elastic IPs tab.
Click Attach and select a Elastic IP from the list.
Secure SSH Access to a VM Instance
To connect via SSH to a VM instance, enter the following:
$ ssh -i <private_key_file> <default_username_for_image>@<elastic_ip>
Example:
$ ssh -i id_rsa fedora@192.237.248.66
In the above example, the private key file is id_rsa, the default
username for the image is fedora and the Elastic IP is 192.237.248.66.
Creating Snapshots of VM Instances
Caution
Snapshots configured in the VM and Storage UI are individual, and not crash-consistent.
For crash-consistent backups, we highly recommend configuring snapshots using Data Protection using Protection Groups.
To create a VM instance snapshot:
Navigate to the Compute> Instances view.
From the displayed list, select the VM instance for which the snapshot is to be created and click More.
In the More menu, select Snapshot.
In the displayed Create Snapshot window, enter a name for the new snapshot or accept the default name consisting of the original VM instance name and the date-time stamp of the snapshot creation.
(Optional) Enter the description of the snapshot.
Click OK. A new snapshot is created. It is displayed in the Compute > Snapshots view.
Protecting VM Instances
After creating a VM instance, protect it by assigning it to a Protection Group.
Protecting VM Instances via the Zadara Cloud Services GUI
Navigate to the Compute > Instances view.
From the displayed list, select the VM instance to protect and click More.
In the More menu, click Protect.
In the Protect Resource window, select a protection group from the dispalyed list and click OK.
In the Compute > Instances view, the protection column will be checked for the VM instance.
Note
This window can also be used to remove a protection group from a VM instance.
Protecting VM Instances via the Zadara Cloud Services CLI
To protect a VM instance resource, assign it to a protection group as shown in the example below for ‘VM-1’ assigned to Protection_Group-1’.
Note
The resource and the protection group must belong to the same project.
Retrieve the ID of the VM instance,’VM-1’, together with its project_id.
Zadara @ user1/cloudacc1> `vm list -m columns='^id|^name|^project_id'`

+--------------------------------------+------+----------------------------------+
| id                                   | name | project_id                       |
+======================================+======+==================================+
| c4d017cf-04f4-4f85-9e21-1d067e1d384e | VM-1 | 08459aa189e849d0a47ddd985db594bd |
+--------------------------------------+------+----------------------------------+
Retrieve the ID of the protection group, Protection-Group-1, together with its project_id.
Zadara @ user1/cloudacc1 > *\ `protection groups list -m columns='^id|^name|^project_id'`Verify that the VM instance and protection group belong to the same project.
Protect the VM instance VM-1 by assigning it to the protection group Protection_Group-1.
Zadara @ user1/cloudacc1 > protection memberships create  0d6df1eb-0e3b-4b59-9669-ed620b6ad65d instance c4d017cf-04f4-4f85-9e21-1d067e1d384e

=============== ==========================================
Field           Value
=============== ==========================================
| id            | ff25527a-7b08-4b76-bbc7-b5715f9182c0
| account_id    | cloudacc1
| created_at    | 2019-02-06T08:36:01.401731
| group_id      | **0d6df1eb-0e3b-4b59-9669-ed620b6ad65d**
| project_id    | 6666cfcf840f4a788cecfa6a3a00b2ee
| resource_id   | **c4d017cf-04f4-4f85-9e21-1d067e1d384e**
| resource_type | instance
| triggered_at  | none
| user_id       | user1
=============== ==========================================
The VM instance, ‘VM-1’ will now be protected according to the local backup schedule found in the protection group, ‘Protection-Group-1’.