Distributed Virtual Switch (DVS)
DVS Introduction
Distributed Virtual Switch (DVS), is a zCompute networking model which provides layer 2, VLAN-based networking functionality for VMs running on zCompute.
The idea behind DVS is to provide customers who are more familiar with legacy virtualization platforms (for example, VMware, Hyper-V, Nutanix, etc.) with a networking environment similar to the simplified networking model found in such legacy environments.
DVS provides simple OSI layer 2 VLAN-based switched networking functionality for VMs. DVS networks can be used to interconnect VMs attached to them, as well as for connecting these VMs with other network entities that reside in the hosting data center (servers, routers, storage devices, etc.).
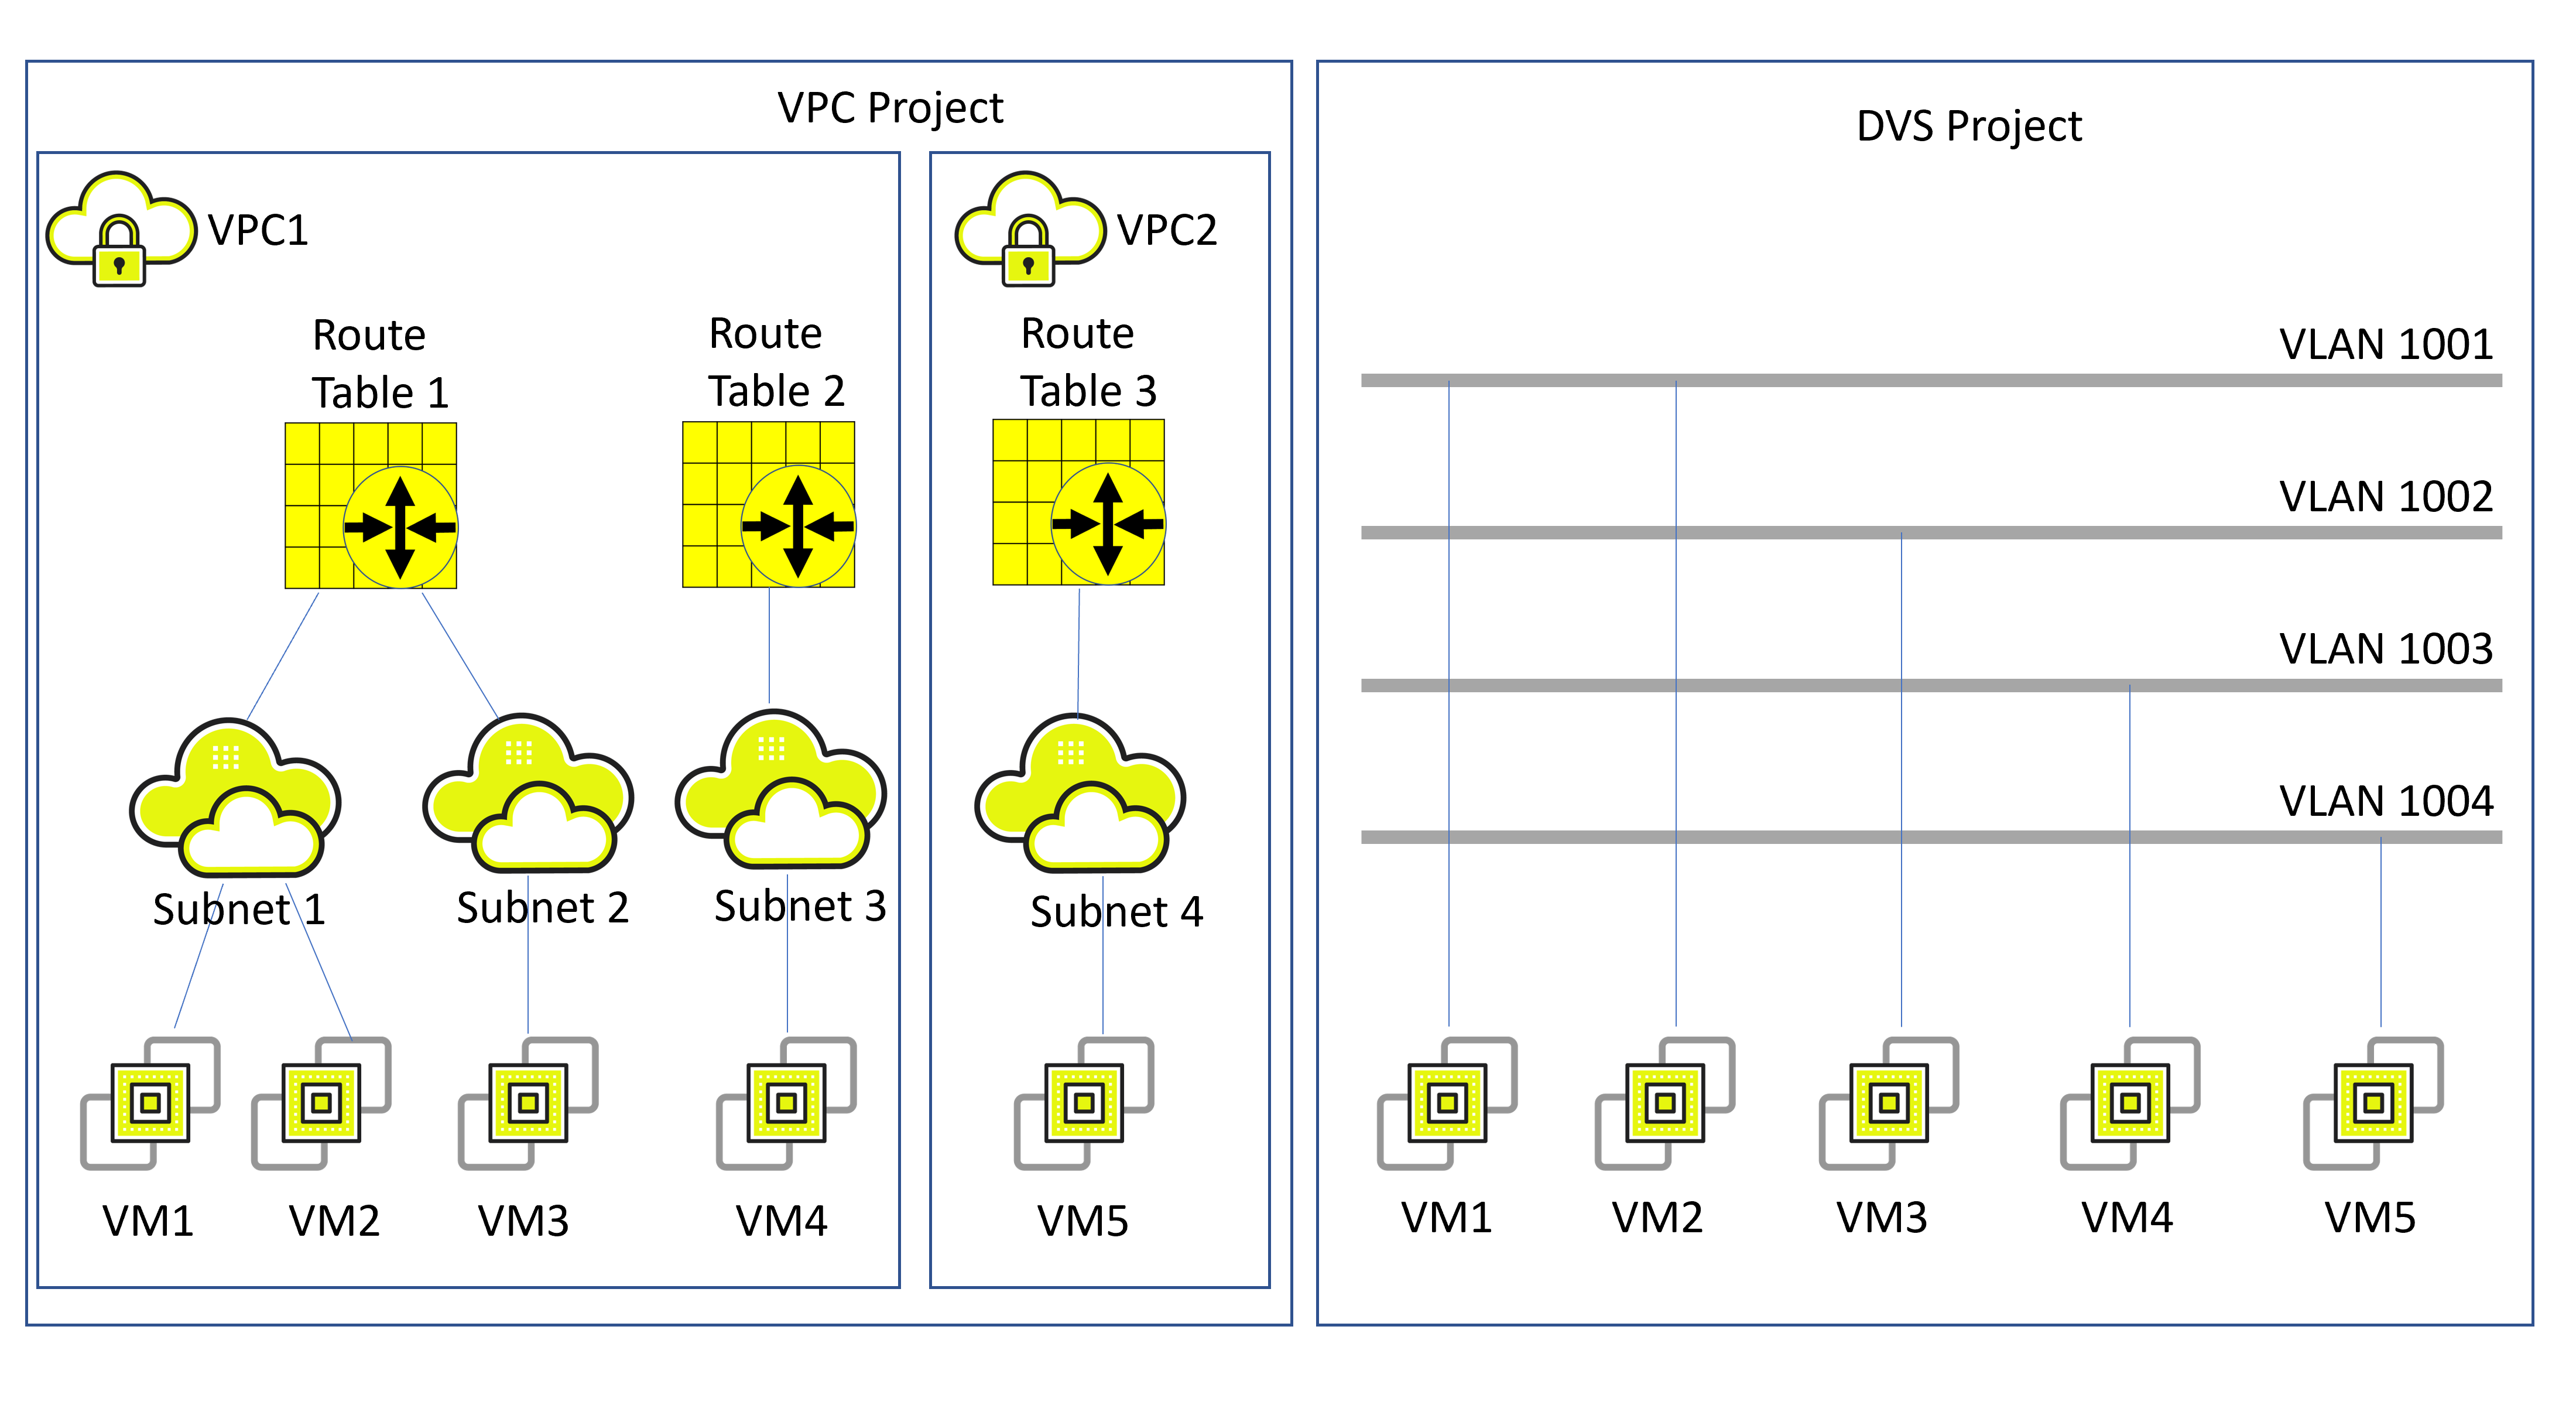
The DVS model provides physical switching L2, VLAN-based connectivity, whereas VPC provides a rich IP networking platform (route-tables, subnets, security groups, Internet gateways, DNS, Elastic IPs, etc.) alongside other cloud-native services that are independent of physical switching configuration, such as auto-scaling groups, load-balancers, etc.
Zadara zCompute supports both VPC and DVS networking modes in coexistence: A single zCompute account (tenant), can have multiple VPC-based projects alongside DVS-based projects.
Comparison of VPC and DVS type projects:
Note
A zCompute project can be either a VPC project or a DVS project.
DVS VLANs Management
(zCompute v23.08 and later)
To use DVS-mode networking, a cloud administrator first allocates VLANs or VLAN ranges for use on the zCompute cloud. The cloud administrator then assigns some of these VLANs to various accounts on that zCompute cloud.
Note
A VLAN can be assigned to one account, and cannot be shared between accounts.
An account administrator (or a cloud administrator on behalf of the account) creates one or more DVS projects in an account. The account administrator then assigns VLANs (assigned to the account by a cloud administrator) to the DVS projects on that account.
Once assigned to a project, member users can create DVS networks using these VLANs, and attach VMs to those DVS networks using the zCompute UI, the Symp CLI or APIs.
VLANs assignment is dynamic in the sense that VLANs can be assigned or released from projects, accounts or even the cloud, and re-assigned as needed, governed by the user’s role and permissions.
VLAN creation and allocation flow
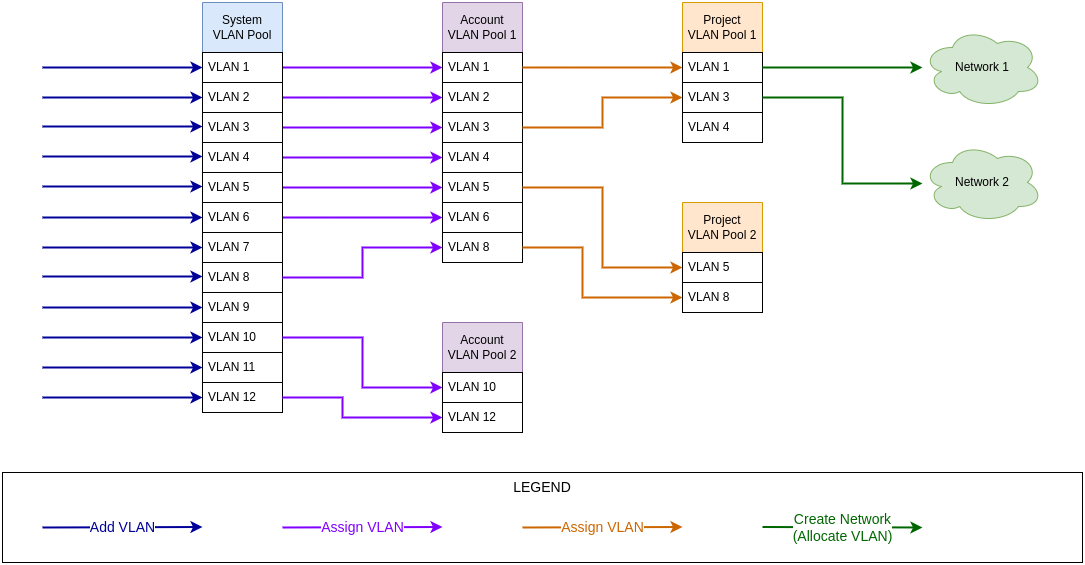
Zadara Operations creates the system VLAN pool, and adds or removes VLANs in the pool.
MSPs or Zadara Operations allocate VLANs from the system VLAN pool to an account’s VLAN pool.
Note
An account’s VLAN pool is automatically created when the account is created.
An account can have only one VLAN pool.
When an account is deleted, its VLAN pool is automatically deleted.
When an account’s VLAN pool is deleted:
All of the account’s projects’ VLAN pools are automatically deleted.
All of the account’s VLANs are automatically deleted.
A VLAN in a project’s VLAN pool that is released from an account’s VLAN pool is first automatically released from the project’s VLAN pool.
The account administrator (MSP or tenant) assigns VLANs from the account’s VLAN pool to a project’s VLAN pool.
Note
A project’s VLAN pool is automatically created when the project is created.
A project can have only one VLAN pool.
When a project’s VLAN pool is deleted, all of its VLANs are automatically released.
When a project is deleted, its VLAN pool is automatically deleted.
The account administrator can create a DVS network by allocating a VLAN to a DVS project, and associating a VM instance with the project’s network.
Note
A VLAN in a project’s VLAN pool cannot be released if the VLAN is allocated to a network.
VLAN release and deletion flow
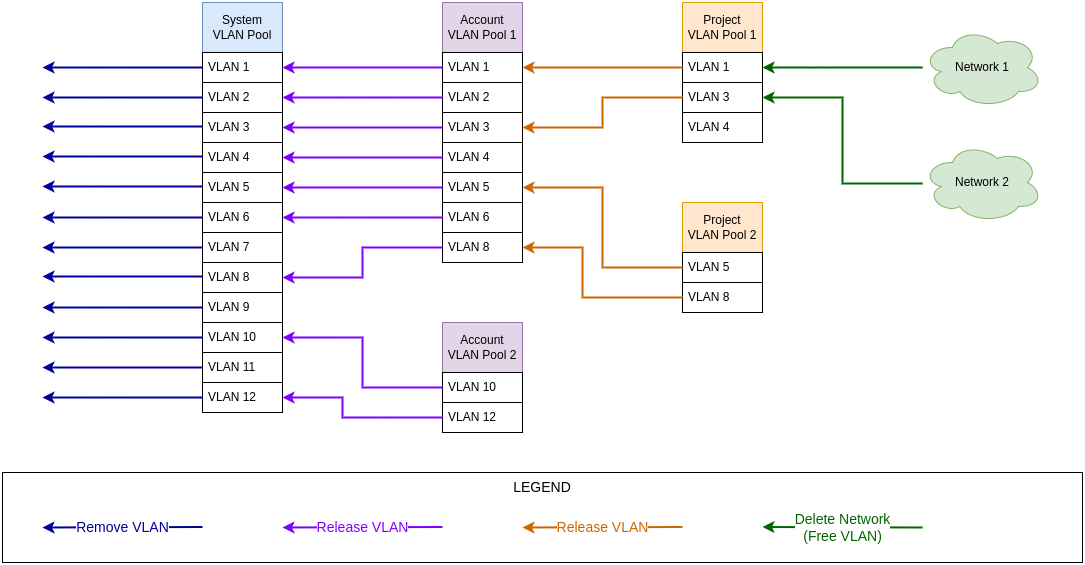
The account administrator (MSP or tenant) can release a VLAN that is allocated to a network, back to the project’s VLAN pool, by deleting its network.
The account administrator can release VLANs that are not allocated to a network, from a project’s VLAN pool back into the account’s VLAN pool.
Note
A VLAN in a project’s VLAN pool cannot be released if the VLAN is allocated to a network.
When a project’s VLAN pool is deleted, all of its VLANs are automatically released.
When a project is deleted, its VLAN pool is automatically deleted.
Zadara Operations can release VLANs that are not allocated to a network, from an account’s VLAN pool back into the system VLAN pool.
Note
When an account is deleted, its VLAN pool is automatically deleted.
When an account’s VLAN pool is deleted:
All of the account’s projects’ VLAN pools are automatically deleted.
All of the account’s VLANs are automatically deleted.
A VLAN in a project’s VLAN pool that is released from an account’s VLAN pool is first automatically released from the project’s VLAN pool.
Zadara Operations can remove a VLAN from the system pool.
DVS - MSP account admin perspective
(zCompute v23.08 and later)
zCompute introduces some powerful VLANs management tools, that provide the ability for account admininstrators to centrally manage multiple VLANs at the zCompute cloud level, alongside the ability to assign multiple VLANs to accounts and delegate control to these accounts for managing these resources in a self-service fashion.
zCompute still allows MSP account administrators to create DVS networks for these accounts as they see fit, in the event that their managed services models and practices require it.
Such DVS VLANs can span beyond the zCompute cloud, into the MSP’s physical network switches, over the Zadara switches’ uplink trunks.
In order to use VLANs, the Zadara cloud’s physical switches need to be configured. The creation and assignment of VLANs to the zCompute cloud requires opening a change-request ticket with Zadara Operations (via Zadara Support’s email address: support@zadara.com).
Account administrators can can also release and reassign VLANs to other projects, accounts or even remove VLANs from the cloud.
Since initial configuration of VLANs requires Zadara operations intervention and coordination, it it highly recommended for MSPs to plan ahead and designate a range, or multiple ranges, of VLANs for the zCompute cloud, to make the physical switches a one-off, well-planned activity.
MSPs don’t have to configure their upstream switches interfaces to use these VLANs immediately (though it’s recommended), but can do so later at a time that suits them.
While MSP administrators can delegate VLAN management to accounts, it is not mandatory. They can still manage VLANs and DVS networks on behalf of other accounts.
Creating a DVS network (UI and CLI)
(zCompute v23.08 and later)
Prerequisites for creating a DVS network
An existing DVS project on the tenant’s account.
An existing, unused VLAN defined in zCompute, assigned to the DVS project (implying that it’s already assigned to the tenant account).
Creating a DVS project
Create a DVS project using either the zCompute UI or the CLI:
zCompute UI
In the zCompute UI, go to Identity & Access > Accounts > <account>.
In the Projects tab, click Create Project. In the dialog that opens, enter:
Project Name.
Project Description (optional).
Project Type: Select DVS.
Click OK. The new project appears in the projects list, as a project of type DVS.
Symp CLI
Create a DVS project using the
project createcommand with a meaningful project name and description.For example:
project create --description 'My DVS project' mydvsproj

+-------------+----------------------------------+
| id          | 4d12575ce21c4982a29e6c10077e5af4 |
| name        | mydvsproj                        |
| description | My DVS project                   |
| domain_id   | msp                              |
| domain_name | cloud_msp                        |
| enabled     | true                             |
| is_domain   | false                            |
| is_vpc      | false                            |
| parent_id   | ops                              |
+-------------+----------------------------------+
By default, the project will be
enabledand will be of type legacy (is_vpc=false).Use the
dvs project provision <project-id>command to complete the DVS project creation.For example:
dvs project provision 4d12575ce21c4982a29e6c10077e5af4

+-------------------------+--------------------------------------+
| account_id              | b9e1928e69dc48baa504edadd5b72880     |
| created_at              | 2023-08-30T16:22:46Z                 |
| default_edge_network    | none                                 |
| default_edge_subnet     | none                                 |
| default_edgenet_ip_pool | none                                 |
| flowlogs_enabled        | false                                |
| project_id              | 4d12575ce21c4982a29e6c10077e5af4     |
| project_type            | dvs_project                          |
| project_vlan_pool_id    | cc79d8db-da11-46f5-ab4e-2dbfbf91ee72 |
| updated_at              | 2023-08-30T16:22:46Z                 |
| user_id                 | 976f7c47a73244c98505703bfa4c7ace     |
+-------------------------+--------------------------------------+
The project type is set to DVS (
project_type=dvs_project).The
project listcommand, filtered with a search for the project name (or part of it) returns the project attributes, similar to theproject createcommand above.For example:
project list -m grep-i=mydvs
Checking available VLANs
zCompute UI
In the zCompute UI, go to Account Networking > VLANs Management.
The account’s VLANs are listed.
Check for an available VLAN that is not assigned to a project.
(A VLAN that does not have a value in the Project column.)
Symp CLI
List the VLANs assigned to the account using
vlan-pool vlan list.For example:
vlan-pool vlan list -c id -c guest_network_pool_id -c project_vlan_pool_id -c vlan_tag_id

+--------------------------------------+--------------------------------------+--------------------------------------+-------------+
| id                                   | guest_network_pool_id                | project_vlan_pool_id                 | vlan_tag_id |
+======================================+======================================+======================================+=============+
| 1c654186-8d7f-4bcb-bf71-d7bd61fad225 | f8022add-81b5-42d6-be2c-05d0d082a5b1 | none                                 | 1015        |
| 26813030-5572-4fae-8cc8-43d3173124b6 | f8022add-81b5-42d6-be2c-05d0d082a5b1 | none                                 | 1018        |
| 39b9d144-bbb0-405f-8877-50b85251496e | f8022add-81b5-42d6-be2c-05d0d082a5b1 | none                                 | 1016        |
| fa32bc3f-886e-4b83-8d66-417192527aeb | f8022add-81b5-42d6-be2c-05d0d082a5b1 | 7ce52679-6b31-4a6c-bf55-2bbc371831b0 | 1017        |
+--------------------------------------+--------------------------------------+--------------------------------------+-------------+
Locate the the
vlan_tag_idto use for the DVS project. Confirm that it has not already been allocated to a project (project_vlan_pool_id=none).
Assigning a VLAN to an account and DVS project
Note
Only MSP administrators and Zadara Operations team can assign a VLAN to an account.
Tenant administrators can assign a VLAN to a project.
zCompute UI
In the zCompute UI, go to Account Networking > VLANs Management.
The account’s VLANs are listed.
Check for an available VLAN that is not assigned to a project.
(A VLAN that does not have a value in the Project column.)
If there is an available VLAN, click its row to select it.
From the menu bar, click Assign.
In the Assign VLANs dialog, select the DVS project in the
Project dropdown.
Click Ok.
If there aren’t any available VLANs, and it’s necessary to add a new
available VLAN (or VLAN range) to the account (MSP or Zadara Operations team):
Click + to add VLANs.
In the Add VLANs dialog, enter:
Node network: Select the network from the dropdown.
Account: Select the account from the dropdown.
Project: Select the DVS project from the dropdown.
VLAN Range:
For a single VLAN, enter the VLAN number in both From and To.
For a range of consecutive VLAN numbers, enter the range in Start and To.
For an additional range, click Add, and enter the range.
Click Ok.
Symp CLI
If necessary, add a new available VLAN to the account. Specify the
guest_network_pool_idreturned from thevlan-pool vlan listcommand above.For example:
vlan-pool vlan add '[{"vlan": "1020", "guest_network_pool_id": "f8022add-81b5-42d6-be2c-05d0d082a5b1"}]'

-----+------------------------------------------------------------------------------------------------------------------------------------------------
value|id                                  |name|account_vl|created_at|guest_netw                          |network_id|project_vl|updated_at|vlan_tag_i
     |                                    |    |an_pool_id|          |ork_pool_i                          |          |an_pool_id|          |d
     |                                    |    |          |          |d                                   |          |          |          |
     |====================================+====+==========+==========+====================================+==========+==========+==========+==========
     |9214c238-15f0-497b-b6c0-fedaa084b4ec|none|none      |2023-08-30|f8022add-81b5-42d6-be2c-05d0d082a5b1|none      |none      |2023-08-30|1020
     |                                    |    |          |T16:23:26Z|                                    |          |          |T16:23:26Z|
-----+------------------------------------------------------------------------------------------------------------------------------------------------
Assign a VLAN to the account (MSP or Zadara Operations team) and to the DVS project, using:
The VLAN’s
idreturned from thevlan-pool vlan addcommand or from thevlan-pool vlan listcommand.The
account_vlan_pool_idandproject_vlan_pool_idreturned from thevlan-pool vlan listcommand above.
Assign a VLAN to an account (MSP or Zadara Operations team):
vlan-pool account-pool assign-vlans <account_vlan_pool_id> <vlan id>For example:
vlan-pool account-pool assign-vlans 6fe0b862-c13e-4d85-97a0-d81673814f88 9214c238-15f0-497b-b6c0-fedaa084b4ec

+-------+---------+
| value | Success |
+-------+---------+
Assign a VLAN to a project:
vlan-pool project-pool assign-vlans <project_vlan_pool_id> <vlan id>For example:
vlan-pool project-pool assign-vlans 7ce52679-6b31-4a6c-bf55-2bbc371831b0 9214c238-15f0-497b-b6c0-fedaa084b4ec

+-------+---------+
| value | Success |
+-------+---------+
Creating a DVS network
zCompute UI
In the zCompute UI, go to DVS Networking > Networks.
The account’s DVS networks are listed.
Click + to add a new DVS network and associate it with a DVS project and VLAN.
In the Create DVS Network dialog, enter:
Name: A meaningful name for the DVS network.
Description: Enter a description (optional).
MTU: Maximum Transmission Unit.
Project: Select the DVS project from the dropdown.
VLAN: Select a VLAN from the dropdown. If there is only one VLAN configured for the DVS project, it automatically appears in the dropdown as the only valid value.
Click Finish.
Symp CLI
Create the DVS network for the selected VLAN ID using
dvs network create.For example:
dvs network create --project-id 4fcd1cf44ad14704ae0f7f2c9722152b  --name 'vlan1020-net' --description 'VLAN 1020 DVS network' --mtu 8950 1c654186-8d7f-4bcb-bf71-d7bd61fad225

+-----------------+--------------------------------------+
| id              | 19b2225b-98fd-482f-8666-dc7e68588095 |
| name            | vlan1020-net                         |
| state           | pending                              |
| account_id      | 4fcd1cf44ad14704ae0f7f2c9722152b     |
| created_at      | 2023-08-30T16:25:25Z                 |
| description     | VLAN 1020 DVS network                |
| dhcp_options_id | 2e00be4a-3cf9-4aca-a3ec-15c85dfafe3c |
| is_default      | false                                |
| mtu             | 8950                                 |
| network_type    | dvs_network                          |
| project_id      | 4fcd1cf44ad14704ae0f7f2c9722152b     |
| subnet_infos    | []                                   |
| tags            | []                                   |
| updated_at      | 2023-08-30T16:25:25Z                 |
| vlan            | 1020                                 |
| vlan_uuid       | 1c654186-8d7f-4bcb-bf71-d7bd61fad225 |
| vn_group_id     | b4ca2ba9-5a7d-41ff-8bcd-60c0716adf32 |
+-----------------+--------------------------------------+
DVS project and VLAN management operations
Note
MSPs, Zadara Operations and account administrators (tenant administrators) each fulfill their own roles in VLAN management, depending on the phases in an account’s, project’s and VLAN’s lifecycle.
Project operations
Refer to Projects in the zCompute Identity and Access guide for details on the following project actions:
Creating a project
Enabling or disabling a project
Renaming a project
Deleting a project
Assigning a user to a project
VLAN operations
Refer to the Creating a DVS network (UI and CLI) section above, for details on the following DVS project and network operations:
Viewing available VLANs
Assigning (allocating) a VLAN to an account and to a DVS project
Creating a DVS network
Modify DVS network
Note
To change a DVS network’s Project or VLAN assignments, first delete the DVS network, and then create a new one.
To apply changes to an existing DVS network’s Name, Description or MTU configurations:
In the zCompute UI, go to DVS Networking > Networks. The list of DVS networks is displayed.
Select the DVS network to modify.
In the top toolbar, click Modify.
In the Modify DVS Network dialog, update the values of:
Name
Description
MTU
Click Finish.
Set default DVS network
Multiple DVS networks can be configured for the same project.
To configure a DVS network as the default DVS network for the project:
In the zCompute UI, go to DVS Networking > Networks.
The list of DVS networks is displayed.
Select the DVS network to set as the project’s default DVS network.
In the top toolbar, click Set Default.
In the Set Default Network confirmation dialog, click Set Default.
In the DVS networks list, the selected network’s Default icon is marked.
Releasing (freeing) a VLAN
A VLAN can be assigned to only one account, and to one project in that account, and to only one DVS network in that project.
To assign a VLAN to a different DVS network, the DVS network to which it is assigned must first be deleted, to permit creation of a new network with the VLAN assigned to it.
To assign a VLAN to a different project in the same account, the VLAN must be first released from its associated DVS network, by deleting the DVS network. Then, it must be released from its current project, to permit assignment to another project.
To assign a VLAN to a project in a different account, the VLAN must be first released from its associated DVS network and current project. Then, the MSPs or Zadara Operations team can remove the VLAN from its current project, and finally from its current account.
Releasing (freeing) a VLAN (deleting a DVS network)
In the zCompute UI, go to DVS Networking > Networks. The list of DVS networks is displayed.
Select the DVS network to delete.
In the top toolbar, click Delete.
In the Delete DVS Network confirmation dialog, click Delete.
Releasing a VLAN from a project
In the zCompute UI, go to Account Networking > VLANs Management. The list of VLANs is displayed.
Select the VLAN to release from the project.
In the top toolbar, click Release From Project.
In the Release VLAN from Project confirmation dialog, click OK.
Releasing a VLAN from an account (MSPs and Zadara Operations only)
In the zCompute UI, go to Account Networking > VLANs Management. The list of VLANs is displayed.
Select the VLAN to release from the project.
(Optional) In the top toolbar, click Release From Project.
In the Release VLAN from Project confirmation dialog, click OK.
In the top toolbar, click Remove.
Migrating a VM to a DVS project
VMware VMs that are migrated to zCompute using the V2Z utility in the Migrating VMware VMs to zCompute process result in VMs in a rich VPC networking type project rather than in the simpler DVS networking alternative.
This section details the requirements and procedure to migrate a VM instance from a VPC type project to a DVS type project. The same procedure is applicable to any VPC VM, irrespective of whether they are VMs that were migrated from VMware, or VMs created from scratch in VPC projects.
Prerequisites
DVS project
DVS network
See:
VPC to DVS VM migration
Make sure that the VM is shut down.
In Compute > Instances, locate the VM in the list of instances.
If the Status display is not Shutoff:
Select the instance, and on either the right-click menu or the top menu bar, select Stop.
Wait for the Status display to change to Shutoff.
In Compute > Instances select the VM, and on either the right-click menu select Create Image or the top menu bar, select More > Create Image.
In the Create Image from <source image> dialog, enter a Name that identifies the new DVS type image.
The Operating System is derived from the source image, and cannot be modified.
Optional: Enter a Description, Tags, and select whether new VM instances of this image must Reboot (recommended to avoid corruption).
Click Ok.
To deploy the new VM image to a DVS project:
In Machine Images > Images wait intil the new image’s Status displays Ready.
To enable creating instances of the image in a DVS project, modify the image’s scope so that it is available to all projects in the account:
Select the image, and on either the right-click menu or the top menu bar, select Modify.
In the Modify Image dialog, make sure that Scope is set to Account.
Click Ok.
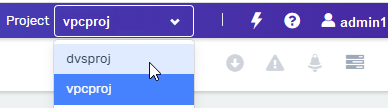
If permitted, in the Project dropdown at the top right, select the DVS target project for the VM instance, or log out and sign on as a user in the DVS target project.
In Machine Images > Images select the image, and on either the right-click menu or the top menu bar, select Launch.
In the Create Instance dialog:
In the Compute tab:
Enter a Name that identifies the new DVS VM instance, and Select the Instance Type from the dropdown.
Optionally, apply Tags and enable or disable any of the other options.
Click Next.
In the Storage tab:
Select the Boot Volume’s Volume Type from the dropdown.
Optionally, Add, create and allocate data volumes.
Click Next.
In the Networking tab:
Select a DVS network from the Network dropdown.
Optionally, Add, create and assign additional networks.
Click Finish.
In Compute > Instances the new DVS instance’s status initially displays Spawning while it powers up.
Wait until the status displays Active before connecting to it.