VPN Service for Zadara Edge Clouds
The VPN Service for Zadara Edge Clouds enables remote access to a VPC.
The implementation uses OpenVPN technology for securing private connections between remote clients and Zadara Edge Cloud resources.
Introduction
Virtual Private Cloud (VPC)
A virtual private cloud (VPC) is a virtual network dedicated to your Zadara Edge Cloud account. It is logically isolated from other virtual networks. You can launch virtual machines running computing workloads into your VPC.
zCompute VPN Service for VPC
A VPN service for VPC enables secure access from remote clients to resources running on a VPC associated with Zadara Edge accounts. Zadara Edge Cloud uses the existing infrastructure of a VPC to create a VPC access GW, providing authentication and authorization services based on OpenVPN technology.
Leveraging zCompute capabilities, Zadara offers a self-managed VPN Service for VPC, based on the open-source pfSense software.
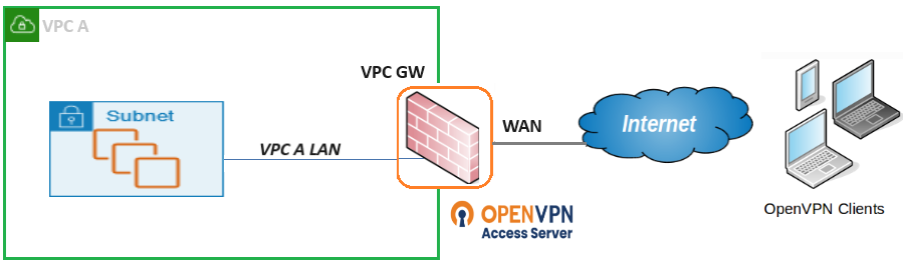
The VPN Service is based on the VPC GW image available in zCompute’s Marketplace, for deployment on instances allocated in the VPC. The VPC GW implements Firewall (FW) functions between the internal VPC subnet and the external public WAN. The VPC GW is attached to the internal VPC subnet and external WAN subnet. It has capabilities for managing access and pass-through rules over FW. The WAN interface of the VPC GW is associated with an Elastic IP (EIP) and used for OpenVPN deployment, and provides highly secured private access from clients to VPC resources.
The VPC GW image comes with a built-in easy installation for clients, to be applied on remote machines supporting various OSes.
VPC GW Deployment
The deployment workflow for the VPN Service is based on pfSense software.
Deployment Requirements
X86-64 Instance
1 vCPU
2GB RAM
8 GB disk drive
2 NICs (WAN and LAN)
EIP on WAN interface
A zCompute VPC configured with Public and Private Subnets.
Deployment Workflow
Note
The initial deployment flow is identical for both VPC Peering for multiple Zadara Edge Clouds and for VPN Service for Zadara Edge Clouds.
The following workflow must be run on a VPC GW instance that is configured with:
Public and Private Subnets
A Security Group preconfigured for this deployment. See the section on Security Hardening at the end of this page.
A preloaded image is available in the zCompute Marketplace, and provides an easy to use pfSense OpenVPN deployment option.
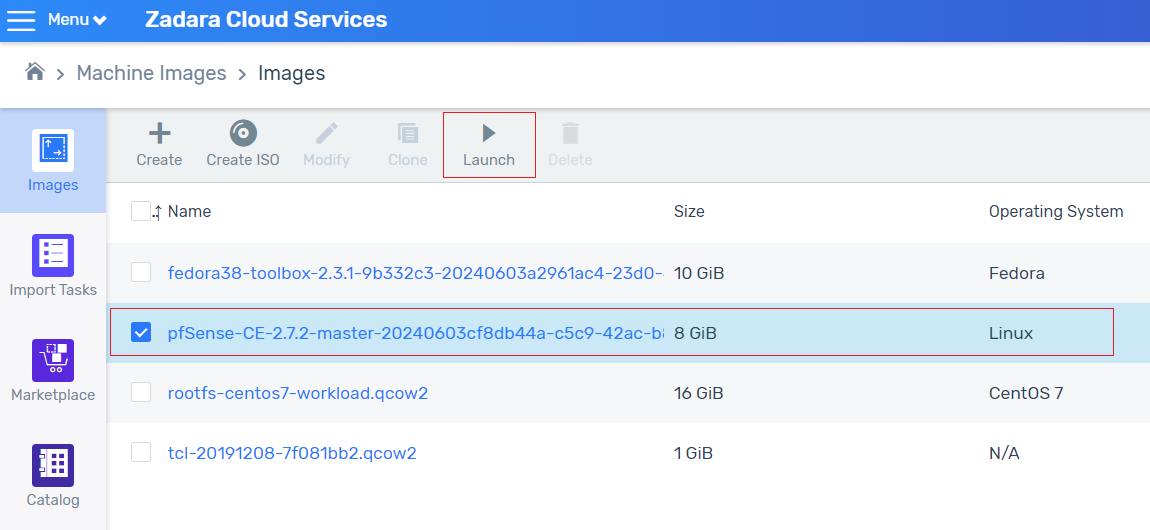
Download the pfSense image from Marketplace
In the zCompute UI, go to Machine Images > Marketplace and select the pfSense-CE (VPC Peering GW) image.
Set the Scope to Project or Account, and download the image.
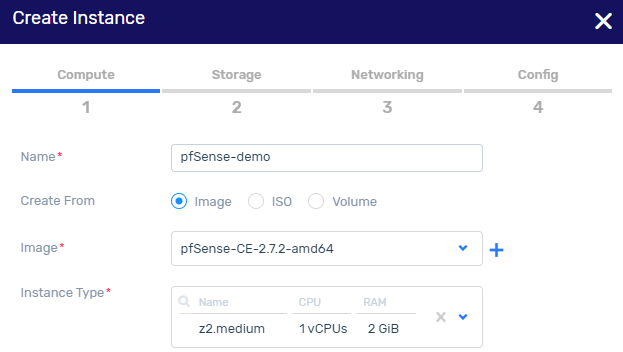
Create an instance based on the pfSense image
In Machine Images > Images, select the VPC Peering GW (pfSense-CE) image.
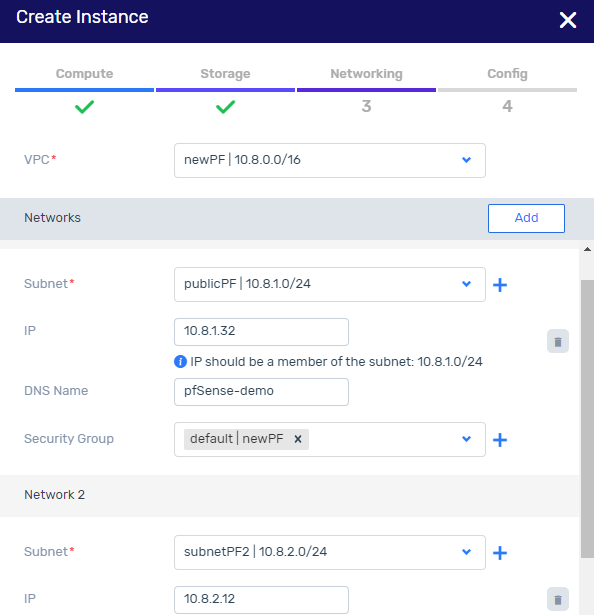
Click Launch to create an instance with 2 subnets.
One subnet is for the internal VPC LAN. The other subnet will be used for the public-facing WAN interface.
In the Storage tab, accept the default settings. Click Next.
In the Networking tab, configure the public subnet.
On completion of the public subnet configuration, click Add to configure the private subnet.
Note
The significance of first configuring the public subnet followed by the private subnet is so that the public subnet should be associated with eth0, and the private subnet associated with eth1.
Networking configuration for the pfSense instance
Go to Compute > Instances and select the instance.
In the instance’s lower pane, click the Networks tab.
Attach an Elastic IP to the public subnet:
Click the row of the public subnet.
In the lower menu, select More > Attach Elastic IP. Attach an Elastic IP to the NIC attached to the WAN/public subnet, for example eth0.
The Elastic IP will be used for the WAN interface on the VPC GW.
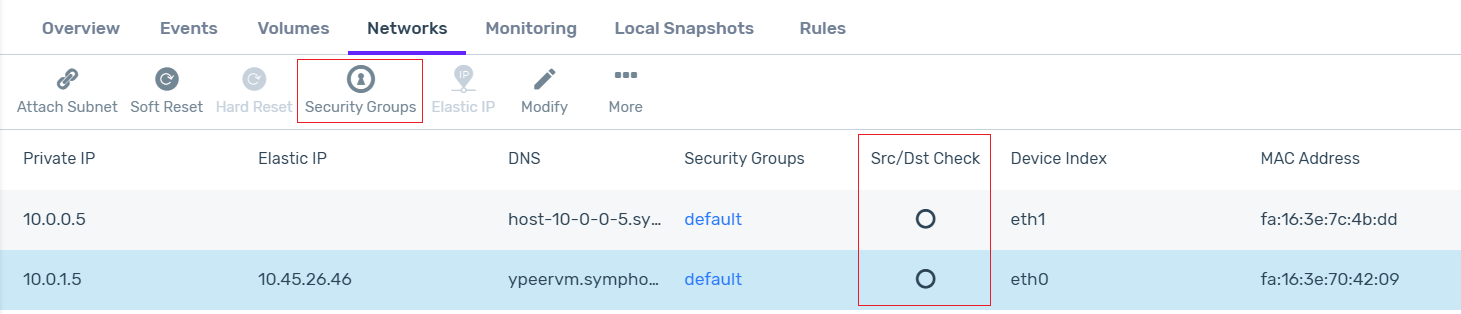
For each of the eth0 and eth1 interfaces (both the public and private subnets), disable the Src/Dst Check:
In the instance’s Networks tab in the lower pane, click the network interface row.
Click Security Groups. In the Security Groups modal that opens, uncheck the Source/Destination checkbox, and save the configuration.
Networking setup on the pfSense VM
Connect to the VM VNC to set up the networking configuration.
Go to Compute > Instances > [VM instance name] > Connect.
The VNC window opens, and the pfSense menu displays:
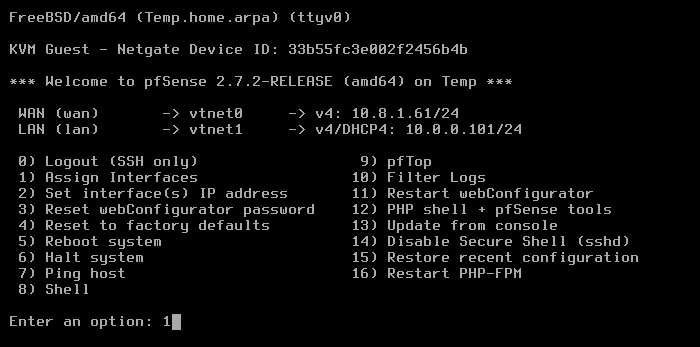
From the menu, select option 1: Assign interfaces:
Note
There is no need to set up VLANs.
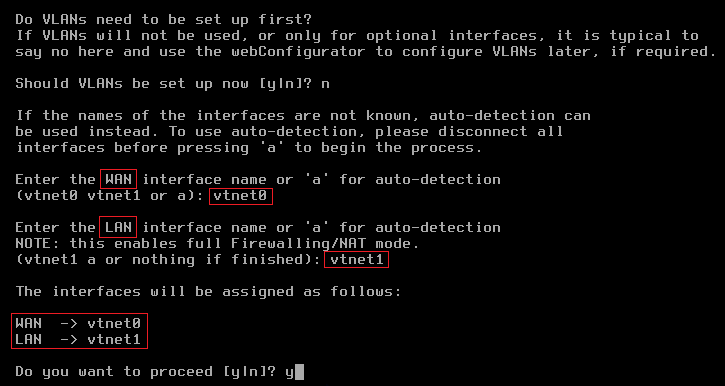
Set up vtnet0 for WAN (mapped to eth0 on the VM instance).
Set up vtnet1 for LAN (mapped to eth1 on the VM instance).
After assignment of the network interfaces, the pfSense menu reappears.
From the menu, select option 2: Set interface(s) IP address.
Setup the WAN to static IPv4.
For example:
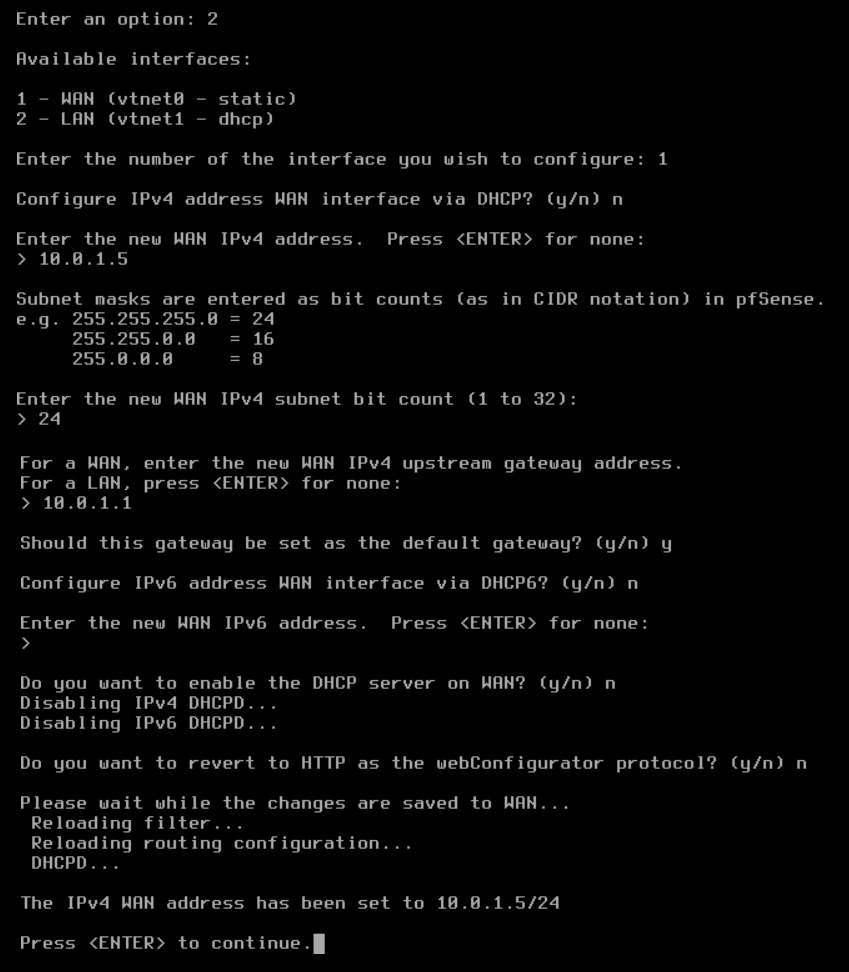
Set up the LAN interface with IPv4 DHCP.
For example:
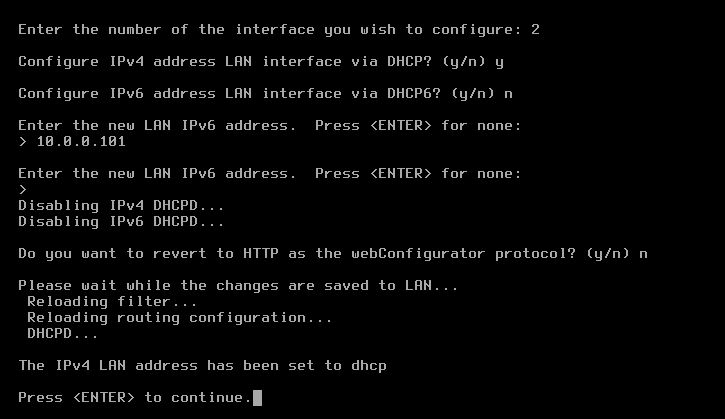
On completion of the IP setup, the updated WAN and LAN IP assignments display, followed by the pfSense menu.
Note
The deployment flow up to this step is identical for both VPC Peering for multiple Zadara Edge Clouds and for VPN Service for Zadara Edge Clouds.
Sign on to the pfSense web client to continue the specific deployment implementation.
In a browser window, launch the pfSense web client using the Elastic IP assigned earlier to the public subnet. For example,
https://10.41.31.5.The pfSense web client’s default credentials:
username:
adminpassword:
pfsense
Note
The recommended best practice is to change the pfSense admin password at the first sign-on to the pfSense web client.
Certificate Authority setup
In the pfSense web client, navigate to System > Certificates.
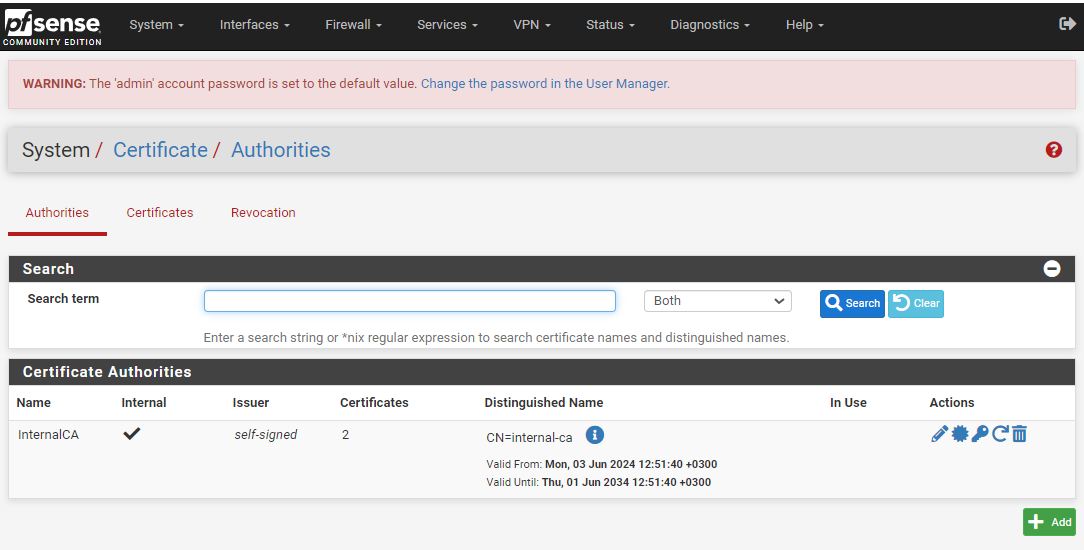
Under the Certificate Authorities list, click Add.
In the Certificate Authorities input form, configure the following:
Descriptive name: Enter a meaningful name for the Certificate Authority.
Method: Select Create an internal Cerificate Authority.
Accept the other defaults and click Save.
The new configuration is added to the Certificate Authorities list.
OpenVPN Access Server setup
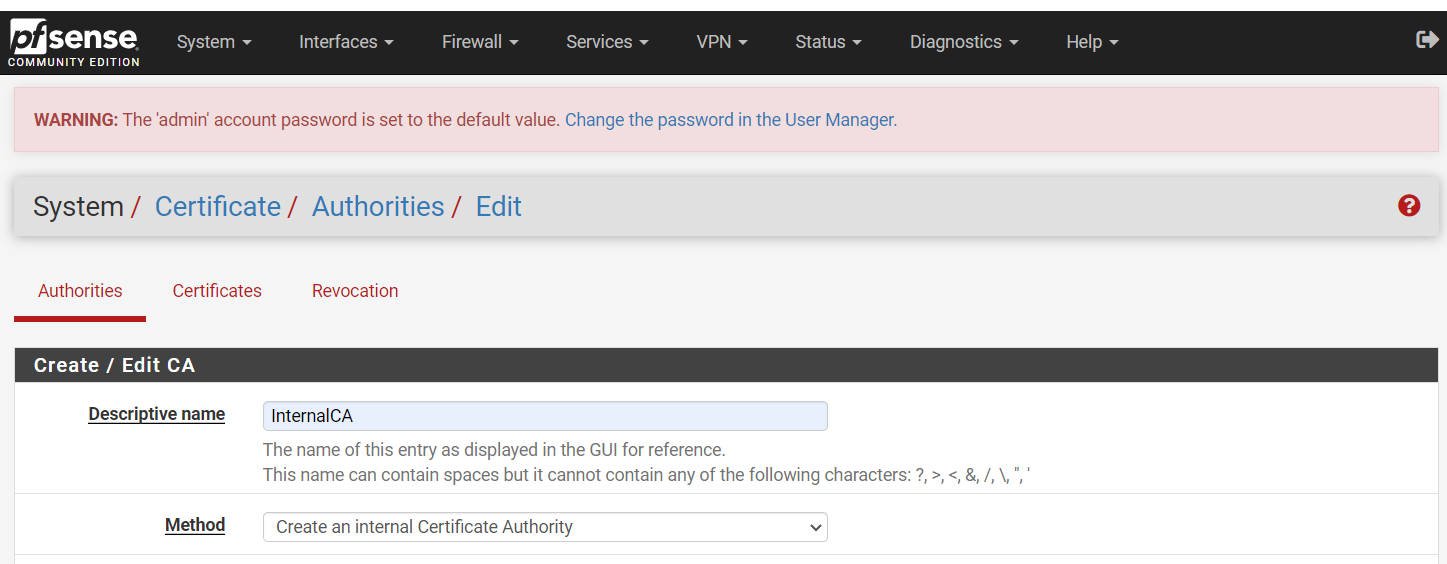
In the pfSense web client, navigate to System > Certificates. Click Certificates tab.
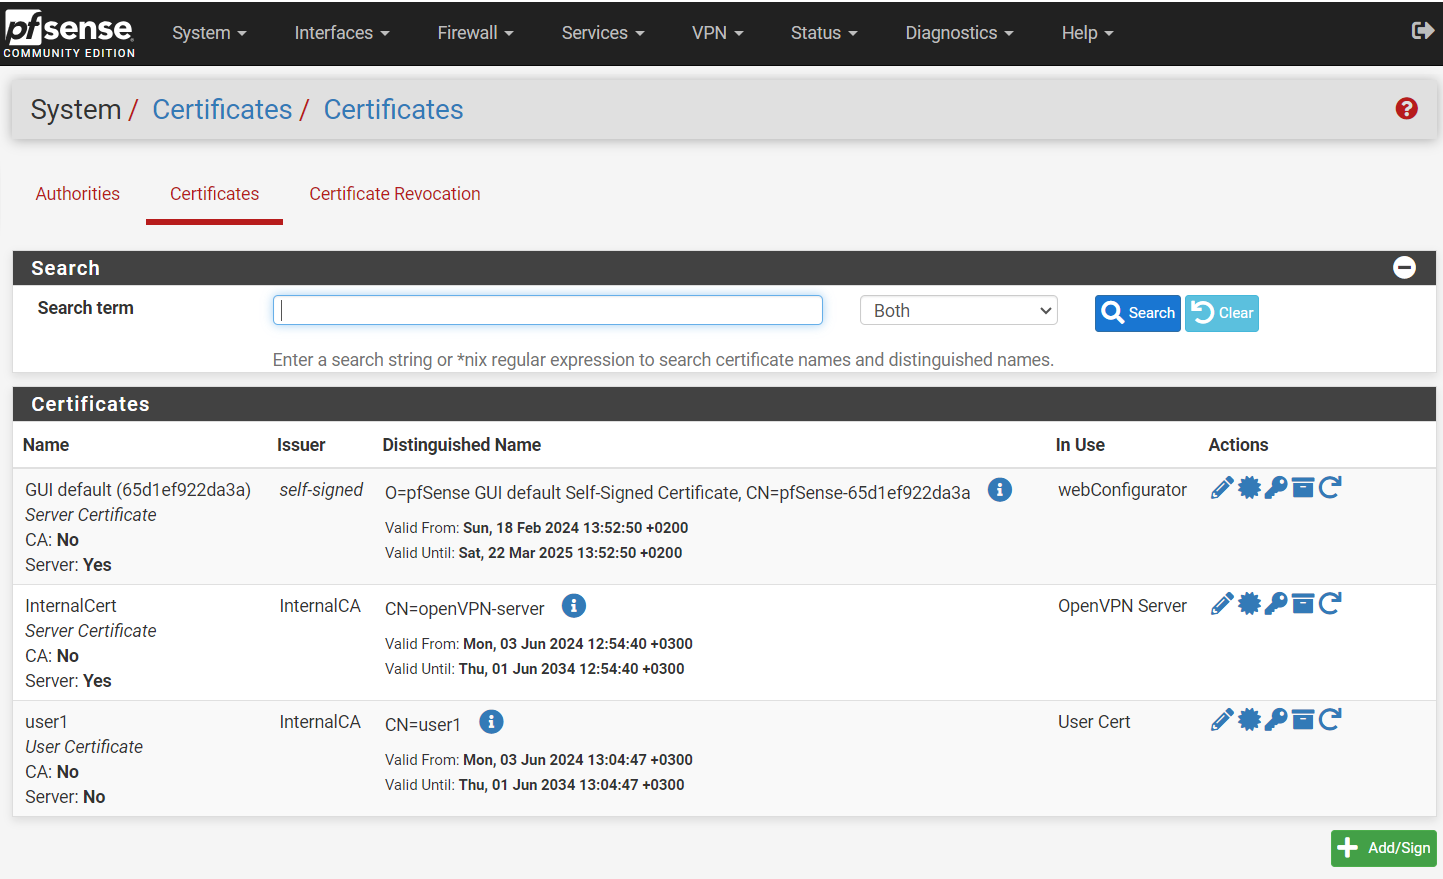
Under the Certificates list, click Add to create a server certificate.
In the Certificate input form, configure the following:
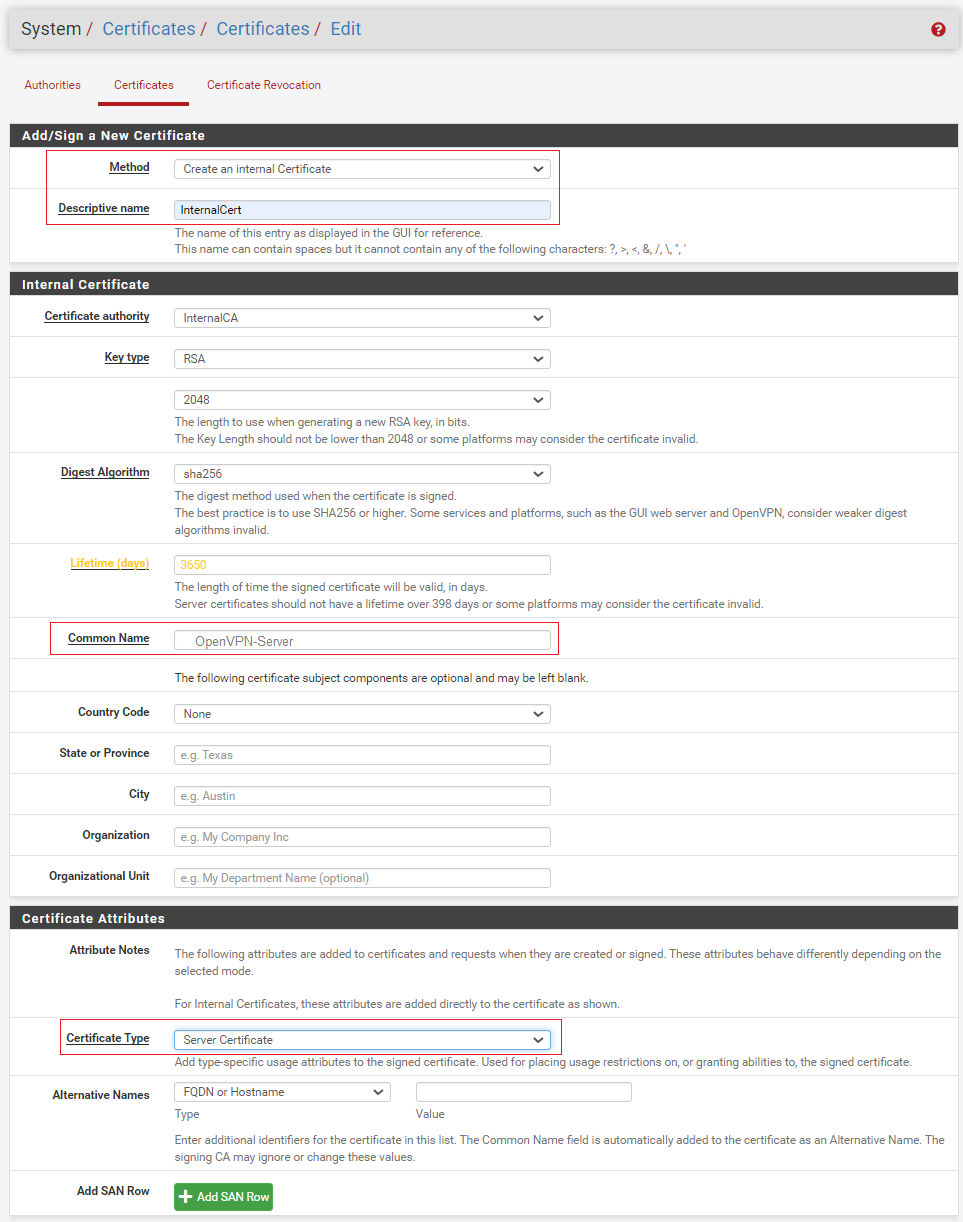
Method: Select Create an internal Cerificate.
Descriptive name: Enter a meaningful name for the certificate.
Common Name: Enter a meaningful name, for example,
OpenVPN-Server.Certificate Type: Select Server Certificate.
Accept the other defaults and click Save.
The new certificate is added to the Certificates list.
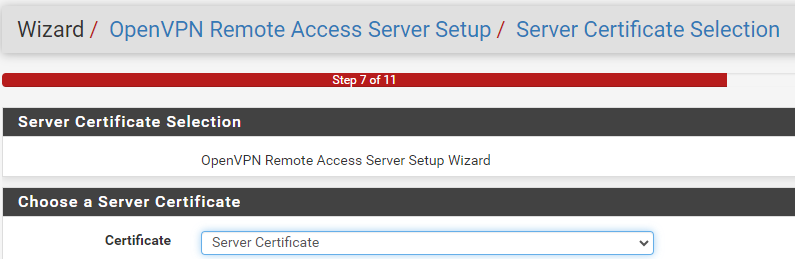
In the pfSense web client, navigate to VPN > OpenVPN, and click the Wizards tab.
In the OpenVPN Remote Access Server Setup wizard, accept the default settings, with the following exceptions:
In step 7 of the wizard, select the server certificate created previously in Certificate Authority setup.
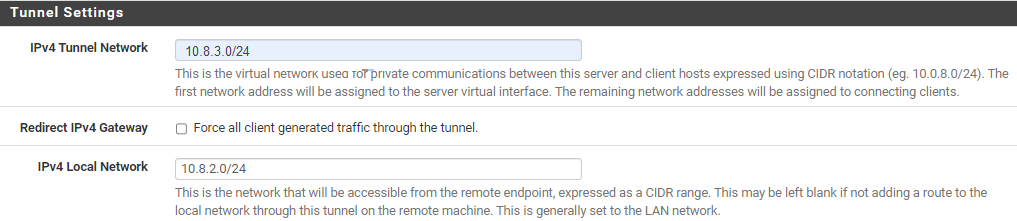
In step 9 of the wizard, in the Tunnel Settings section:
IPv4 Tunnel Network: Enter a unique CIDR.
IPv4 Local Network: Enter the CIDR of the private subnet allocated for the instance.
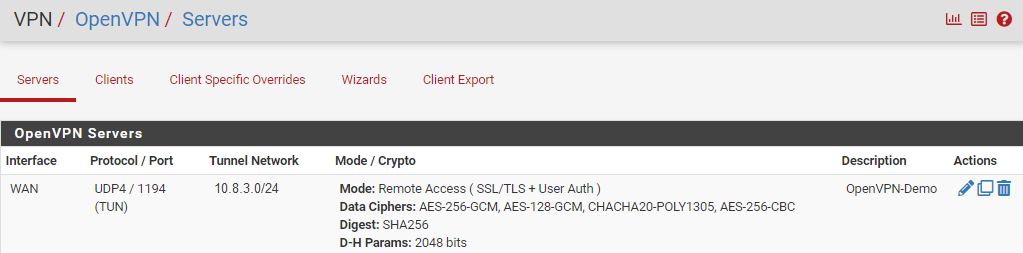
The configured OpenVPN server will be added to the list of OpenVPN Servers.
Note
For more detailed information, the pfSense user guide provides a comprehensive step by step OpenVPN Remote Access Configuration Example.
OpenVPN Client setup
This workflow uses local user authentication. The following steps provide an example for adding a user for accessing the cloud from a remote client machine:
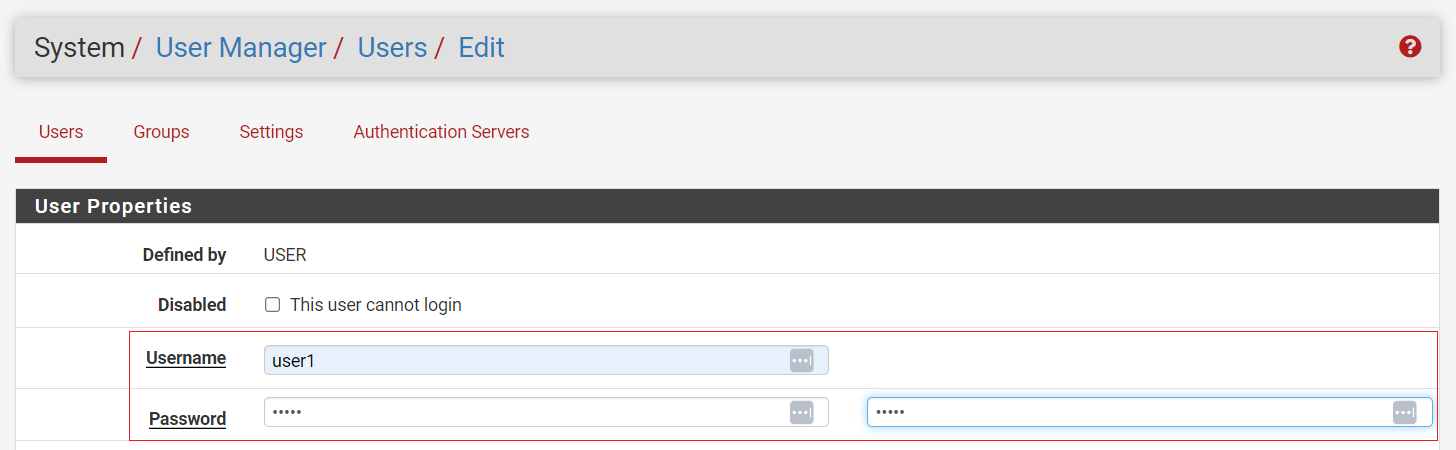
In the pfSense web client, navigate to System > User Manager.
Add a user for remote access.
Click Save, and edit again to generate a user certificate with the certificate authority defined previously in Certificate Authority setup.
In the pfSense web client navigate to VPN > OpenVPN > Client Export.
At the bottom of the Client Export page, select the user, and the OS that will host the OpenVPN client.
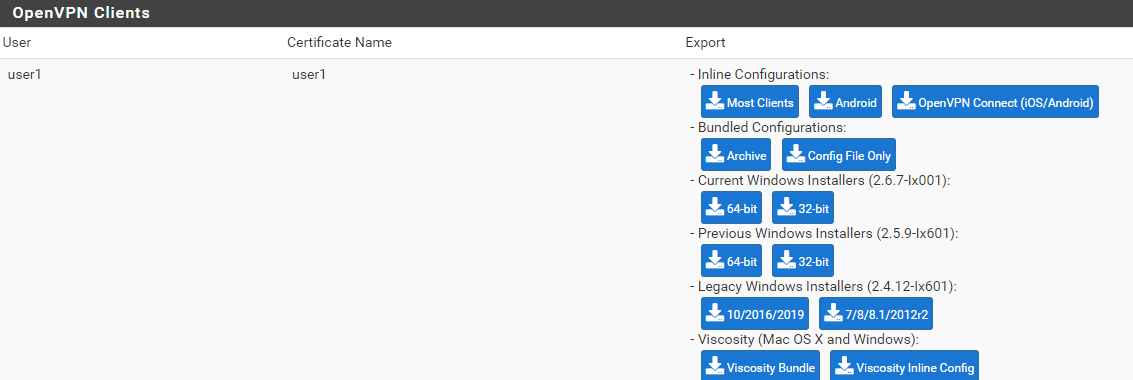
For example, by clicking Windows 64-bit, to download its OpenVPN installation package to the local client machine. The installation package includes the configuration and certificate required for the user to connect to the VPN from the specified OS.
Important
To export a user+OS of a new VPN to a client machine that already has an OpenVPN client and configuration for an existing VPN:
Select the user’s Bundled Configurations > Archive.
The same procedure applies for configuring a new user who will access an existing VPN on the client machine.
On the remote client machine:
Install the OpenVPN client:
For a client machine that does not yet have an OpenVPN client installation:
Install the OpenVPN client on the remote client machine, using the OpenVPN installation package downloaded in the previous step.
For a client machine that already has an OpenVPN client and configuration for an existing VPN:
On the local client machine, open the zipped package into the OpenVPN configuration folder, for example,
C:\\Program Files\\OpenVPN\\config.
Configure the VPN:
Edit the user’s OpenVPN client configuration file, for example,
C:\\Program Files\\OpenVPN\\config\\<name>-<username>-config. For example: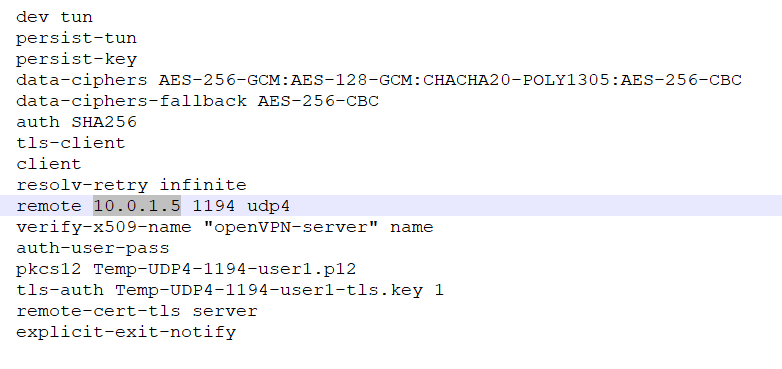
In the user’s OpenVPN client configuration file, in the
remote <private IP address>line, replace the private IP address with the Elastic IP address.Note
This step applies to all scenarios for the client machine, whether it’s a first-time OpenVPN installation, or the addition of a new VPN, or the addition of a new user on an existing VPN configuration. #. Connect to the VPN:
Connect to the VPN:
On the remote client machine, launch the OpenVPN client GUI.

On the first launch of the OpenVPN client GUI, the OpenVPN icon is added to the system tray:
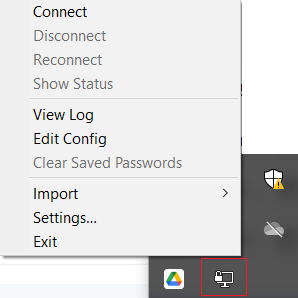
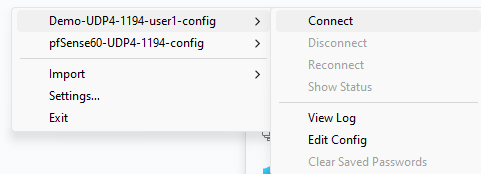
Right-click the OpenVPN icon in the system tray.
The OpenVPN client menu opens.
If a single VPN is configured on the client machine, click Connect.
If there are multiple VPNs configured on the client machine, select the desired VPN and click Connect.
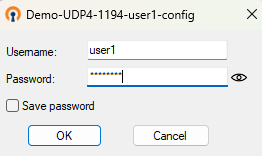
Sign on using the user credentials that were defined earlier in the pfSense web client’s System > User Manager configurations.
Security hardening configuration
Change default passwords to non-default ones.
Update the VPC Security Group to block non-essential ports.
The OpenVPN Service requires the following port for normal operations:
UDP port 1194 for OpenVPN access

Additional ports might be needed for applications running on VPC VM instances.