VLANs Management
VLANs
A VLAN is a numbered network segment used to separate traffic inside a switch domain. In zCompute, a VLAN helps organize network connectivity by linking a VLAN tag to a specific switch domain, and then associating that VLAN with an account, project, or network as needed.
Use the Account Networking > VLANs Management screen to manage VLANs for accounts, see where a VLAN is assigned, and to perform lifecycle tasks such as adding, assigning, releasing, or checking VLAN connectivity.
VLAN creation and allocation flow
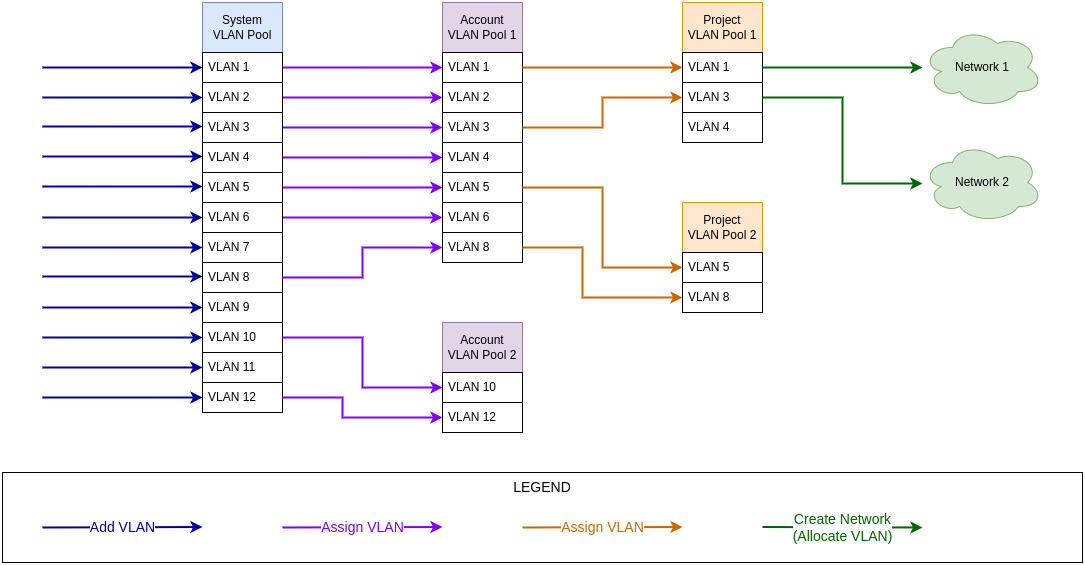
Zadara Operations creates the system VLAN pool, and adds or removes VLANs in the pool.
MSPs or Zadara Operations allocate VLANs from the system VLAN pool to an account’s VLAN pool.
Note
An account’s VLAN pool is automatically created when the account is created.
An account can have only one VLAN pool.
When an account is deleted, its VLAN pool is automatically deleted.
When an account’s VLAN pool is deleted:
All of the account’s projects’ VLAN pools are automatically deleted.
All of the account’s VLANs are automatically deleted.
A VLAN in a project’s VLAN pool that is released from an account’s VLAN pool is first automatically released from the project’s VLAN pool.
The account administrator (MSP or tenant) assigns VLANs from the account’s VLAN pool to a project’s VLAN pool.
Note
A project’s VLAN pool is automatically created when the project is created.
A project can have only one VLAN pool.
When a project’s VLAN pool is deleted, all of its VLANs are automatically released.
When a project is deleted, its VLAN pool is automatically deleted.
The account administrator can create a DVS network by allocating a VLAN to a DVS project, and associating a VM instance with the project’s network.
Note
A VLAN in a project’s VLAN pool cannot be released if the VLAN is allocated to a network.
VLAN release and deletion flow
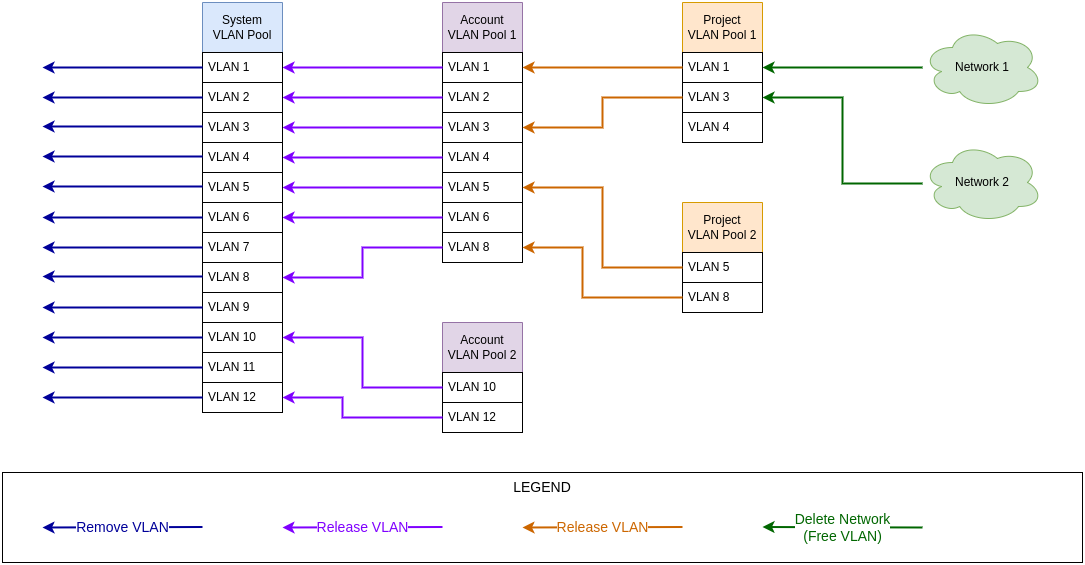
The account administrator (MSP or tenant) can release a VLAN that is allocated to a network, back to the project’s VLAN pool, by deleting its network.
The account administrator can release VLANs that are not allocated to a network, from a project’s VLAN pool back into the account’s VLAN pool.
Note
A VLAN in a project’s VLAN pool cannot be released if the VLAN is allocated to a network.
When a project’s VLAN pool is deleted, all of its VLANs are automatically released.
When a project is deleted, its VLAN pool is automatically deleted.
Zadara Operations can release VLANs that are not allocated to a network, from an account’s VLAN pool back into the system VLAN pool.
Note
When an account is deleted, its VLAN pool is automatically deleted.
When an account’s VLAN pool is deleted:
All of the account’s projects’ VLAN pools are automatically deleted.
All of the account’s VLANs are automatically deleted.
A VLAN in a project’s VLAN pool that is released from an account’s VLAN pool is first automatically released from the project’s VLAN pool.
Zadara Operations can remove a VLAN from the system pool.
Managing VLANs
Viewing VLANs
To view the VLANs that are available:
Go to Account Networking > VLANs Management.
The VLANs Management screen opens in List view.
Review the VLANs table.
The table shows these fields:
VLAN
The VLAN tag ID.
Use it to identify the VLAN.
Account
The account that owns the VLAN assignment.
Project
The project that uses the VLAN.
Network
The linked network.
Use it to see whether the VLAN is already tied to a network.
VMs
The number of VMs that use the linked network.
Switch Domain
The switch domain linked to the VLAN.
Adding VLANs
A single VLAN, multiple individual VLANs, a range and multiple ranges of VLANs can be created in one request.
Assigning the VLANs to an account and project can be configured when adding new VLANs, or can be left to be assigned later.
To configure new VLAN entries:
Go to Account Networking > VLANs Management.
The VLANs Management screen opens in List view.
From the top toolbar, select + Add.
The Add VLANs dialog opens.
Enter the VLAN ranges:
Switch Domain
From the dropdown, select the switch domain where the VLAN range will be created.
Required.
Account
From the dropdown, select the VLAN account pool that the VLANs can be assigned to.
If this is not entered, it can be assigned later.
Project
From the dropdown, select the project that can use the VLANs.
The project list depends on the selected account.
If this is not entered, it can be assigned later.
VLAN Range
The section that defines one or more VLAN tag ranges to create.
From
The first VLAN tag in the range.
Required.
to
The last VLAN tag in the range.
Required.
Note
For a single VLAN, the to value is the same as From.
For an additional range, select Add, and enter the VLAN range.
Selecting the Delete row icon removes the current VLAN range row from the list in the request.
To confirm creating the VLANs range, select Ok.
Assigning VLANs
A single VLAN or multiple VLANs can be assigned to an account or project in a single Assign request.
To select and assign VLANs to an account or project:
Go to Account Networking > VLANs Management.
The VLANs Management screen opens in List view.
To select the VLANs to assign, mark their checkboxes.
The Assign option is enabled on the top toolbar.
From the top toolbar, select Assign.
The Assign VLANs dialog opens, prompting for the following:
Account
From the dropdown, select the account pool that the VLAN will be assigned to.
Required.
Note
If the VLAN is already assigned to an account, its value is displayed and only the Project can be selected.
Project
From the dropdown, select the project that will use the selected VLAN.
The project list depends on the selected account.
To confirm assigning the VLAN, select Ok.
Removing VLANs
Use this action to remove one or more VLANs from the VLAN pool.
A VLAN cannot be removed when it is linked to a network.
To select VLANs to remove:
Go to Account Networking > VLANs Management.
The VLANs Management screen opens in List view.
To select the VLANs to remove, mark their checkboxes.
The Remove option is enabled on the top toolbar.
From the top toolbar, select Remove.
The Remove VLANs dialog opens, displaying the VLANs selected for removal.
To confirm removing the selected VLANs from the VLAN pool, select Ok.
Releasing VLANs from an account
Use this action to release a VLAN from an account’s VLAN pool.
This action is enabled only when the VLAN is assigned to an account and is not assigned to a project.
To select a VLAN to release from an account:
Go to Account Networking > VLANs Management.
The VLANs Management screen opens in List view.
To select the VLAN to release from an account, mark its checkbox.
The Release From Account option is enabled on the top toolbar.
From the top toolbar, select Release From Account.
The Release VLAN From Account dialog opens, displaying the Name and ID of the VLAN selected for release, and the Account from which to release it.
To confirm releasing the selected VLAN from the account, select Ok.
Releasing VLANs from a project
Use this action to release a VLAN from a project’s VLAN pool.
This action is available only when the VLAN is assigned to a project and is not linked to a network.
To select a VLAN to release from a project:
Go to Account Networking > VLANs Management.
The VLANs Management screen opens in List view.
To select the VLAN to release from a project, mark its checkbox.
The Release From Project option is enabled on the top toolbar.
From the top toolbar, select Release From Project.
The Release VLAN From Project dialog opens, displaying the ID of the VLAN selected for release, and the Project from which to release it.
To confirm releasing the selected VLAN from the project, select Ok.
Releasing VLANs from a network
To release a VLAN from a network, whether a direct subnet or a DVS network, deleting the network releases its assigned VLAN back to the project pool.
Checking VLANs
Use this action to run a VLAN connectivity check.
Check VLAN tests whether selected nodes can communicate with each other on the chosen VLAN. It shows the result as a pass/fail matrix, plus an overall Connected, Not Connected, or Partially Connected summary.
The action is available only when at least two nodes are present.
The check uses the VLAN’s switch domain.
To select VLANs to check:
Go to Account Networking > VLANs Management.
The VLANs Management screen opens in List view.
To select the VLANs to check, mark their checkboxes.
The Check VLAN option is enabled on the top toolbar.
From the top toolbar, select Check VLAN.
The Check VLAN dialog opens.
Enter:
MTU
The packet size that the check uses.
Valid range: 1500 (default) to 16000.
Nodes
The nodes that take part in the check.
Select the nodes to test.
Confirm proceeding with the connectivity test.
The test results are displayed as a pass/fail matrix, plus an overall Connected, Not Connected, or Partially Connected summary.
Recommended best practices
Review the Network column before you remove or release a VLAN.
Review the Project and Account columns before you change VLAN ownership.
Review the Switch Domain value to confirm that you are working on the correct VLAN context.
Add VLAN ranges carefully to avoid overlap or incorrect tag entry.
Run Check VLAN before and after a change when at least two nodes are available.
Keep the MTU value within the supported range for the check.
Troubleshooting
You cannot assign a VLAN
Check whether the Account field is selected.
If the Project list shows no projects, verify that the selected account has available projects.
You cannot add VLANs
Check that Switch Domain, From, and to are completed.
If you add more than one range, review each row before you save.
You cannot remove a VLAN
A VLAN cannot be removed when it is linked to a network.
Check the Network column. If a network is shown, remove the network dependency first.
You cannot release a VLAN from a project
The project release action is disabled when the VLAN is not assigned to a project or when it is linked to a network.
Check the Project and Network columns before you try again.
You cannot release a VLAN from an account
The account release action is shown only when the VLAN is assigned to an account and is not assigned to a project.
Check the row values to confirm the current assignment state.
You cannot run Check VLAN
The check action requires at least two nodes.
If the action is unavailable, verify that the environment has at least two nodes.