Managing Cloud Networking
Background
The Zadara cloud is a flexible storage cloud supporting multiple topologies, a vast range of use cases and cloud hosted environments. Due to the Zadara cloud flexibility it requires a flexible and dynamic virtual networking infrastructure that can be tailored to meet any customer demand and configuration while also enabling Zadara’s managed services architecture.
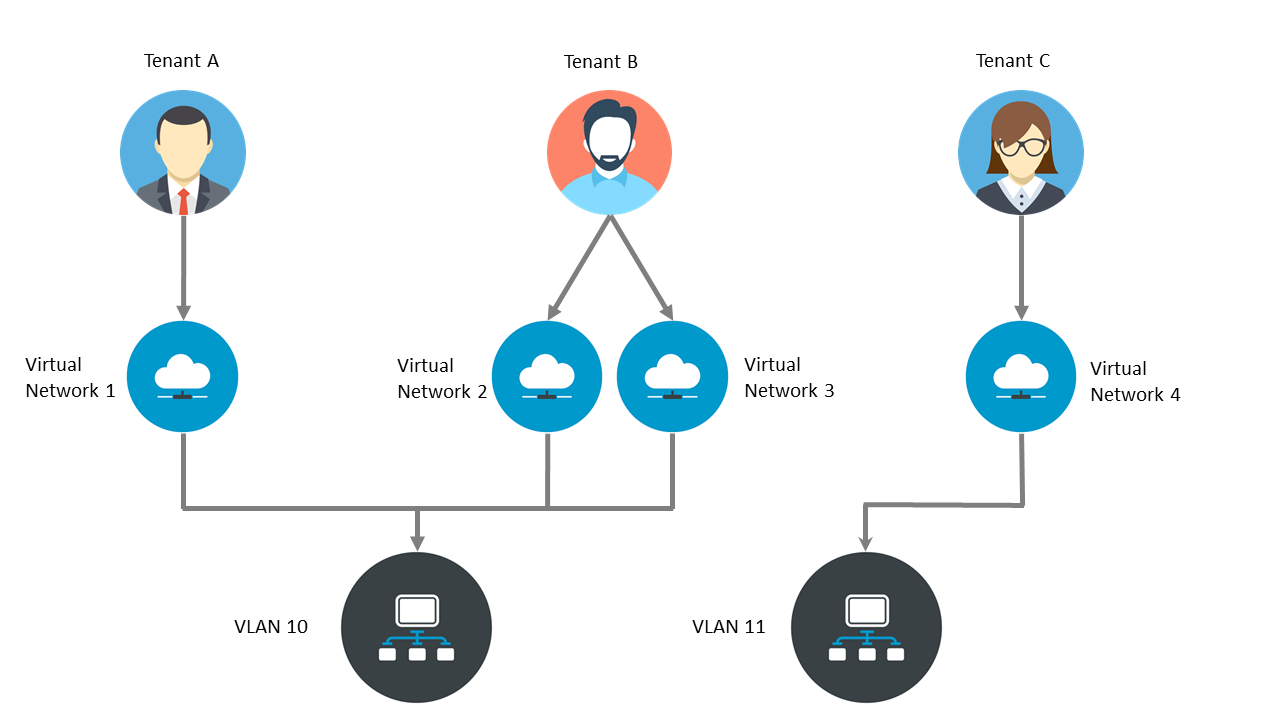
The Zadara cloud networking architecture enables allocation of virtual networks to Cloud tenants ( which are a representation of a cloud user and a referring provider) and interconnecting between virtual networks and networks external to the Zadara cloud using technologies such as IP routing and 802.1q VLAN tagging.
There are 2 distinct virtual networking elements managed within the Zadara Cloud:
Virtual Local area networks(VLANs): Supported VLAN ID range per for the Zadara cloud is specified at installation. Specific VLAN IDs can be allocated to one or more cloud tenants.
Virtual networks : Defines a set of available IP addresses within a specific network segment. Virtual networks are allocated for a specific cloud tenant and within a specific VLAN.
The below diagram depicts the relationship between cloud tenants, virtual networks and VLANs:
Command center provides a single point of management in which cloud administrator can define virtual networking configuration allocate networking resources to tenants.
Performing Cloud Networking Management
Viewing tenant configuration
To view configuration for a specific Tenants from Command center click on Users/Tenants on the right menu pane.
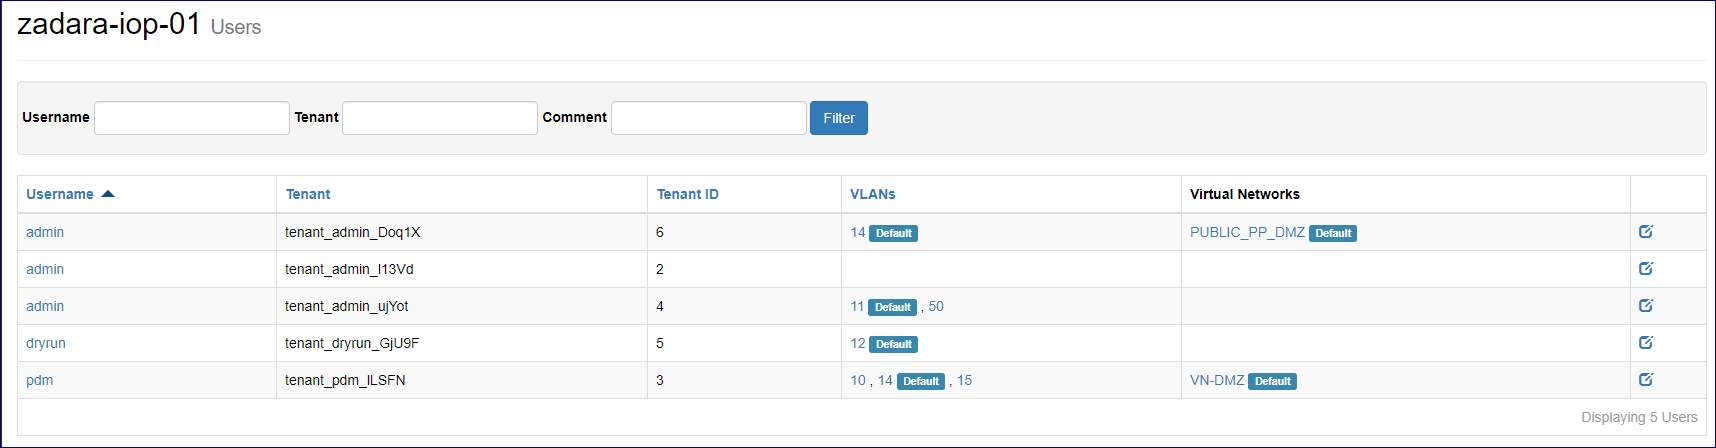
The tenants dialog provides basic configuration details for all tenants defined in the cloud. The main tenant table display the following details:
Cloud user name
Cloud tenant name
Tenant id
VLNAS which have allocation per each tenant
Virtual networks defined in each tenant
Note
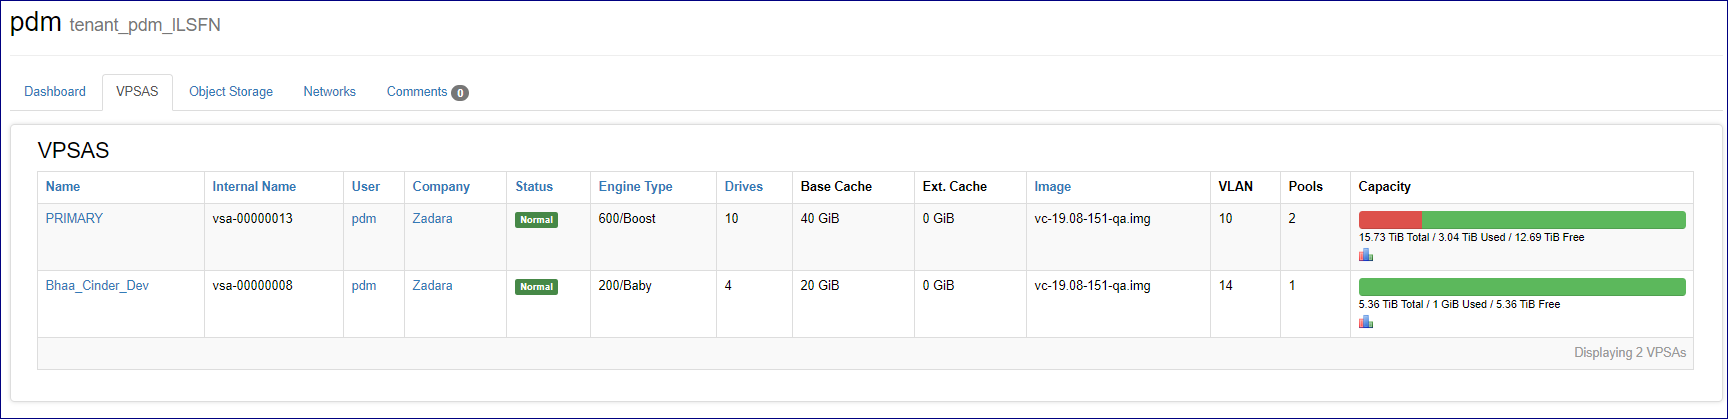
Clicking on a specific tenant record displays a drilled down view of the tenants configuration and allocated assets such as VPSA/VPSA Object storage instances and allocated virtual network details.
Viewing VLAN configuration
To view VLAN configuration from Command center click on VLANs from the right menu pane.
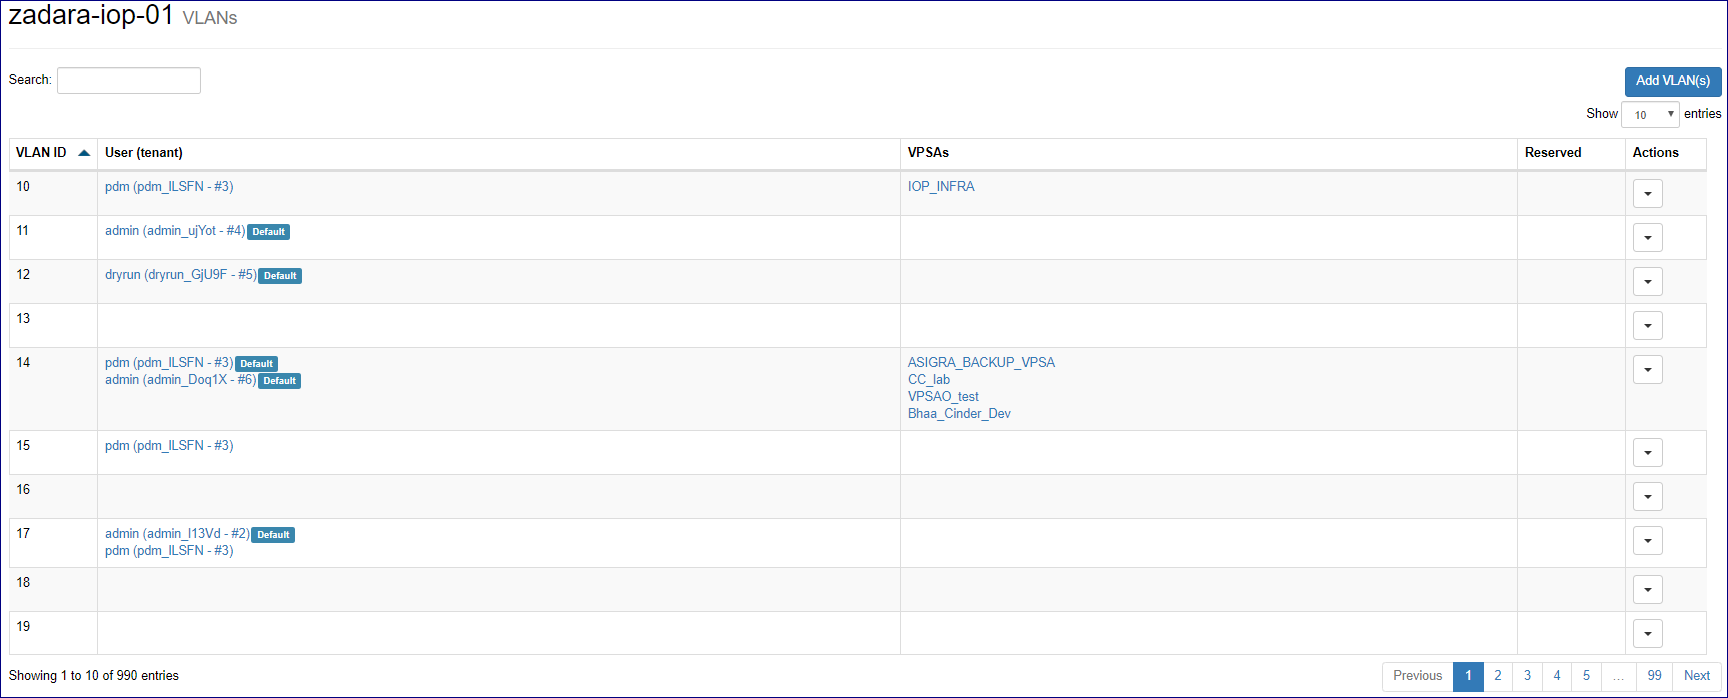
The VLAN configuration screen displays a list of ALL VLAN IDs specified as the cloud available VLAN range while per VLANS that have been assigned to a specific tenant Tenant and allocated VPSA/VPSA Object storage information is also displayed.
Expanding cloud addressable VLAN range
To add additional VLANS to the addressable range specified in the initial cloud configuration navigate the VLAN properties screen and click on the Add VLAN(S) button.
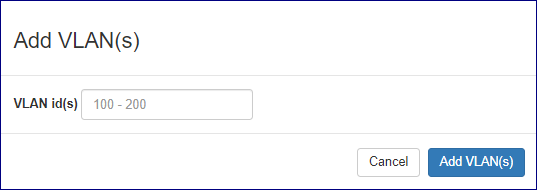
Specify an additional VLAN range that is not overlapping the currently defined range and click the Add VLAN(S) button the confirm expansion.
Assigning and unsinging VLANS
To assign a VLAN to a cloud tenant navigate the VLAN properties screen, locate the required VLAN id, click on its corresponding downward arrow button on the left side button and select Allocate.
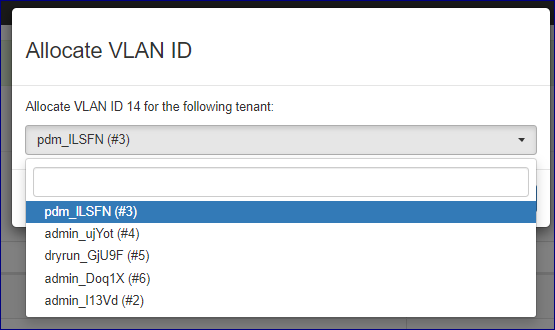
On the popup dialog that will appear select the tenant to which you would list to allocate this VLAN and click on the Allocate button to confirm.
To remove a VLAN from a cloud tenant navigate the VLAN properties screen, locate the required VLAN ID, click on its corresponding downward arrow button on the left side button
and select Deallocate.
On the popup dialog that will appear select the tenant to which you would list to allocate this VLAN and click on the Deallocate button to confirm.
Reserving VLANS
VLAN IDs can be reserved by command center to protect them from being allocated to tenants, reserved VLANs can be identified by a green check sign on the VLAN properties screen.

To reserve a VLAN ID navigate the VLAN properties screen, locate the required VLAN id, click on its corresponding downward arrow button on the left side button and select Reserve.
To release a VLAN ID from reservation navigate the VLAN properties screen, locate the required VLAN id, click on its corresponding downward arrow button on the left side button and select Unreserve.
Setting a VLAN as default
Per each tenant one VLAN can be set as its default VLAN, default VLAN is the one that will be allocated for newly created VPSA\VPSA Object storage instances.
To set a VLAN as default navigate the VLAN properties screen, locate the required VLAN id, click on its corresponding downward arrow button on the left side button
and select Set As default. On the popup dialog that will appear select the tenant for which this VLAN will be set as default and click on the Set as default button to confirm the operation.
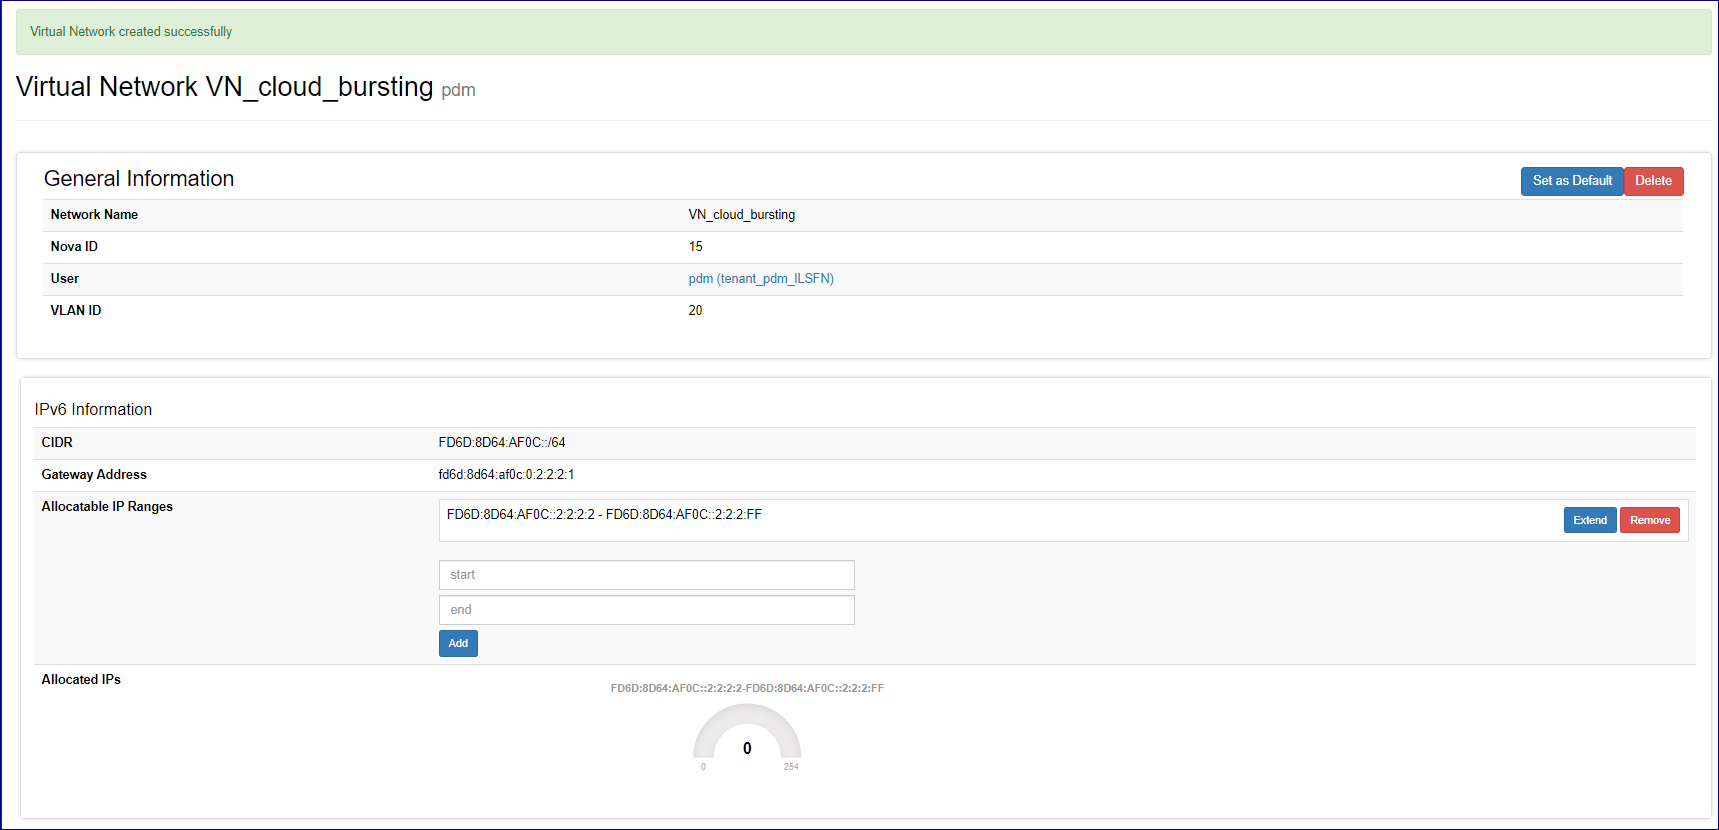
Viewing virtual networks configuration
To view the configuration of one or more virtual networks from Command center click on Virtual Networks on the right menu pane.
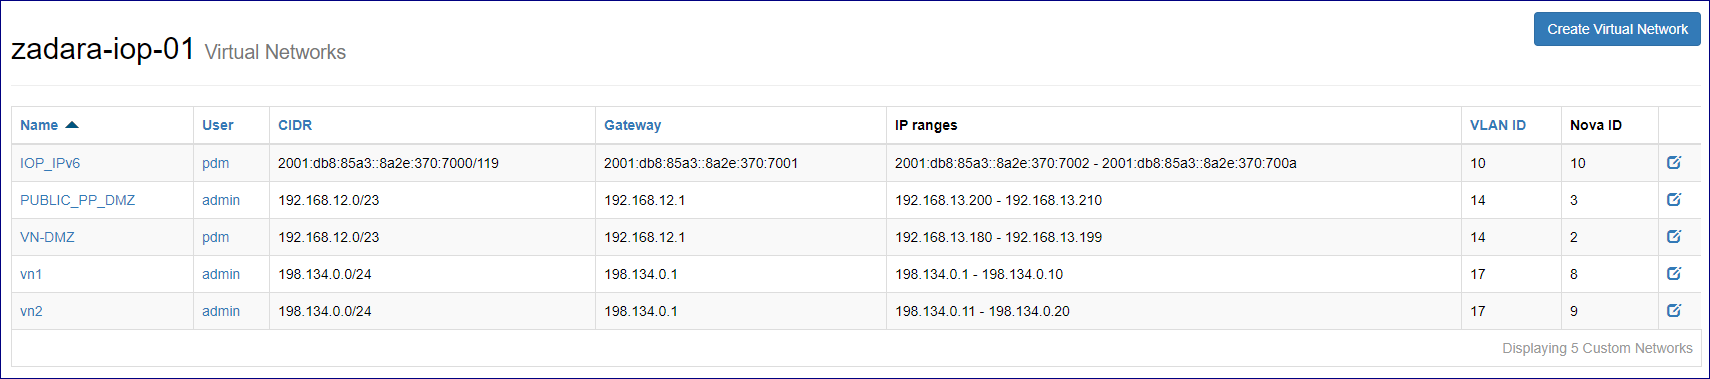
To drill down into a specific virtual network configuration click on its name.
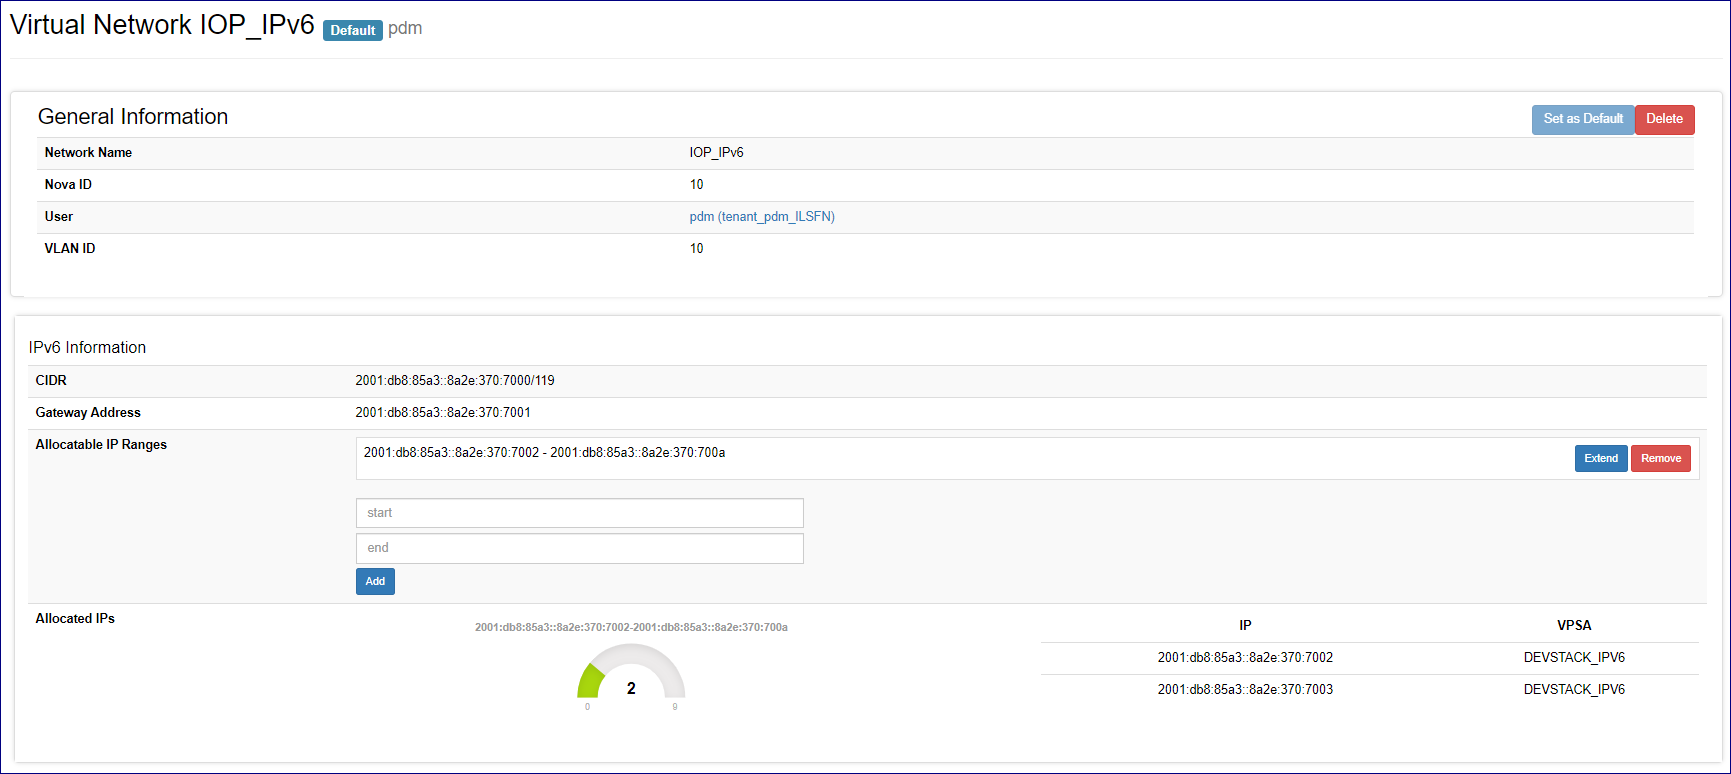
The virtual network configuration screens displays information on the network configuration such as:
User and tenant to which this network is allocated
Virtual Network internet protocol(IP) version (IPv4/IPv6)
CIDR
Default gateway
Virtual network IP address range
IP address allocation for VPSA and VPSA object storage entities
Creating a virtual network
To create a new virtual network from Command center click on Virtual Networks on the right menu pane and then click on the Create Virtual Network button.
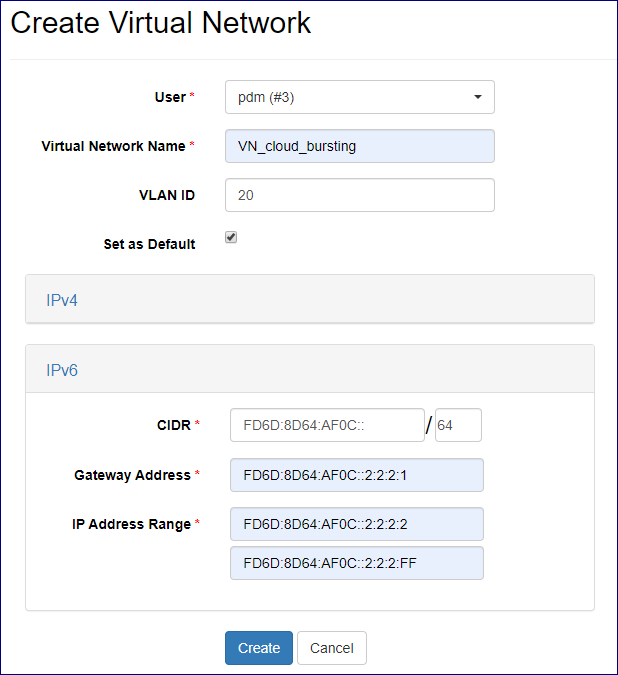
On the virtual network creation dialog specify:
The owning user name and tenant id (tenant id can be verified in the Users/Tenants screen).
The new virtual network name
Internet protocol(IP) version (define IPv4 or IPv6 Virtual Network)
Network CIDR
Default gateway
IP address range allocated for this virtual network
VLAN ID in which this virtual network will be allocated ( if VLAN ID is left blank it will be automatically selected)
Weather you would like to set this virtual network as the default network for this Tenant (each VPSA\VPSA object storage created by this tenant will attempt to allocate a front-end IP address from this virtual network).
Note
Click on the Create button to confirm the virtual network creation
Note
Expanding/Shrinking a virtual network IP range
A virtual network IP range can be expanded in 2 ways:
Addition of another IP range within the specified subnet.
Expansion of an existing IP range with contiguous IP addresses.
To add a new IP address range : to go to the specific virtual network configuration screen, specify the new IP range in the Allocatable IP Ranges section and click
on the Add button.
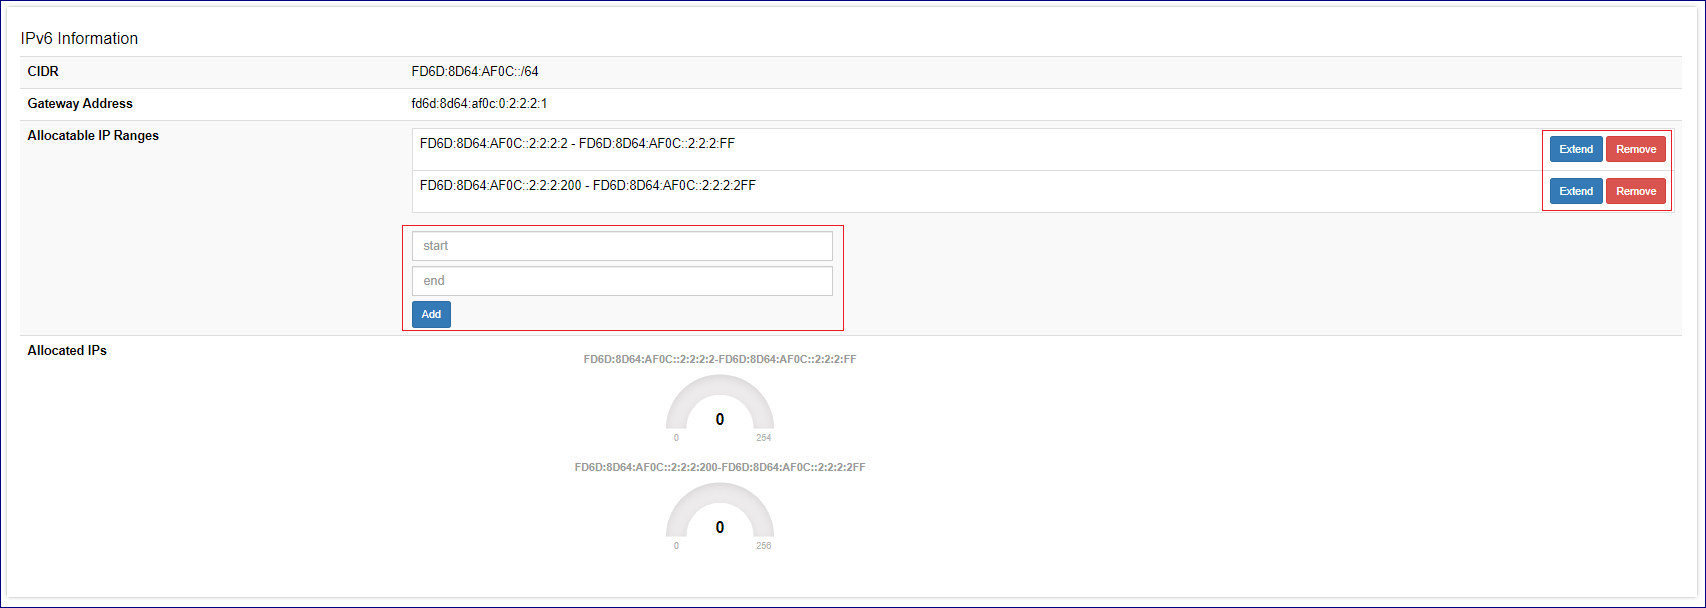
To extend an existing IP address range : click on the Extend button in the Allocatable IP Ranges section, specify the new upper limit for the virtual network IP range and click the Extend button.
To remove an existing IP address range from a virtual network : click on the Remove button in the Allocatable IP Ranges section, on the popup dialog that will appear click the Confirm button for removal confirmation.
Setting a virtual network as default
Per each tenant one Virtual network can be set as its default virtual network, default network is the one from which IP addresses will be allocated for newly created VPSA\VPSA Object storage instances.
To set a virtual network as the default network to go to the specific virtual network configuration screen and click the Set As default button. the setting will be immediately applied and reflected in the virtual network\tenant configuration.
Deleting a virtual network
To delete a virtual network it must be unutilized(without any IP address allocations to VPSA/VPSA object storage instances). To perform deletion to go to the specific virtual network configuration screen
and click the Delete button. On the popup dialog that will appear confirm deletion by clicking on the Delete button.