Remote Clones
Remote cloning introduction
The Remote Clone feature makes a specified snapshot of a source volume instantly available as a volume on another VPSA. The snapshot is available before data is copied, in the same cloud or in a different cloud, and over any distance. The cloned new volume is immediately available, in contrast to mirroring that might take a long time to replicate data, which depends on capacity and link bandwidth.
Remote cloning modes
The remote cloning process can run in one of two modes:
On-demand mode
The cloned volume retrieves blocks of data from the source volume on demand, as needed. During that time, the clone behaves like any other volume, but is dependent on its source volume. After all the data is copied to the clone, the relation between the source and cloned volumes breaks, and the cloned volume becomes a regular volume.
Background mode
The system retrieves all the data from the source volume in the background. In this mode, after all the data is retrieved, the connection to the original snapshot breaks and the volume becomes independent.
Common remote cloning use cases
The most common remote cloning use cases are:
Instant mobility
Instant mobility is the rapid migration of volumes between VPSAs with minimal downtime for the application accessing the migrating volume.
Instant mobility is useful for:
Volume migration from a VPSA that runs out of capacity, into a VPSA that has free capacity
Volume migration between VPSA Storage Array and VPSA Flash Array
Volume migration between sites
Volume migration from a private cloud to the public cloud
Offline processing
Offline processing requires the creation of an instant clone of a volume on another VPSA (local or remote). The new cloned volume can then be used for offline processing, without affecting the original production volume.
Offline processing is useful for:
Development and Test
Analytics
Reporting
The following table summarizes an example of a sequence of steps, including high-level steps for remote cloning, for implementing the Instant mobility or Offline processing use cases:
Step |
Action |
For instant mobility |
For offline processing |
|---|---|---|---|
1 |
If relevant: Stop the application that accesses the volume to be migrated. |
✓ |
✗ |
2 |
Take a snapshot of the volume to be cloned from the source VPSA. |
✓ |
✓ |
3 |
✓ |
✓ |
|
4 |
✓ |
✓ |
|
5 |
✓ |
✓ |
|
6 |
If relevant: Start offline processing on the server accessing the new volume. |
✗ |
✓ |
6 7 |
If relevant: Restart the application that will access the new volume. |
✓ |
✗ |
Connect source and destination VPSAs
A clone can only be created on a pair of VPSA’s that are known to each other. To establish the connection between VPSAs, remote VPSAs are discovered and defined in the same way as for remote mirroring.
If the VPSAs are located in different Zadara Storage Clouds, you will need to first assign a public IP to each VPSA.
Follow the details in Connect to a remote VPSA to discover the remote VPSA and establish a connection.
Create a remote clone
A remote cloned volume is created on the destination VPSA as a new type of volume.
To create a remote cloned volume:
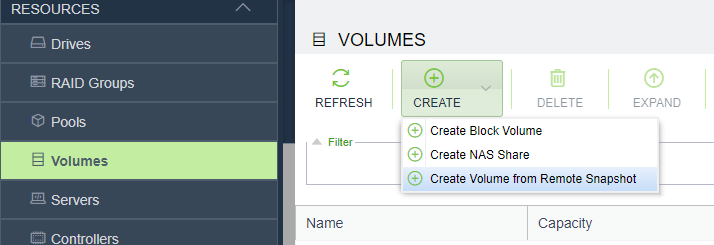
Go to Resources > Volumes.
In the Volumes view, click Create and select Create Volume from Remote Snapshot from the dropdown.
In the Create Volume from Remote Snapshot dialog that opens, select the source VPSA volume’s snapshot to clone:
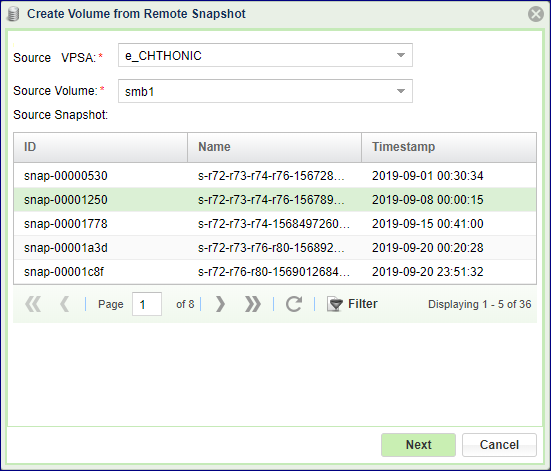
Source VPSA: From the list of VPSAs in the dropdown, select the remote VPSA from which to clone.
Source Volume: From the list of volumes in the dropdown, select the remote VPSA’s volume to clone. The selected volume’s list of snapshots is displayed in the Source Snaphot table.
Source Snapshot: Click the snapshot to use, from the list of snaps of the selected source volume.
Click Next. The dialog switches, for entering the destination volume details.
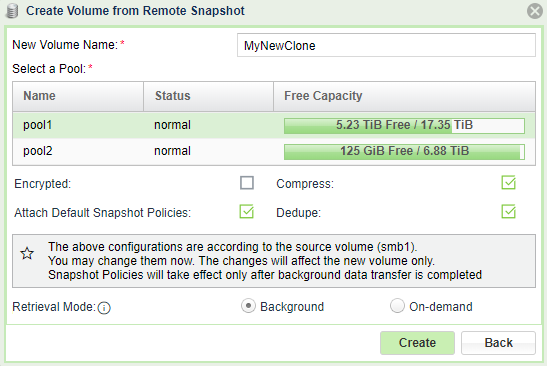
NewVolume Name: Enter a name for the new volume.
Select a Pool: From the list of available storage pools, click the pool from which to allocate storage resources for the new volume.
Encrypted: To encrypt the new volume, mark the checkbox.
Note
A cloned volume can be encrypted, even if the source volume is not encrypted.
VPSA Flash Array To dedupe or compress a new volume on a VPSA Flash Array, mark the checkboxes.
Note
A volume that is being cloned on a VPSA Flash Array can be deduped or compressed, even if the source volume is not.
Select the Retrieval Mode for the cloning process:
On-Demand: Blocks of data are retrieved as needed, until all the source volume data is copied to the destination volume.
Background: All the source volume’s data is retrieved in the background.
Click Create.
Monitoring a remote clone
Destination VPSA
Cloned volume properties are identical to those of a regular volume.
Capacity of a clone shows the virtual capacity of the original volume, and the physical capacity of the cloned volume.
While retrieving data, the system detects whether the clone is connected. If connectivity to the source snapshot is lost during data retrieval, the clone becomes unavailable.
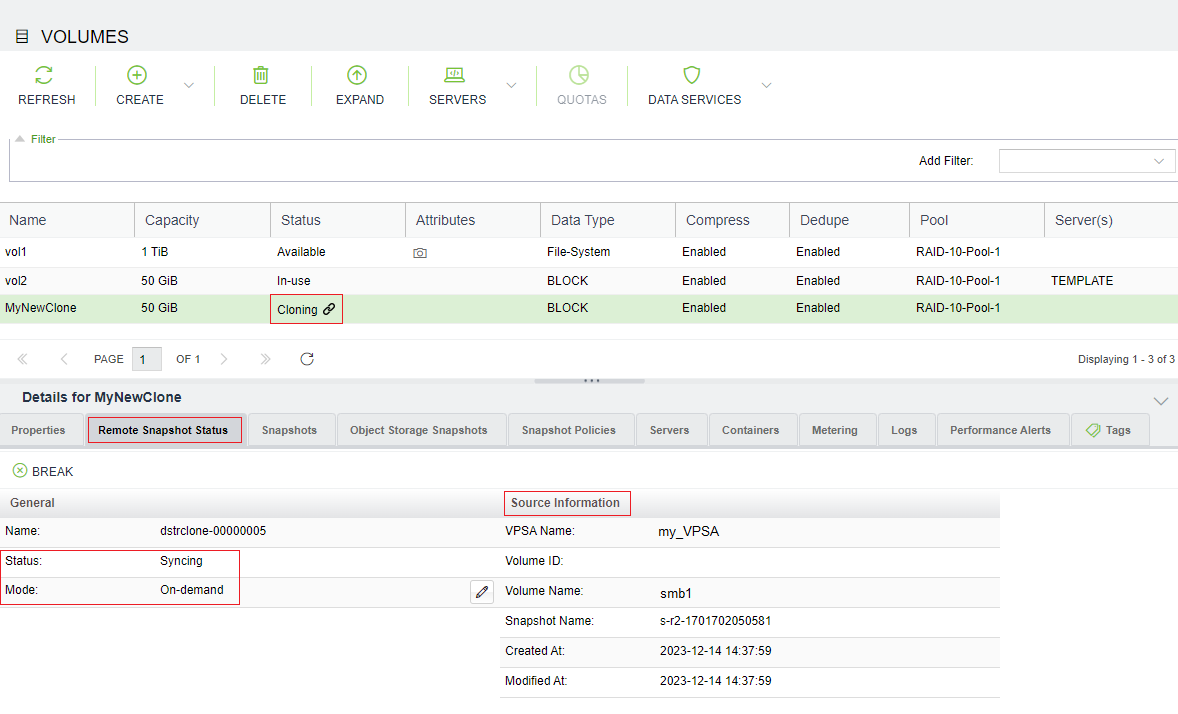
During the cloning process, the destination volume is listed in the Volumes table with its Status column entry displaying the value
Cloningtogether with a connectivity icon, indicating the activity in progress.The cloning data retrieval’s status is displayed on the south panel’s Remote Snapshot Status tab, while data is copied from the source volume to its clone.
During the cloning process, you can break the connection between the clone and its origin, by clicking the Break button in the Remote Snapshot Status tab.
During the cloning process in Background mode, there are also controls to Pause and Resume the data transfer. This feature is useful when experiencing load problems on the system.
After all the data is retrieved, the relationship between the source and the cloned volumes is broken, the cloned volume becomes a regular volume and the Remote Snapshot Status tab is no longer displayed.
Source VPSA
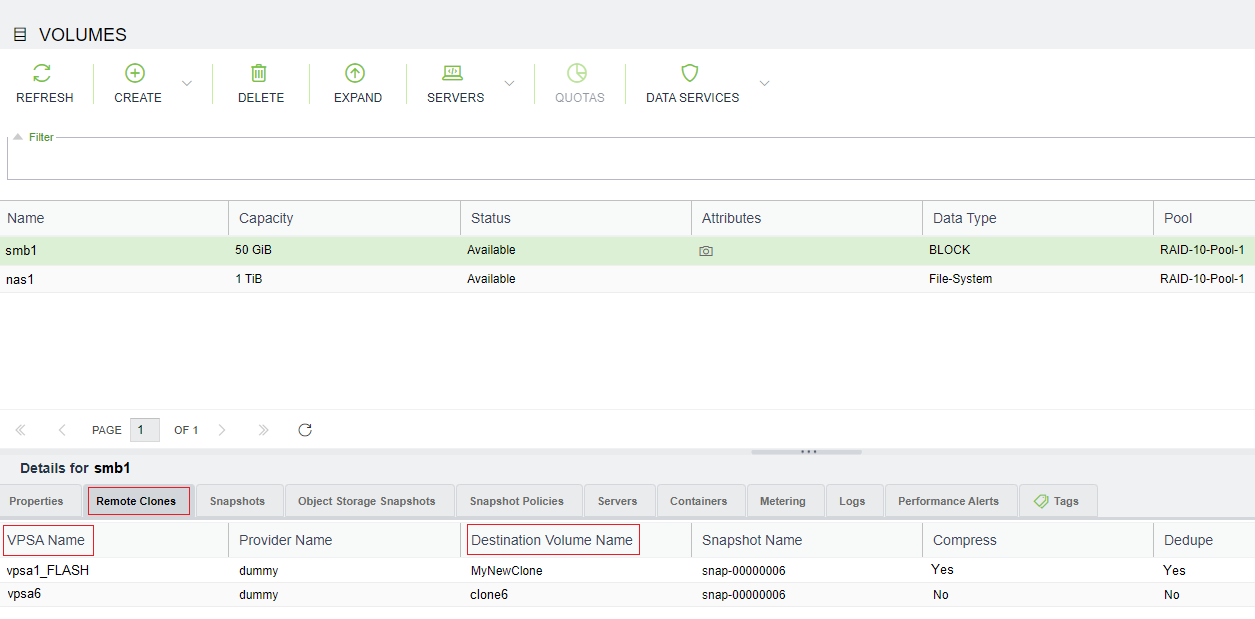
On the source VPSA during the cloning process, the south pane of a source volume being cloned displays the additional Remote Clones tab. This tab lists the names and details of the destination volumes in the process of being cloned from the selected source, and the destination VPSA on which they are being cloned.
On completion of a cloning process, the entry of the successfully cloned remote volume disappears from the table in the source volume’s Remote Clones tab. On completion of all cloning processes for a source volume, there are no longer any entries in the table in its Remote Clones tab, and the tab is no longer displayed.
Attach a clone to a server
A remote clone is attached to servers on the target VPSA, in the same way as a regular volume. Similarly, a cloned volume can be detached from a server in the same way as a regular volume. Follow the instructions in Attaching & detaching Volumes to Servers.
Data services
The following data services are not available on destination volumes while the source data is being retrieved:
Snapshots
Clones
Mirrors
B2OS
After all the data is retrieved and the relationship between the source and the clone has been broken, all data services become available.
Delete a clone
Deletion of a remote cloned volume is done on the destination VPSA, and it breaks the relations with the source volume. You can delete a remote clone in the same way that you delete any other volume. Follow the instructions in Creating and Deleting a Volume.