Settings
General
Volumes Recycle Bin
The Recycle Bin is enabled by default, but you can also disable it. When enabled, deleted Volumes are kept in the Pool’s Recycle Bin and can be restored. If the Recycle Bin is disabled deleted Volumes are immediately destroyed and cannot be recovered.
Public IPs
This displays any Public IPs assigned to the Controllers. A Public IP allows host connectivity from outside of the VPSA VPN.
Datamover Concurrency Level
You can control the load allowed for datamovers such as mirroing, cloning, etc… by setting the concurrency level. Default is Medium
Zadara Container Services Engine
This displays which, if any, ZCS Engine has been configured via the Provisioning Portal.
Zadara IO Engine
This displays which VPSA IO Engine (Model) has been configured via the Provisioning Portal.
Server Connectivity Monitoring
Server connectivity monitoring allows the VPSA administrator to modify the default settings for all servers records that are set with “Connectivity monitoring” option.
Available configuration:
Status:
Enabled - feature is enabled and notifications (emails) are allowed
Enabled (Tickets Disabled) - the feature is enabled however notifications will not be sent to the administrator. Connectivity status can be reviewed in the scope of the server in the VPSA servers view
Disabled - feature is disabled globally and will not be present per server
Connection attempts - number of connection attempts to a server record (default: 10)
Success threshold - the number of successful attempt that will be considered as normal (default: 6)
Security
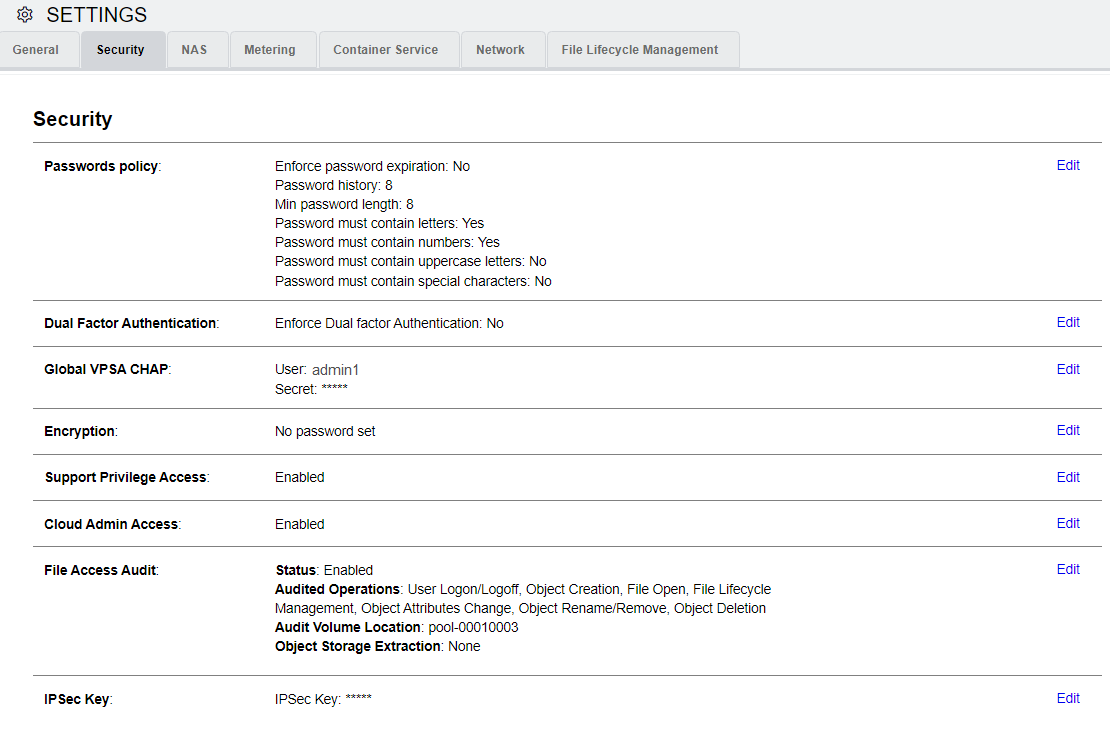
Password Policy
The VPSA Admin can control the VPSA Password expiration policy and password history policy.
Dual Factor Authentication
The VPSA Admin can force all users to login to the VPSA GUI using dual factor authentication. For details see Dual Factor Authentication.
Global VPSA CHAP
This gives you a uniform username and password to use when you create Servers.
Encryption
This sets the Volume encryption password for the VPSA’s data-at-rest encryption.
For more information on managing encrypted volumes see Managing Encrypted Volumes.
Support Privilege Access
This controls the ability of Zadara support engineers to access the VPSA virtual controllers with privileged rights. Only the VPSA Admin can change this setting. If enabled, the VPSA Admin gets notification every time the privileged access is used.
Cloud Admin Access
This sets the cloud admin’s VPSA GUI access (via the Command Center) to Enabled/Disabled status.
File Access Audit
The VPSA provides the option to enable audit logging of specific file system events. File access audit can be leveraged to comply with organizational security demands and to assist in root cause analysis of specific data access related events.
To implement file access auditing, it must first be enabled globally, and then applied to each volume that should be audited.
To enable file access auditing globally, or to edit the existing file access audit policy:
In the Security tab in the Settings page, click Edit on the right of File Access Auditing. The File Access Auditing configuration dialog box opens.
Mark the checkboxes of the access operations to be audited.
Click Save.
To apply file access auditing to a volume, see Creating a NAS share under Creating and Deleting a Volume.
IPsec Key
This displays the key to be used when configuring IPsec tunneling for secured host connections.
Allow iSCSI over Public IP
Allow VPSA iSCSI connectivity over Public IP interface (default = False)
NAS
NFS Domain
This sets the domain name for NFS shares. This defaults to localdomain. (NFS4 Only)
NFS ID mapping
If enabled, each UNIX (Linux) User must be defined as a NAS User in the VPSA. If disabled, UNIX Users are authenticated on the UNIX host side.
SMB NetBios Name
This gives the VPSA Admin the option to change the default name of the VPSA as it apears in Active Directory. This field must be modified before the VPSA joins AD.
SMB Character Set
This gives you the default Character Sets used by the SMB service for SMB Volumes. Unix charset - indicates the local character set used by the System. DOS Charset - indicates the Character sets used to communicate with DOS(windows) clients connecting to SMB shares. If you plan to use filenames with different encoding in the filename (other than English), you may want to change the Character Set. The default value for the unix character set is UTF-8 and the default value for the DOS character set is CP850. It is important to note that some character sets can be selected using the listbox items in the setup dialog but all other character sets can be also specified by directly editing the settings field.
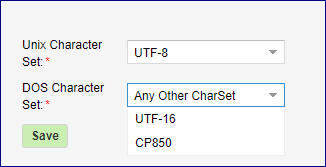
Changing this value while clients are connected will cause them to temporarily lose access to all SMB shares.
Defragmentation
On HDD media, files are written and deleted in blocks. When files are deleted, data can become fragmented and stored in non-contiguous blocks. Defragmentation reorganizes these blocks, placing file fragments closer together. This reduces seek time and improves file access speed on mechanical drives.
You can enable or disable background file system Defragmentation. You can also run Defragmentation on demand.
By default, Defragmentation is enabled and is scheduled to run every weekend on Sundays at 00:00 (midnight Saturdays night).
To view or change the Defragmentation schedule:
In the navigation tree, select System > Settings.
In the NAS tab, next to Defragmentation, click Edit.
Optionally, update the settings:
Defragmentation status:
Displays the current Defragmentation status:
Standby: Waiting to start the next Defragmentation run according to the configured schedule or an on-demand request.
Running: Defragmentation is currently in progress.
Start Now / Stop toggle: Immediately start Defragmentation
on demand, or stop an in-progress Defragmentation run.
Allow automatic Defragmentation: Enable or disable periodic Defragmentation runs in the background, according to the configured schedule. Select one of:
Weekly (default):
Day of Week: From the dropdown, select a day of the week.
Sunday (default) - Saturday.
Hour: From the dropdown, select the time of day that the Defragmentation will run.
00:00 (default) - 23:00, on the hour only.
Note
The default schedules for Defragmentation and File System Trim vary in both day and time, to distribute system overhead more efficiently.
Monthly:
Day of month: From the dropdown, select a day of the month.
The range is restricted to 1 - 28, to avoid discrepancies between longer and shorter months.
Hour: From the dropdown, select the time of day that the Defragmentation will run.
00:00 - 23:00, on the hour only.
Optionally, click Default to reset the settings to their defaults.
Click Submit to save the changes, or Cancel to exit without applying changes to the settings.
File System Trim
On SSD media, files are written and deleted in memory cells. When files are deleted, the SSD might not immediately recognize the freed space, leading to performance degradation over time. The File System Trim (FSTRIM) operation overcomes this by informing the SSD which blocks are no longer in use, allowing them to be erased and reused efficiently. This helps maintain consistent performance and extends the lifespan of the drive.
You can enable or disable background File System Trim. You can also run File System Trim on demand.
By default, File System Trim is enabled and is scheduled to run every weekend on Saturdays at 00:00 (midnight Friday night).
To view or change the File System Trim schedule:
In the navigation tree, select System > Settings.
In the NAS tab, next to File System Trim, click Edit.
Optionally, update the settings:
File System Trim status:
Displays the current File System Trim status:
Standby: Waiting to start the next File System Trim run according to the configured schedule or an on-demand request.
Running: File System Trim is currently in progress.
Start Now / Stop toggle: Immediately start File System Trim
on demand, or stop an in-progress File System Trim run.
Allow automatic File System Trim: Enable or disable periodic File System Trim runs in the background, according to the configured schedule. Select one of:
Weekly (default):
Day of Week: From the dropdown, select a day of the week.
Sunday - Saturday (default).
Hour: From the dropdown, select the time of day that the File System Trim will run.
00:00 - 23:00, on the hour only. Default: 01:00.
Note
The default schedules for Defragmentation and File System Trim vary in both day and time, to distribute system overhead more efficiently.
Monthly:
Day of month: From the dropdown, select a day of the month.
The range is restricted to 1 - 28, to avoid discrepancies between longer and shorter months.
Hour: From the dropdown, select the time of day that the File System Trim will run.
00:00 - 23:00, on the hour only.
Optionally, click Default to reset the settings to their defaults.
Click Submit to save the changes, or Cancel to exit without applying changes to the settings.
Default Filesystem Write Policy
Set the default write policy for new volumes (can be applied for existing volumes in a bulk operation as well. The Write Policy refers to different ways in which data is written to the underlying VPSA volume filesystem during filesystem operations.
Asynchronous Writing (default) When the filesystem is mounted with the “Asynchronous Writing” option, data modifications are not immediately synchronized with the volume file-system. Instead, the system buffers these changes in memory and may perform the actual write to the filesystem at a later time. This can lead to faster write performance as the system doesn’t need to wait for each individual write to complete before proceeding with other tasks.
Synchronous Writing When a filesystem is mounted with the “Synchronous Writing” option, all data modifications (writes) are immediately synchronized with the storage device. This means that before a write operation is considered complete, the data is physically written to the VPSA filesystem, ensuring that changes are safely stored on stable storage. This can ensure data integrity but can also lead to slower write performance, as the system waits for the filesystem to confirm the write operation before proceeding.
Metering
The VPSA provides an option to download its performance metering database which contains per-minute performance statistics about all active and monitored Objects – Drives, RAID Groups, Pools, Volumes and Servers. The database is downloaded in a binary format and is accompanied with a tool (meter2csv) to convert the raw binary database to a csv formatted file.
Container Service
Container Network
This displays the internal IP range of the ZCS and is accessible only by the host VPSA.
Exposed Ports
This displays the Ports ranges that are exposed for host access.
Image Repository
This displays the Status, Pool and Capacity of the Image Repository that stores all of the ZCS containers and images.
Network
Maximum Transmission Unit (MTU) is the largest size, in bytes, of a single packet that can be sent over a network interface without fragmentation.
Important
Best Practice
While the FE and Public networks may use different MTU values from each other, all components within each network must use the same MTU setting.
For the FE Network, configure an identical MTU across all its connected zStorage components — VPSAs, Object Storages, Storage Nodes, and any associated customer-side hosts or switches.
For the Public Network, also ensure a consistent MTU across all of its connected components.
Inconsistent MTU settings across zStorage components for a network can cause packet fragmentation, increased latency, or dropped connections, which could impact performance and data availability.
The MTU size can be set by selecting values from 1500 (default) to 9000 from the dropdown for both the Front End (data) network, and the public network & VNIs (Public & VNI network MTU).
The VPSA also supports customizing the Front End Network MTU, by overwriting the displayed MTU value with a custom MTU size in the range of 1420 - 9000.
Note
Changing the MTU can be disruptive for ongoing traffic. Existing iSCSI server sessions may require a restart for the new MTU setting to take effect.
File Lifecycle Management
The VPSA supports file lifecycle management and analytics. When file lifecycle management is enabled for a VPSA, a toggle is provided to pause or resume global file lifecycle management indexing on volumes.

In the File Lifecycle Management tab on the Settings page, click Edit.

In the dialog that opens, click Pause or Resume, according to the context.
Note
To disable file lifecycle management globally for the VPSA, use the VPSA’s Disable File Lifecycle operation in the Provisioning Portal.