Object Storage
Command Center provides cloud administrators with centralized management capabilities for Zadara Cloud Object Storage environment. Cloud administrators can use Command Center for:
Management operations on Object Storage instances
Configuring Object Storage Availability Zones resource allocation
Monitoring Object Storage capacity consumption trends
Viewing Object Storage Properties
To view a specific Object Storage:
Click Object Storage in Command Center’s left menu panel.
In the Instances tab, click the Object Storage instance in the Object Storages grid.
Object Storage Instance Dashboard
The Object Storage instance’s main Dashboard tab’s Information panel provides information regarding the Object Storage’s configuration, current health status and network topology.
Property |
Description |
|---|---|
Name |
Object Storage instance’s display name |
Internal Name |
Object Storage instance’s internal name |
User |
User who created the instance |
Company |
Company of the user who created the instance |
Description |
Description given when the instance was provisioned |
Nova ID |
Object Storage instance’s Nova ID |
Status |
Current status of the instance |
Protection Zone |
Instance Protection Zone configuration |
IO Engine type |
VC type for the Object Storage
|
VCPUs |
VCPUs per VC type (Proxy+Storage/Proxy/Replicator) for this instance |
RAM |
RAM per VC type (Proxy+Storage/Proxy/Replicator) for this instance |
SSL Termination |
Indicates whether SSL termination is internal or external |
Storage VCs |
Instance Storage VC count |
Replicator VCs |
Instance Replicator VC count |
Proxy VCs |
Instance Proxy VC count |
IP Address |
Instance floating frontend IP address |
Public IP |
Instance public IP address |
Mgmt. Address |
Instance hostname for management access |
Load Balancer |
Instance Load Balancer type: Basic (Internal Load Balancer) |
Image |
Instance deployment image |
UUID |
Instance UUID |
SNMPv3 Engine ID |
Instance SNMPv3 Engine ID |
Created |
Instance creation timestamp |
Updated |
Instance last update timestamp |
Managing Object Storage Availability Zones
Object Storage Availability Zones are required to support the various protection policies used in the cloud. By default there are four Availability Zones defined in each cloud to which Storage Nodes can be allocated.
The cloud administrator’s ability to define specific Object Storage protection policies is dependent on the Storage Node to Availability Zones allocation scheme.
Protection Policy |
Number of Fault Domains (FD) |
|---|---|
2-way mirroring |
2 |
4+2 erasure coding |
3 |
Assigning and removing Storage Nodes to Object Storage Availability Zones
To view the current Object Storage Availability Zones configuration:
select the Object Storage tab and then on the following screen select the Object Storage Availability Zones tab. The Object Storage Availability Zones tab presents the current resource allocation scheme and amount of resources (VCPUs , Memory and Drives) is Allocated , Utilized or free in each availability Zone. On the lower part of the screen a list of available Storage Nodes and their resources inventory is displayed.
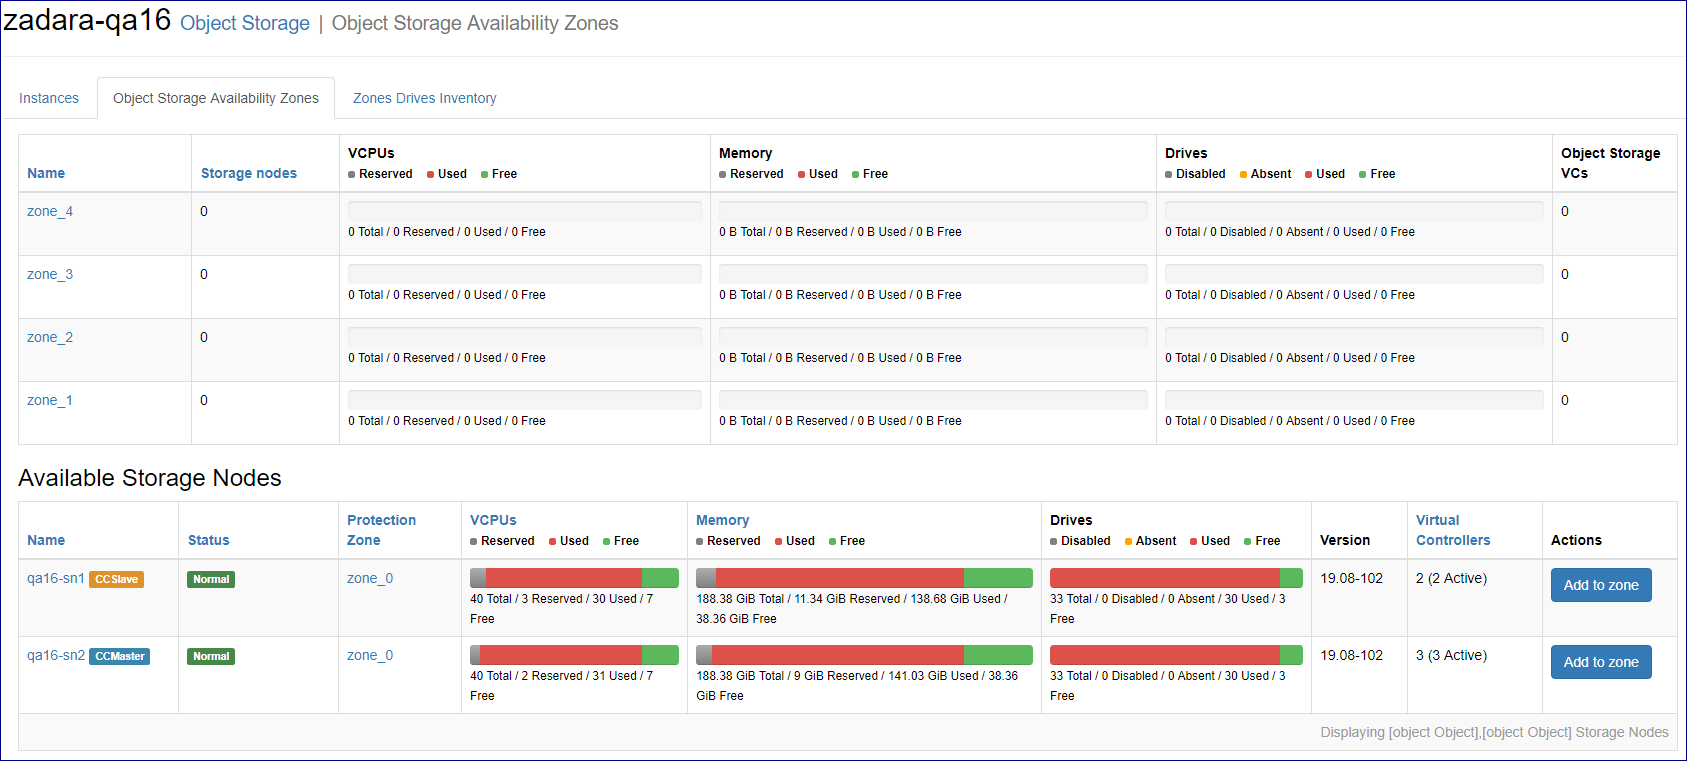
To allocate a Storage Node to an Availability Zone:
Select a Storage Node and click the appropriate
Add to zonebutton on the right side of the screenOn the popup dialog that appears select the required Availability Zone and click
addThe Availability Zone configuration will update to reflect the required changes.
To remove a Storage Node from an Availability Zone:
Click on required Availability Zone
On the Storage Nodes tab locate the node you wish to remove and click the
Removebutton

On the following popup dialog confirm the removal request
The Availability Zone configuration will update to reflect the required changes.
Viewing Object Storage Availability Zones drive inventory
To view drive inventory click on the Zones Drives inventory tab, Inventory will be presented grouped by drive types.

Managing Object Storage Instances
Object Storage instance management options are available from the Actions dropdown menu in the Information panel on the Object Storage’s Dashboard tab:
Changing a VPSA Object Storage engine type VPSA Object Storage
Assigning or Unassigning a Public IP address to an Object Storage
Enable Elastic Load Balancer for a VPSA Object Storage VPSA Object Storage
Adding Drives to an Object Storage
To add drives to an Object Storage:
Click Object Storage in Command Center’s left menu panel.
In the Instances tab, click the Object Storage instance in the Object Storages grid.
In the Object Storage’s Dashboard tab, on the Object Storage’s Information panel, click Actions.
From the dropdown, select Add Drives.
In the Add Drives dialog, select the relevant values from each parameter’s dropdown:
Policy Name
Drive Type
Quantity
Click Add Drives to confirm the operation.
Note
When adding drives to an Object Storage, Virtual Controllers can also be added automatically, depending on the drive to VC ratio
Virtual Controllers that belong to an Object Storage instance older than version 20.01 cannot be spawned on Storage Nodes with ConnectX-5 NICs.
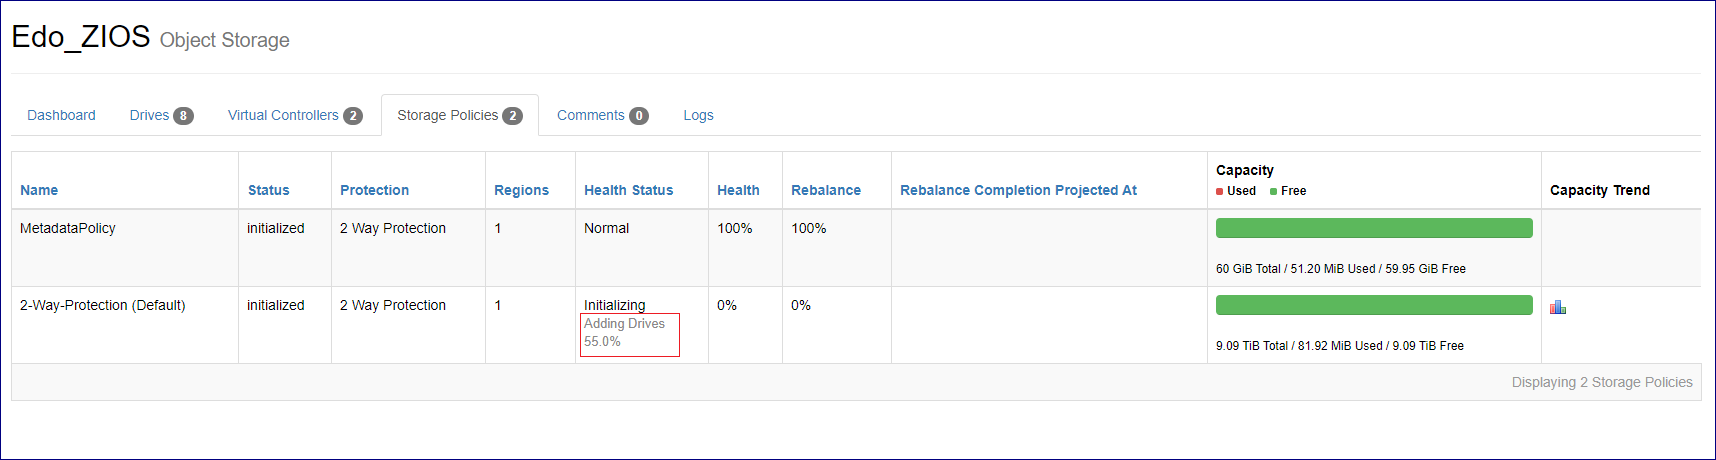
To avoid any performance impact, the drive addition process is performed gradually. VPSA Object Storage
The drive addition progress can be monitored in the Health Status column of the Object Storage’s Storage Policies tab in Command Center.
Adding a Proxy Virtual Controller
To add a Proxy Virtual Controller to an Object Storage:
Click Object Storage in Command Center’s left menu panel.
In the Instances tab, click the Object Storage instance in the Object Storages grid.
In the Object Storage’s Dashboard tab, on the Object Storage’s Information panel, click Actions.
From the dropdown, select Add Proxy VC.
In the Add Proxy Virtual Controller dialog, click Add Proxy Virtual Controller to confirm the operation.
On completion, the Proxy VCs count on the Object Storage’s Information panel is incremented.
Enabling Container Replication Service
Zadara Object Storage supports replication at container level.
Object replication is the automatic duplication and ongoing synchronization of objects from a container in a source Object Storage to a target container in a remote Object Storage instance, or even to a target container in the same Object Storage instance as the source.
Note
Enabling the Container Replication Service incurs an additional cost.
By default, the Container Replication Service is disabled for an Object Storage instance.
Enabling the Container Replication Service for an Object Storage instance is a prerequisite for configuring replication jobs for containers in the Object Storage instance.
Enabling the Container Replication Service creates a Replicator Virtual Controller that can take several minutes to complete.
To enable the Container Replication Service for an Object Storage:
Click Object Storage in Command Center’s left menu panel.
In the Instances tab, click the Object Storage instance in the Object Storages grid.
In the Object Storage’s Dashboard tab, on the Object Storage’s Information panel, click Actions.
From the dropdown, select Enable Container Replication Service.
In the Enable Container Replication Service dialog, confirm the operation.
In the Object Storage instance’s Virtual Controllers tab, a new VC is added, and the initial value of its State is Standby.
On completion, the new VC’s State value changes to Created, and its Storage Role is Replicator.
In the Object Storage instance’s Logs tab, the following Info messages indicate successful completion of enabling the Container Replication Service:
Container Replication is enabled

replicator VC #n was successfully added.
The Replicator VCs, Replicator VCPUs and Replicator RAM counts on the Object Storage’s Information panel is incremented.
See the Zadara Object Storage User Guide for more information on Replication.
Adding a Replicator Virtual Controller
Note
The option to add a Replicator Virtual Controller is available only when the Container Replication Service is enabled for the Object Storage.
To add a Replicator Virtual Controller to an Object Storage:
Click Object Storage in Command Center’s left menu panel.
In the Instances tab, click the Object Storage instance in the Object Storages grid.
In the Object Storage’s Dashboard tab, on the Object Storage’s Information panel, click Actions.
From the dropdown, select Add Replicator VC.
In the Add Replicator Virtual Controller dialog, click Add Replicator Virtual Controller to confirm the operation.
Creation of a Replication VC can take several minutes.
In the Object Storage instance’s Virtual Controllers tab, a new VC is added, and the initial value of its State is Standby.
In the Object Storage instance’s Logs tab, the following Info messages indicate successful completion of adding the Replicator VC:
replicator VC #n was successfully added.On completion, the Replicator VCs count on the Object Storage’s Information panel is incremented.
See the Zadara Object Storage User Guide for more information on Replication.
Disabling Container Replication Service
Note
To disable the Container Replication Service for an Object Storage:
Click Object Storage in Command Center’s left menu panel.
In the Instances tab, click the Object Storage instance in the Object Storages grid.
In the Object Storage’s Dashboard tab, on the Object Storage’s Information panel, click Actions.
From the dropdown, select Disable Container Replication Service.
In the Disable Container Replication Service dialog, confirm the operation.
See the Zadara Object Storage User Guide for more information on Replication.
Changing a VPSA Object Storage engine type
Scope: VPSA Object Storage
When creating a VPSA Object Storage with 4 disk drives or less, the VPSA Object Storage’s engine type is set to Mini. The Mini engine type is a lesser footprint engine compared to the full Standard VPSA Object Storage virtual controller, designed to support up to 12 disk drives.
VPSA Object Storage Mini virtual controllers can be manually converted to the full Standard footprint in Command Center.
Note
When more than 4 disk drives are provisioned to a VPSA Object Storage engine, it will be automatically be upgraded.
To change a VPSA Object Storage’s engine type:
Click Object Storage in Command Center’s left menu panel.
In the Instances tab, click the Object Storage instance in the Object Storages grid.
In the Object Storage’s Dashboard tab, on the Object Storage’s Information panel, click Actions.
From the dropdown, select Change Engine Type.
In the Change Engine dialog, click Change engine to confirm the Change Engine Type operation.
On completion, on the VPSA Object Storage’s Information panel, the IO Engine Type changes to Standard.
Upgrading an Object Storage
Command Center allows administrators to perform a version upgrade on the Object Storage instances running in the cloud.
To upgrade an Object Storage’s version:
Click Object Storage in Command Center’s left menu panel.
In the Instances tab, click the Object Storage instance in the Object Storages grid.
In the Object Storage’s Dashboard tab, on the Object Storage’s Information panel, click Actions.
From the dropdown, select Upgrade.
In the Upgrade Object Storage dialog:
From the dropdown, select the Object Storage image version for the upgrade.
Advanced options:
Version Validation: By default, the upgrade process includes version validation. To skip the validation, mark the checkbox.
Click Upgrade.
In the Confirm Upgrade dialog, click Upgrade to confirm the Upgrade Object Storage version operation.
The Object Storage’s Status changes to Upgrading version for the duration of the process, and then to Normal when complete.
Note
From cloud version 20.12:
An Object Storage upgrade to a version which is more then 2 major releases higher than the current version will be blocked by Command Center.
An Object Storage version downgrade will be blocked by Command Center.
Maintenance mode
Maintenance mode is useful for protecting an Object Storage against any data integrity issue when a planned cloud physical maintenance is scheduled.
While in maintenance mode, all Object Storage services are stopped and the Object Storage’s management console is not accessible. The instance is offline and its consumed resources (vCPU, RAM) are freed at the Storage Node level.
Maintenance mode involves the process of deleting an Object Storage’s Virtual Controllers, while maintaining the data drives and all the necessary metadata to resume its operation at a later stage.
Taking an Object Storage out of maintenance mode and resuming its operation takes only a few minutes.
To transit an Object Storage to maintenance mode:
Click Object Storage in Command Center’s left menu panel.
In the Instances tab, click the Object Storage instance in the Object Storages grid.
In the Object Storage’s Dashboard tab, on the Object Storage’s Information panel, click Actions.
From the dropdown, select Maintenance Mode.
In the Enter Maintenance Mode dialog:
In the text box, enter the Object Storage ID.
Click Maintenance to confirm the Enter Maintenance Mode operation.
Assigning or Unassigning a Public IP address to an Object Storage
In specific cases where an Object Storage requires public internet connectivity, a public IP address can be assigned to it.
See Public IP Addresses for information about configuration of cloud-level public IP ranges.
Assigning a Public IP address
To assign a Public IP address:
Click Object Storage in Command Center’s left menu panel.
In the Instances tab, click the Object Storage instance in the Object Storages grid.
In the Object Storage’s Dashboard tab, on the Object Storage’s Information panel, click Actions.
From the dropdown, select Assign Public IP.
In the Assign Public IP dialog:
Select one of the options:
Automatic IP address assignment
Manual IP address assignment
Select an IP from the dropdown that displays for the manual IP assignment option.
Note
Manual public IP assignment is only available for VPSA Object Storage instances from version 20.01 and later
Public IP is not supported for Object Storage instances with IPV6 frontend addresses
Click Assign to confirm the Assign Public IP operation.
Unassigning a Public IP address
To unassign a Public IP address:
Click Object Storage in Command Center’s left menu panel.
In the Instances tab, click the Object Storage instance in the Object Storages grid.
In the Object Storage’s Dashboard tab, on the Object Storage’s Information panel, click Actions.
From the dropdown, select Unassign Public IP.
In the Unassign Public IP dialog, click Confirm to confirm the Unassign Public IP operation.
Creating an Object Storage Zsnap
An Object Storage Zsnap is a snapshot of the Object Storage at a point in time.
An Object Storage Zsnap is a collection of logs and system meta-data information used for troubleshooting and analysis of the component’s health.
To trigger the manual creation of a Zsnap of the Object Storage:
Click Object Storage in Command Center’s left menu panel.
In the Instances tab, click the Object Storage instance in the Object Storages grid.
In the Object Storage’s Dashboard tab, on the Object Storage’s Information panel, click Actions.
From the dropdown menu, select Create Zsnap.
In the Create Zsnap dialog:
Enter a prefix for the Zsnap.
To include the Object Storage’s metering data in the Zsnap, mark the Collect Metered Data checkbox.
Click Create Zsnap to confirm creation of the Zsnap.
Note
Zadara manages collection of Zsnaps and recovery from Zsnaps when relevant.
There is no need for customers to take Zsnaps, but can do so if requested by Zadara Support.
Customers cannot perform any restore operations.
Adding or releasing an Object Storage’s Virtual Network
Object Storages connected to multiple networks can be used to enable use cases where multiple networks require connectivity to the same Object Storage.
Note
An Object Storage is limited to a maximum of 10 Virtual Networks.
The Object Storage REST API and UI are accessible through any Virtual Networks.
An Object Storage can’t have two Virtual Networks with the same VLAN.
See Performing Cloud Networking Management for viewing, creating and deleting the cloud’s Virtual Networks.
Adding a Virtual Network to an Object Storage
To assign a Virtual Network to an Object Storage:
Verify that an appropriate Virtual Network is already defined in the cloud, excluding the Virtual Network already in use by the Object Storage.
Click Object Storage in Command Center’s left menu panel.
In the Instances tab, click the Object Storage instance in the Object Storages grid.
In the Object Storage’s Dashboard tab, on the Object Storage’s Information panel, click Actions.
From the dropdown, select Add Virtual Network.
In the Add Virtual Network dialog:
Select the Virtual Network to assign to the Object Storage.
Click Add to confirm adding the Virtual Network to the Object Storage.
On completion, the newly added Virtual Network displays in the Object Storage’s Virtual Network tab.
Releasing a Virtual Network from an Object Storage
To release a Virtual Network from an Object Storage:
Click Object Storage in Command Center’s left menu panel.
In the Instances tab, click the Object Storage instance in the Object Storages grid.
In the Object Storage’s Dashboard tab, on the Object Storage’s Information panel, click Actions.
From the dropdown, select Release Virtual Network.
In the Release Virtual Network dialog:
Select the Virtual Network to release from the Object Storage.
Click Release.
The Confirm Release Virtual Network dialog opens, displaying a warning that the Object Storage will no longer be accessible via the selected Virtual Network.
Click Release to reconfirm releasing the Virtual Network from the Object Storage.
On completion, the released Virtual Network no longer appears in the Object Storage’s Virtual Network tab.
Enable Elastic Load Balancer for a VPSA Object Storage
Scope: VPSA Object Storage
To enable an Elastic Load Balancer for a VPSA Object Storage:
Click Object Storage in Command Center’s left menu panel.
In the Instances tab, click the VPSA Object Storage instance in the Object Storages grid.
In the VPSA Object Storage’s Dashboard tab, on the VPSA Object Storage’s Information panel, click Actions.
From the dropdown, select Enable Elastic Load Balancer.
In the Enable Elastic Load Balancer dialog, click Confirm to confirm the Enable Elastic Load Balancer operation.
On completion, on the VPSA Object Storage’s Information panel, the Load Balancer changes to Elastic.