Physical Drives
Command Center provides extensive cloud physical drive management functionality. Using Command Center, a Zadara Cloud administrator can easily perform activities such as :
Drive inventory management
Drive validation and failure management
Assignment of Drives to specific Quality of Service groups
Viewing Physical Drive Inventory
Command Center displays the overall Drive inventory in the Drives view.

The Drive inventory is primarily grouped by Drive model, and displays detailed utilization per group.

Status |
Description |
|---|---|
Total |
Number of Drives from the specific model available in this cloud |
Disabled |
Drives that the cloud admin set as disabled |
Absent |
Drives that are physically unavailable (taken out of their bay) |
Used |
Drives that are actively assigned to a VPSA instance |
Free |
Drives that are not assigned to any VPSA instance |
Note
Drives that are assigned to a specific VPSA, deployed on a specific Protection Zone or installed on a specific Storage Node can also be viewed from the corresponding VPSA, Protection Zone and Storage Node.
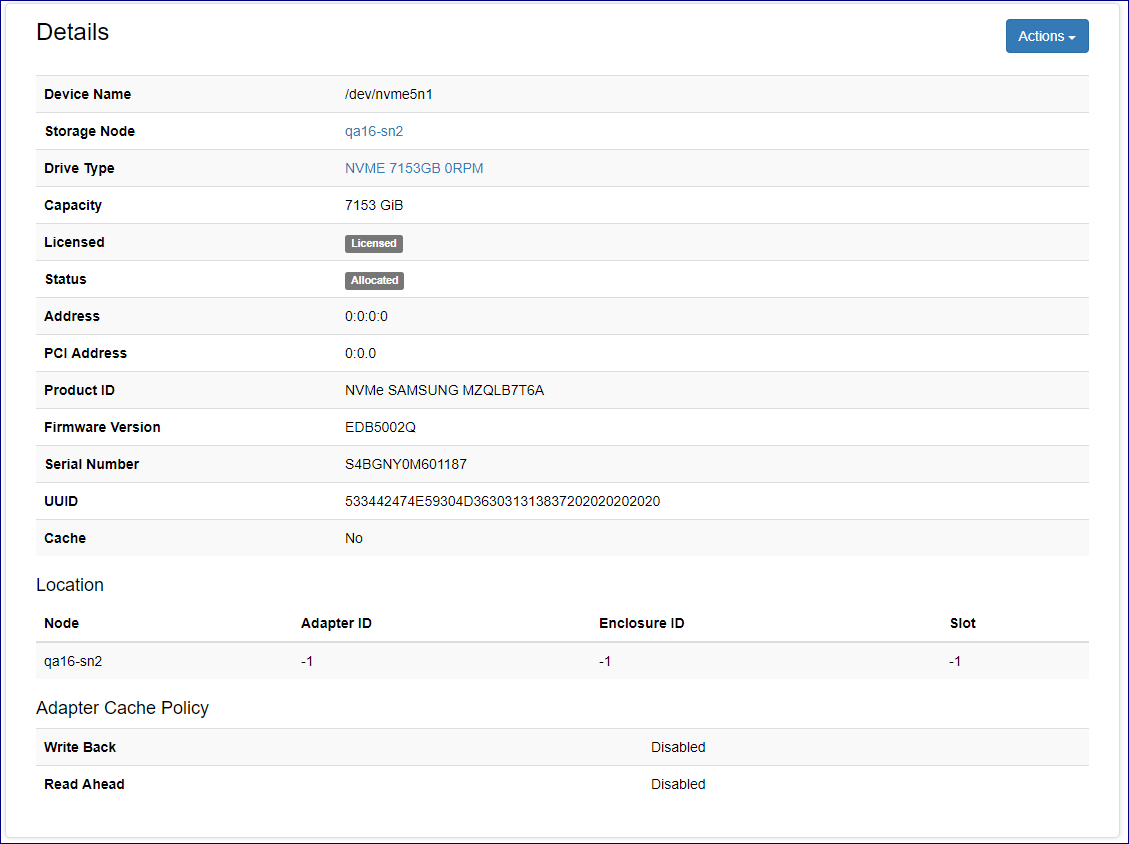
Viewing Drive Properties
In the Command Center’s Drives view, select the Drive Group to which the required Drive belongs. After the list of group members appears, select the required Drive.
Drive Properties
Property |
Description |
|---|---|
Device Name |
Device file identifier for the Drive |
Drive Type |
Drive model |
Capacity |
Physical capacity (GiB) of the Drive Note: SSD Cache Drives also present the capacity of allocated partitions |
License |
Indicates whether the Drive is licensed on the cloud level |
Status |
Indicates the current status of the Drive. Possible values:
|
Address |
Storage Node SCSI address for the specified Drive |
PCI Address |
Storage Node PCI address for the specified Drive |
Address |
Storage Node SCSI address for the specified Drive |
PCI Address |
Storage Node PCI address for the specified Drive |
Product ID |
Product ID for the Drive |
Firmware Version |
Firmware Version of the Drive |
Serial Number |
Serial Number of the Drive |
UUID |
Linux UUID for the Storage Node Device |
Cache |
Whether the Drive is being used as SSD Cache |
Location |
Storage Node and MegaRaid location identifier for the Drive (Adapter ID/Enclosure ID/Slot) |
Adapter Cache Policy |
MegaRaid Adapter Cache Policy:
|
Volume Properties

property |
Description |
|---|---|
ID |
Volume Identifier |
VPSA |
VPSA/Object Storage to which this volume is allocated |
Drive |
Device file name for the Storage Node Physical Drive |
Size |
Volume Capacity |
Cache |
Whether this volume is used as a GEN2 SSD Cache device |
Storage Node |
Storage Node in which this volume is defined |
Replace Volume |
Toggle Drive replacement for this volume |
Performing Operations On Physical Drives
To view all operations that can be performed on a specific Drive:
From the Drives view, select the appropriate Drive Group and go to the Drives tab.
Click the required Physical Drive.
In the Drive’s Details panel on its Dashboard tab, click Actions to display the dropdown listing the possible operations for the Drive.

Disabling a Drive
From the Drive’s Actions dropdown, select Disable.
In the Disable Drive dialog, click Disable to confirm disabling the Drive.
After the operation is complete, the Drive’s Status change to Disabled.
Enabling a Drive
Select a disabled Physical Drive.
In the Enable Drive dialog, click Enable to confirm enabling the Drive.
After the operation is complete, the Drive’s Status change to Enabled.
Managing Drive LED
A Physical Drive LED can be turned on or off in Command Center.
To manage a Physical Drive LED:
From the Drive’s Actions dropdown, select LED On or LED Off.
In the Enable Drive LED or Disable Drive LED dialog, click Confirm to confirm enabling or disabling the Drive LED.
Viewing Drive SMART Attributes
Note
Self-Monitoring, Analysis and Reporting Technology (SMART) attributes are parameters that provide information about the health and status of a disk drive. These attributes are monitored by the disk drive itself.
SMART attributes can differ betwwen disk brands and models.
To view a Drive’s SMART attributes:
From the Drives view, select the appropriate Drive Group and go to its Drives tab.
Click the required Physical Drive.
In the Drive’s Dashboard tab, in the Details panel, click Actions and from the dropdown select SMART Attributes.
The SMART Attributes dialog displays the Drive’s SMART attributes.
Designating SSD Drive as Cache
SSD Drives installed in the cloud can be designated as Cache Drives for use in hybrid VPSA configurations.
Note
The available capacity of an SSD Drive designated as Cache cannot be allocated as user data to VPSA images.
From the Drive’s Actions dropdown, select Designate as Cache.
The Confirm Drive Change dialog displays warning information that the Drive will no longer be available for user storage.
Click Confirm to confirm designating the Drive as Cache.
After the operation is complete, the Drive Type will change to SSD CACHE DRIVES.
Undesignating SSD Drive as Cache
An SSD Drive that is designated as a Cache Drive can be undesignated, to serve as regular drive for user storage.
From the Drive’s Actions dropdown, select Undesignate as Cache.
In the Confirm Drive Change dialog click Confirm to confirm undesignating the Drive as Cache.
After the operation is complete, the Drive Type will change to its native SSD Drive Type.
Removing Drives
The cloud administrator can initiate an orderly removal of Physical Drives from the cloud via Command Center.
To start the removal process, select Offline and Remove from the Drive’s Actions dropdown.
Unlicensing a Drive
Note
Drives that are in use and have the Allocated status cannot be unlicensed.
Only licensed Drives that have the Available status can be unlicensed.
From the Drive’s Actions dropdown, select Unlicense.
In the Unlicense Drive dialog, click Confirm to confirm unlicensing the Drive.
After the operation is complete, the Drive Type will change to Unlicensed.
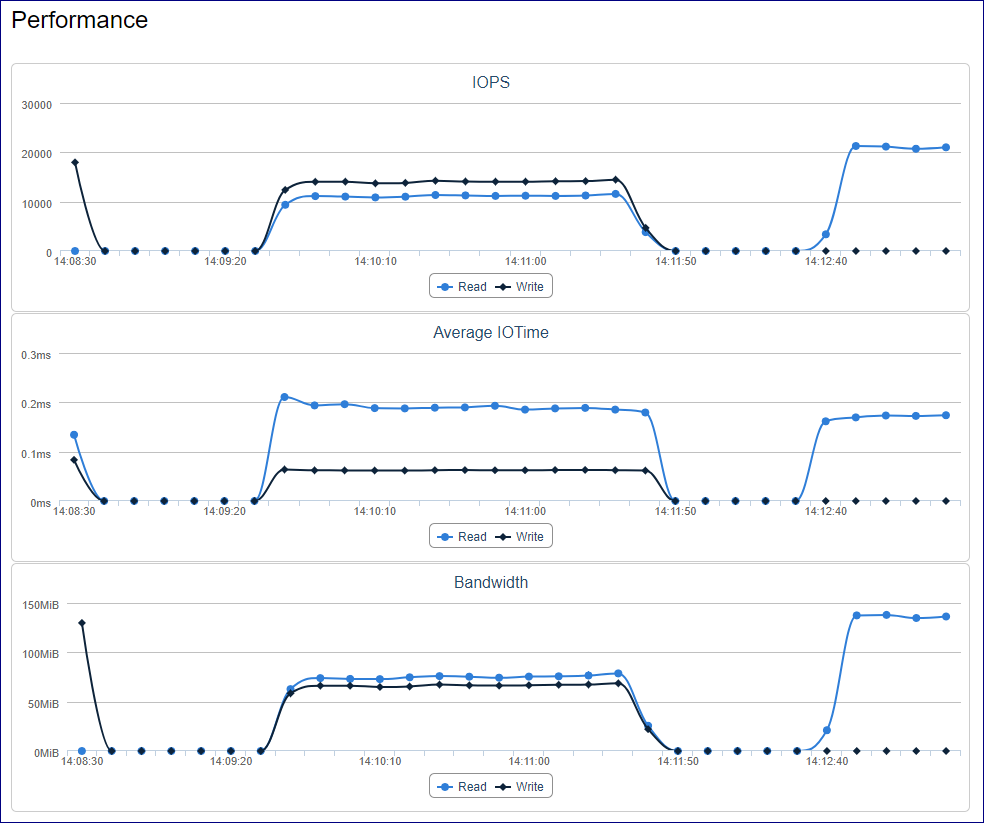
Monitoring Drive Performance
To view performance statistics for a specific Drive:
From the Drives view, select the appropriate Drive Group and go to the Drives tab.
Click the required Physical Drive.
Go to the Performance tab that displays the Drive’s performance statistics:
Average IO rate displayed as read vs. write IOs
Average IO time displayed as read vs. write IOs
Average Bandwidth displayed as read vs. write activity
The monitoring interval can be changed. Supported monitoring intervals:
1 seconds
10 seconds
1 minute
1 hour
1 day
Click the Auto-Refresh toggle to activate or disable the automatic display of updated monitoring data on reaching the monitoring interval.