Storage Nodes
One of Command Center’s key roles is to enable cloud infrastructure management, in which Storage Nodes (SN) are a core component. Command Center provides comprehensive management and monitoring capabilities for the cloud’s Storage Nodes, including all aspects of:
Ongoing maintenance
Upgrade management
Hardware addition and retirement
Health checks
Performance monitoring
Understanding The Storage Node Dashboard
The Storage Node dashboard presents information regarding its configuration, status and resource utilization.
Navigate to the dashboard by clicking Storage Nodes in Command Center’s left menu panel, and then select a specific Storage Node from the cloud inventory.
The Storage Node dashboard contains multiple panels, each providing information on a specific aspect of the SN configuration and status:
Resource Utilization
Provides a current reflection of SN hardware resources and their level of utilization.

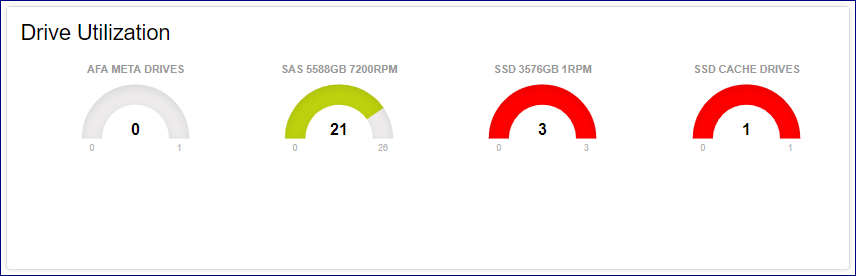
Drive Utilization
Provides a breakdown of the SN drive inventory by type and role, and displays the level of utilization per drive group.
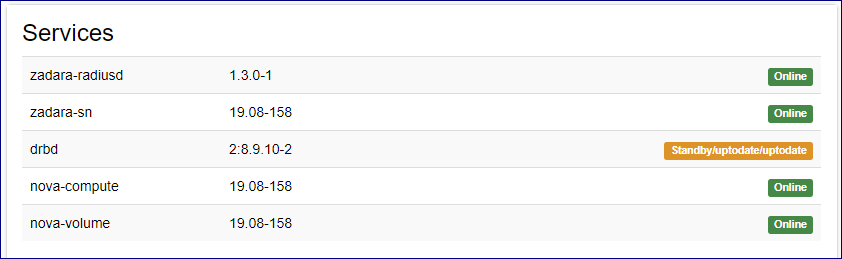
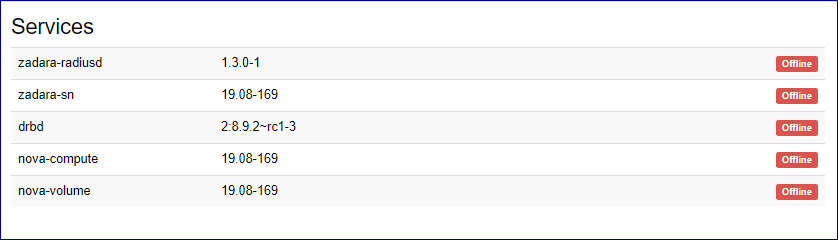
Services
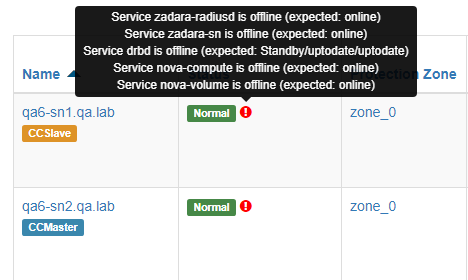
Displays the list of services running on the SN and their current status.
In the event that the Status is not Normal for any services on the Storage Node, the affected services are also indicated by a tooltip on the cloud’s Storage Nodes grid.
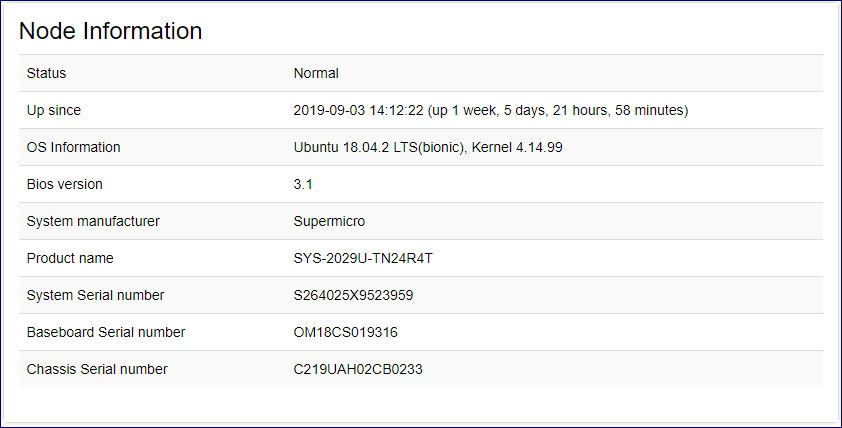
Node Information
Displays SN hardware, configuration and status information such as: SW version, uptime and serial number.
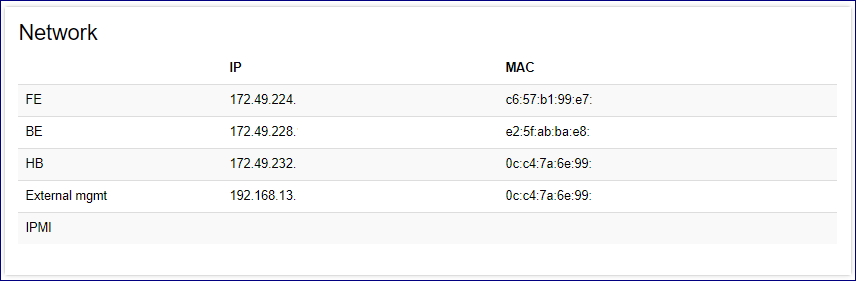
Network
Displays SN networks and configured IP addresses.
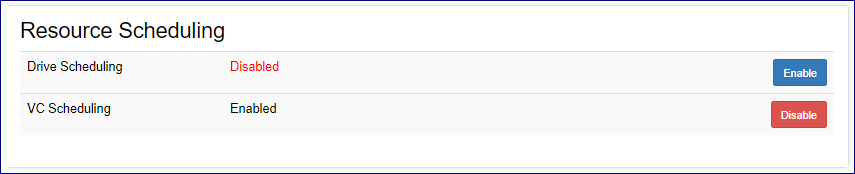
Resource Scheduling
Displays information regarding the availability of the SN’s resources such as VCPUs and disk drives, that can be allocated for newly provisioned VPSA/VPSA Object Storage entities by the cloud’s orchestration framework.
NIC Information
Displays hardware and configuration information on the SN data path network card.
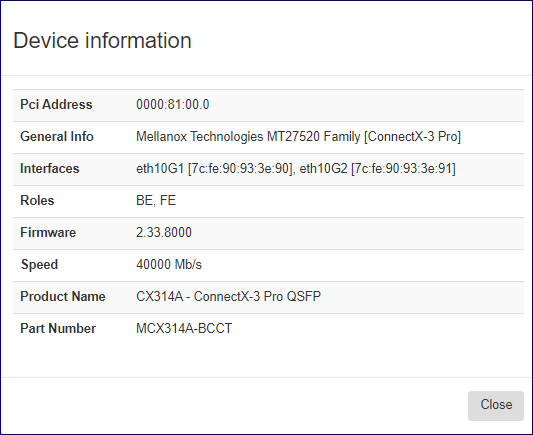
Note
Mellanox ConnectX-5 dual port NICs are presented as 2 sperate network adapters, due to having 2 different PCI addresses.
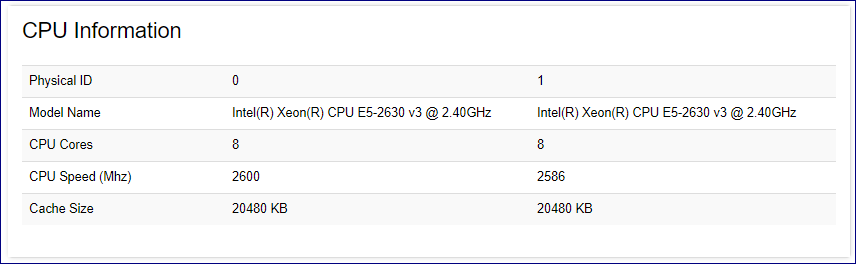
CPU Information
Displays information on the SNs processors.
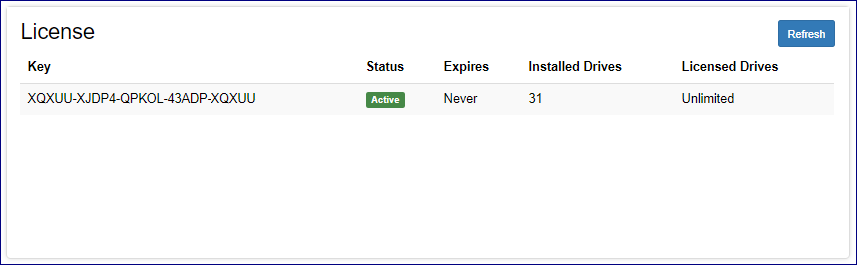
License
Displays SN licensing information.
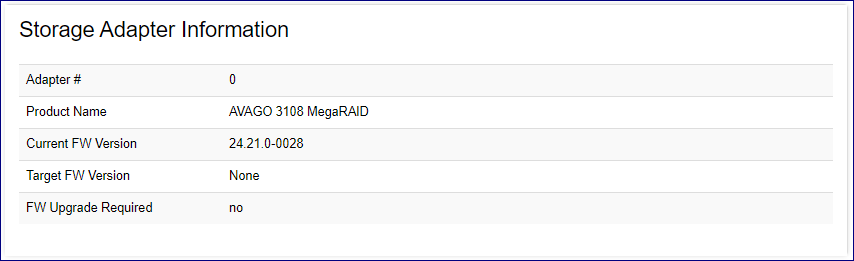
Storage Adapter Information
Displays information on the SN internal RAID adapter.
Monitoring Storage Node Performance
Command Center provides a real-time monitoring framework for Storage Node performance. Monitoring is available in the selected SN’s Performance tab.
Performance statistics displayed per Storage Nodes include :
Storage Node CPU utilization
Storage Node memory consumption
Network bandwidth distribution (read/write)
Average IO service time per IO type
IO throughput distribution
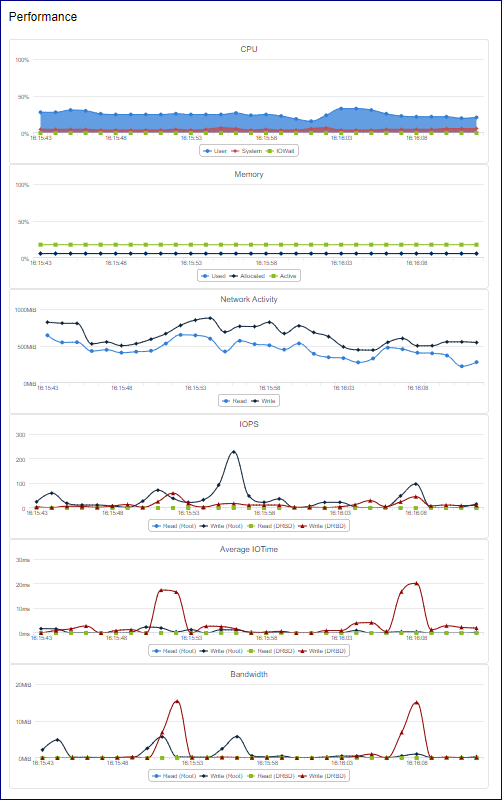
The monitoring interval can be changed. Supported monitoring intervals:
1 seconds
10 seconds
1 minute
1 hour
1 day
Click the Auto-Refresh toggle to activate or disable the automatic display of updated monitoring data on reaching the monitoring interval.
Performing Storage Node Operations
Changing Storage Node Resource Scheduling Configuration
A Storage Node contains compute and storage resources(CPU, RAM and disks) that are allocated for virtual controllers of VPSA and VPSA Object Storage entities. Allocation of SN resources for the creation of virtual controllers, and allocation of disks from SN to virtual controllers can be enabled or disabled using Command Center.
To modify a Storage Node resource allocation policy go to the Resources Scheduling panel in the SN dashboard.
Click on Enable or Disable for Drive Scheduling, to enable or disable allocation of disks from this SN to virtual controllers.
Click on Enable or Disable for VC Scheduling, to enable or disable creation of avirtual controller on this SN.
Changes in the SN scheduling policy are immediately applied.
Creating Storage Node Zsnap
To trigger manual creation of a Zsnap for a Storage Node:
Navigate to the Storage Node’s dashboard.
On the Resource Utilization panel, click Actions.
From the dropdown, select Create Zsnap.
In the popup dialog, provide a prefix for the Zsnap and click Create Zsnap to confirm creation of the Zsnap.
Note
Zadara manages collection of Zsnaps and recovery from Zsnaps when relevant.
There is no need for customers to take Zsnaps, but can do so if requested by Zadara Support.
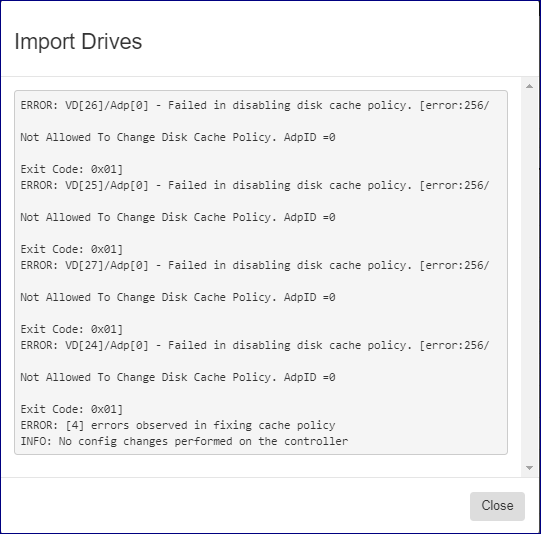
Install and import new drives in a Storage Node
Cloud storage capacity expansion is performed by installing drives in the Storage Node, and then importing the newly installed drives into the SN.
The import operation encapsulates hardware discovery and SN/cloud inventory update.
To import newly installed physical drives into a Storage Node:
Navigate to the Storage Node’s dashboard.
On the Resource Utilization panel, click Actions.
From the dropdown, select Import Drives.
In the popup dialog, click Confirm to confirm the import drives operation.
A resource scan will be performed and any newly installed disks will be imported.
The output from the import operation will be presented in a new popup window.
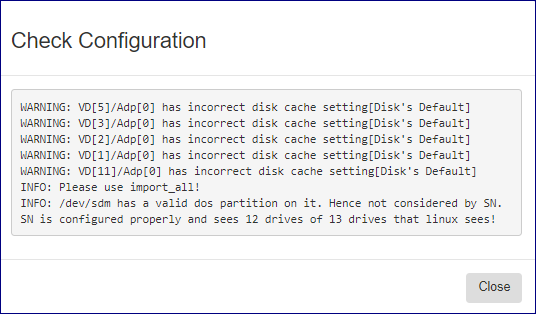
Perform Storage Node drive configuration check
Command Center can trigger a Storage Node drive configuration check, in which the SN drive configuration is validated against the OS drive configuration.
To perform a drive configuration check:
Navigate to the Storage Node’s dashboard.
On the Resource Utilization panel, click Actions.
From the dropdown, select Check Configuration.
In the popup dialog, click Confirm to confirm the drive configuration check operation.
The configuration check will be immediately performed and its output displayed on a new popup dialog.
Upgrading Storage Node Version
A Storage Node Version upgrade can be performed as part of a complete cloud upgrade workflow from Command Center’s main dashboard or from the Storage Node dashboard. The upgrade from the SN dashboard is useful when the cloud upgrade process is performed gradually as a multiple milestone process.
To upgrade a Storage Node from the SN dashboard:
Navigate to the Storage Node’s dashboard.
On the Resource Utilization panel, click Actions.
From the dropdown, select Upgrade Version.
In the Upgrade Storage Node dialog:
From the dropdown listing available versions, select the Version to install.
Note
Versions marked with an asterisk are available, but not downloaded to the cloud.
Upgrading to an asterisked version requires a package download and registration beforehand.
Click Upgrade to confirm the Storage Node Version upgrade.
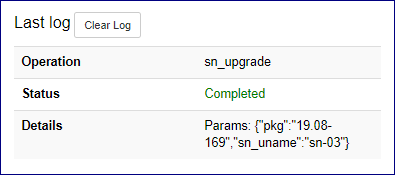
During the SN Version upgrade process, the status is displayed on Command Center’s main dashboard.
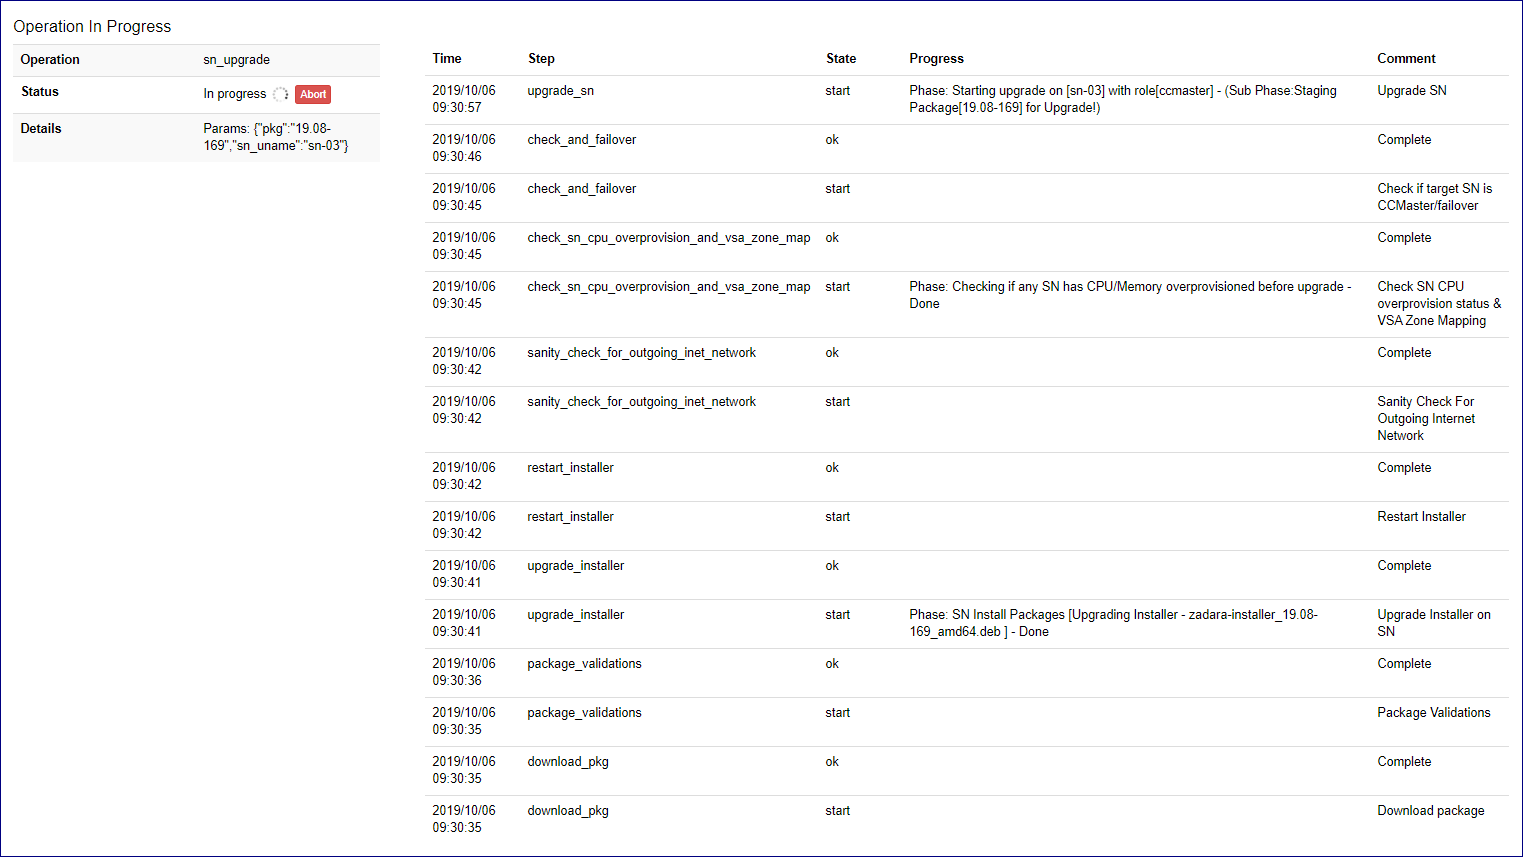
The upgraded Storage Node’s Services panel will present all services as Offline.
When the workflow is finished, the Command Center dashboard displays the Completed status for the Storage Node Version upgrade.
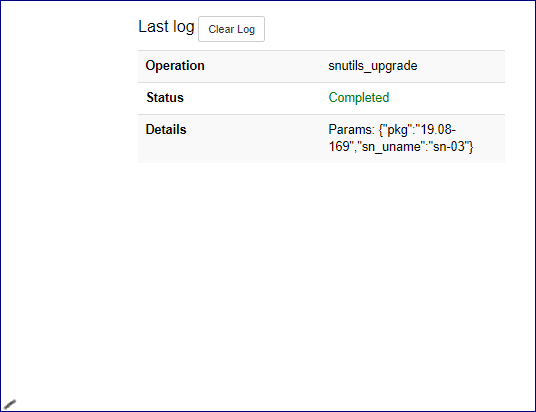
Upgradinging Storage Node Utilities Version
Storage Node utilities can be upgraded in a dedicated process via Command Center’s SN dashboard.
To upgrade Storage Node utilities from the SN dashboard:
Navigate to the Storage Node’s dashboard.
On the Resource Utilization panel, click Actions.
From the dropdown, select Upgrade Utilities.
In the Upgrade Storage Node Utilities dialog:
From the dropdown listing available versions, select the Version to install.
Note
Versions marked with an asterisk are available, but not downloaded to the cloud.
Upgrading to an asterisked version requires a package download and registration beforehand.
Click Upgrade to confirm the Storage Node Utilities upgrade.
During the SN Utilities upgrade process, the status is displayed on Command Center’s main dashboard.

When the workflow is finished, the Command Center dashboard displays the Completed status for the Storage Node Utilities upgrade.
Upgrading Storage Node Disk Drives/RAID Controller Firmware
Command Center can be used to trigger an update of a Storage Node disk drive firmware or RAID controller firmware. Disk drive/RAID controller firmware are bundles with a specific SN software distribution and are updated according to each SW version’s supported levels.
To update Drive/RAID controller firmware for a Storage Node:
Navigate to the Storage Node’s dashboard.
On the Resource Utilization panel, click Actions.
From the dropdown, select Upgrade Drives & Adapter Firmware.
In the Upgrade Drives & Adapter Firmware dialog:
Select the elements for which you would like to perform the FW upgrade:
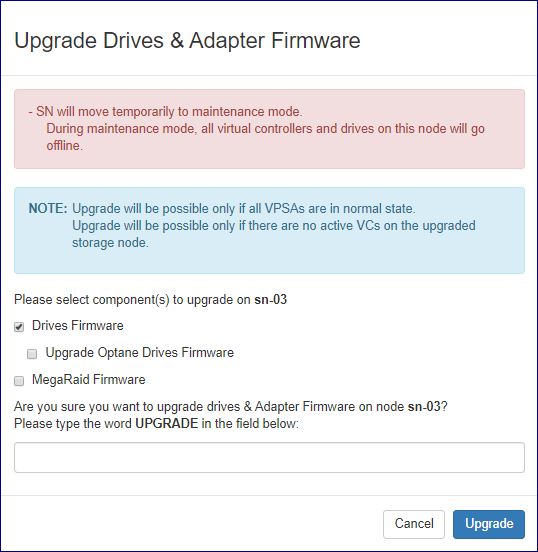
Disk Drives
Intel Optane Drives
RAID controller
Note
In the event of a FW upgrade for Disk Drives or Intel Optane Drive, all disk drives and virtual controllers running on the SN will be taken offline.
In the event of a FW upgrade for RAID controller, the SN will reboot after the FW is installed.
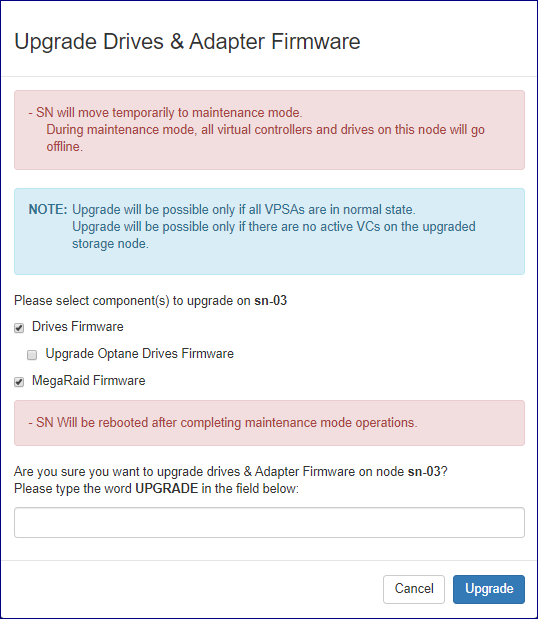
In the text box, enter the word “UPGRADE” and click Upgrade to confirm the Storage Node firmware upgrade.
During the SN firmware upgrade process, the status is displayed on Command Center’s main dashboard.
When the workflow is finished, the Command Center dashboard displays the Completed status for the Storage Node firmware upgrade.
Evacuating all Virtual Controllers from a Storage Node
To immediately free all Storage Node compute resources, you can use Command Center to evacuate all virtual controllers running on it. Evacuation of virtual controllers is useful for preparation of activities such as hardware maintenance or refresh.
To evacuate all virtual controllers from a Storage Node:
Navigate to the Storage Node’s dashboard.
On the Resource Utilization panel, click Actions.
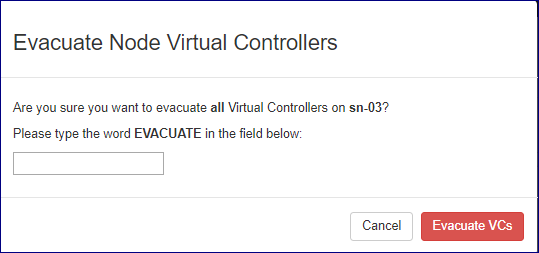
From the dropdown, select Evacuate Virtual Controllers.
In the Evacuate Node Virtual Controllers dialog:
In the text box, enter the word “EVACUATE” and click Evacuate VCs to confirm the Storage Node Virtual Controllers evacuation.
Note
VC Evacuation is possible only if there is available compute capacity in other storage nodes within the cloud, which is sufficient for receiving the evacuated VCs (maintaining dual controller HA for VPSA and Object Storage fault domain demands).
Evacuating all drives from a Storage Node
In the event of decommisioning a Service Node, its drives should be evacuated. The result is the Service Node’s drive data is tranferred from the Service Node’s drives to new locations on a replacement Storage Node.
To evacuate all drives from a Storage Node:
Navigate to the Storage Node’s dashboard.
On the Resource Utilization panel, click Actions.
From the dropdown, select Evacuate Drives.
In the Evacuate Node Drives dialog:
In the text box, enter the word “EVACUATE” and click Evacuate Drives to confirm the Storage Node drives evacuation.
Reboot a Storage Node
To reboot a Storage Node:
Navigate to the Storage Node’s dashboard.
On the Resource Utilization panel, click Actions.
From the dropdown, select Reboot.
In the Reboot Storage Node dialog:
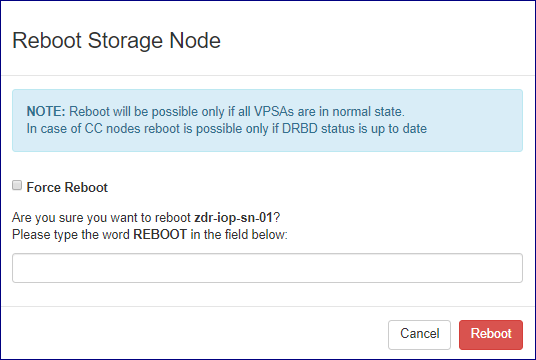
Note
Restrictions:
Storage Node reboot can be performed only if all underlying VPSA/VPSA Object Storage instances statuses are Normal.
A reboot of the CCmaster/CCslave is performed only if the DRBD service is up to date.
The restrictions noted above can be overridden by marking the Force Reboot checkbox.
When using the Force reboot option, the cloud administrator is responsible for verifying and validating the VPSA/DRBD status before rebooting.
To override the restrictions, and force the reboot, mark the Force Reboot checkbox.
In the text box, enter the word “REBOOT” and click Reboot to confirm the Storage Node reboot.
Shutdown a Storage Node
To shut down a Storage Node:
a Storage Node:
Navigate to the Storage Node’s dashboard.
On the Resource Utilization panel, click Actions.
From the dropdown, select Shutdown.
In the Shutdown Storage Node dialog:
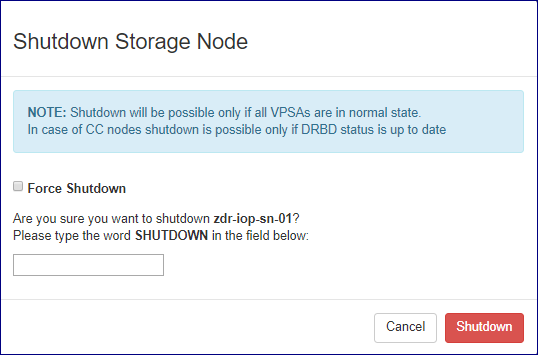
Note
Restrictions:
Storage Node shutdown can be performed only if all underlying VPSA/VPSA Object Storage instances statuses are Normal.
A shutdown of the CCmaster/CCslave is performed only if the DRBD service is up to date.
The restrictions noted above can be overridden by marking the Force Shutdown checkbox.
When using the Force Shutdown option, the cloud administrator is responsible for verifying and validating the VPSA/DRBD status before shutting down the SN.
To override the restrictions and force the shutdown, mark the Force Shutdown checkbox.
In the text box, enter the word “SHUTDOWN” and click Shutdown to confirm the Storage Node shutdown.